
You are using an out of date browser. It may not display this or other websites correctly.
You should upgrade or use an alternative browser.
You should upgrade or use an alternative browser.
The SN65 project car
- Thread starter SN65
- Start date
1320stang
Founding Member
I agree with the chrome bumpers instead of painted to match, but really like the idea of shaving the bumper bolt heads and having the bumpers rechromed. Even if you're buying new repop bumpers, the chrome isn't that great anyway. Toughest thing would be installing it after smoothing them. Maybe the thing would be to alter the bumper brackets and instead of welding the bolts to the bumper and shaving the heads, you could fill the square holes and weld nuts to the underside of the bumper. Then shorter bolts and lockwashers would be used from the backside (if possible).
burg65
New Member
Ok, ya'll want to see ideas, well here! -This should just about settle everything that has been said above  And if you want to see anything else let me know I'll see what I can come up with!
Talk to ya later, Cory


And if you want to see anything else let me know I'll see what I can come up with!Talk to ya later, Cory
bnickel
Founding Member
definitely looks kinda plain without something on the side. i also think that if you go to the trouble of shaving the bumper bolts you should also narrow them as well so they tuck up tighter to the body.
here is a thread on the VMF where another stanger did a custom grille with some really cool looking GT style foglights but with no grilles bars or corral
http://forums.vintage-mustang.com/f...23&Words=grote&topic=&Search=true#Post1212930
here is a thread on the VMF where another stanger did a custom grille with some really cool looking GT style foglights but with no grilles bars or corral
http://forums.vintage-mustang.com/f...23&Words=grote&topic=&Search=true#Post1212930
MustangMatt1966
New Member
Tubo(2-bo)
Member
If ya gotta have graphics why not Shelby style lower rocker stripes & a SN 65 logo?
Stick w/ classic exterior. Yeah Yeah
Stick w/ classic exterior. Yeah Yeah
Sicarius428
Active Member
- Jan 6, 2004
- 2,085
- 5
- 49
cougar_68
Founding Member
burg65 said:
I think this would look cool, but can you take the "SN65" and place it down in the black area and make it yellow?
68rustang
Active Member
Hi Cory,burg65 said:Ok, ya'll want to see ideas, well here! -This should just about settle everything that has been said above
Talk to ya later, Cory
SNIP...
Excellent job. It really helps to be able to see some of these things in more than my minds eye.
I am going to let these things sink in a bit before commenting on any one image.
Thanks for all the hard work.
burg65
New Member
SN65 said:Hi Cory,
Excellent job. It really helps to be able to see some of these things in more than my minds eye.
I am going to let these things sink in a bit before commenting on any one image.
Thanks for all the hard work.
Bob,
No problem! They are a little sloppy, but i thought it would atleast give you an idea of something to look at. If you want to see anymore ideas or even a 100% better photochop job just let me know!
Cory
MustangMatt1966
New Member

Hi All,
Yesterday, I worked on the final engine plumbing details. Radiator and air intake. Everything went pretty well. Not perfect, just pretty well.")
To complete the air intake I need to locate one sensor and plumb up one vacuum line.

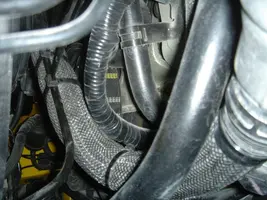
My biggest problem is the lower radiator lines. I have posted some photos (more available at the website) showing the incredibly tight spaghetti bowl of lines and hoses in this area. Everything is pretty good, but I only have about 1/8" clearance between the sway bar and the hose / thermostat housing. There is plenty of flex in the plumbing (if the sway bar pushed on the hose, there is about 1 1/2" of movement). My problem is that there is nothing to tie the hose / housing to save the power steering rack and doing this is a bit problematic. I am thinking that I can make a bracket that ties the bolt of the housing to the rack, but there is nowhere on the rack to bolt to. I am going to have to kick this around for a while until something comes to mind. In the mean time, I am going to place a rubber "shield" around the sway bar to keep it from chaffing the radiator hose.


Any recommendations would be appreciated.
Catch ya'll l8r
Yesterday, I worked on the final engine plumbing details. Radiator and air intake. Everything went pretty well. Not perfect, just pretty well.
To complete the air intake I need to locate one sensor and plumb up one vacuum line.
My biggest problem is the lower radiator lines. I have posted some photos (more available at the website) showing the incredibly tight spaghetti bowl of lines and hoses in this area. Everything is pretty good, but I only have about 1/8" clearance between the sway bar and the hose / thermostat housing. There is plenty of flex in the plumbing (if the sway bar pushed on the hose, there is about 1 1/2" of movement). My problem is that there is nothing to tie the hose / housing to save the power steering rack and doing this is a bit problematic. I am thinking that I can make a bracket that ties the bolt of the housing to the rack, but there is nowhere on the rack to bolt to. I am going to have to kick this around for a while until something comes to mind. In the mean time, I am going to place a rubber "shield" around the sway bar to keep it from chaffing the radiator hose.
Any recommendations would be appreciated.
Catch ya'll l8r
Attachments


1320stang
Founding Member
Bob, can you make a bracket to attach to the two holes on the yellow bracket in the middle picture? It'd have to clear the three vacuum lines, but maybe you could get one of those plastic clips that the snap into and mount it to that bracket as well. Paint the bracket semigloss black like the bracket to the left of it in that picture that's under the shroud and use CAD plated fasteners and I think it might look factory.
68rustang
Active Member
Me too, but that was the SMALLEST file format I could find on my video edditing program. I will keep experimenting and see if I can come up with a diff format at a smaller file size.68rustang said:I hate real player!
big blue
Founding Member


streetstang67
Member
What if you moved the whole thermostat assembly closer to the 'corner'? It looks like if the thermostat was tucked in a corner, the 3 hoses are in the directions of x,y,z axis..?
Similar threads
- Replies
- 2
- Views
- 67
- Replies
- 5
- Views
- 319
- Replies
- 1
- Views
- 283
- Replies
- 3
- Views
- 91