HELP! pig rich and dont know why

silvergt86

New Member
Jul 29, 2008
5
0
0
:mad:i have a 86 mustang gt and i just put a 5.0 out of an explorer and i cant get it to run right it way too rich all the time it went from 22 mph to 11 or 12 mph i checked fule pressusr and thats fine i changed multipule sensers and checked all my vacum lines any ideas? the sensors i changed inclued both o2s air charge and engine coolant temp.
 
Dump the codes and see what the computer says is wrong…Codes may be present in the computer even if the Check Engine light isn’t on.

Here's the link to dump the computer codes with only a jumper wire or paper clip and the check engine light, or test light or voltmeter. I’ve used it for years, and it works great. You watch the flashing test lamp or Check Engine Light and count the flashes.

See Troublcodes.net Trouble Codes OBD & OBD2 Trouble Codes and Technical info & Tool Store. By BAT Auto Technical

B.jpg


F.jpg


If your car is an 86-88 stang, you'll have to use the test lamp or voltmeter method. There is no functional check engine light on the 86-88's except possibly the Cali Mass Air cars.

attachment.php


89 through 95 cars have a working Check Engine light. Watch it instead of using a test lamp.

attachment.php


Do not jumper anything to the single black connector. It is the power for the under the hood light. It is in another bundle of wires near the windshield wiper.

What to expect:
You should get a code 11 (two single flashes in succession). This says that the computer's internal workings are OK, and that the wiring to put the computer into diagnostic mode is good. No code 11 and you have some wiring problems.

Codes have different answers if the engine is running from the answers that it has when the engine isn't running. It helps a lot to know if you had the engine running when you ran the test.

Trouble codes are either 2 digit or 3 digit, there are no cars that use both 2 digit codes and 3 digit codes.

Alternate methods:
For those who are intimidated by all the wires & connections, see Actron® for what a typical hand scanner looks like. Normal retail price is about $30 or so at AutoZone or Wal-Mart.

Or for a nicer scanner see EQUUS DIGITAL FORD CODE READER (3145) – It has a 3 digit LCD display so that you don’t have to count flashes or beeps.. Cost is $30.
 
Are you using the 86's computer? Did you convert to mass-air? Are you sure the vacuum line to the fuel pressure regulator is not kinked or leaking? It sounds like there are a lot of variables out of place here. Like jrichker said, check your codes, but I'd first check to make sure the FPR is getting a decent vacuum reading from the intake.
 
i already checked the codes and i got a code 11 and a egr outta range code o2 sensor and one other code cant remember off the top of my head but they were all due to how rich it runs no mas air and yes still 86 comp.
 
If you got a code 41 or 91 or both, you have O2 sensor problems. Go back and dump the codes and post what you get. The first step in fixing your problem is to know exactly what the computer thinks is not working correctly.
 
i already checked the codes and i got a code 11 and a egr outta range code o2 sensor and one other code cant remember off the top of my head but they were all due to how rich it runs no mas air and yes still 86 comp.
You need to know all of the codes, at both KOEO and KOER! Or, just replace the engine, sensors, actuators, EEC, wiring and so on. :) It's important to know all of the codes you got at both KOEO and KOER!

Why? My guess is that your MAP, vacuum line to the MAP, or vacuum source for the MAP is bad. In that case, you get many other codes. But, a MAP code at either KOEO or KOER is what you have to fix first. You can replace O2 sensors, and even the whole engine. But, if you don't have the right and correct vacuum source for the MAP, you're SOL.

Getting the right vacuum source from an Explorer intake for an SD car can be tricky! And, it will differ depending on which year Explorer intake you have. Different years have different vacuum ports.

NOTE: You need a dedicated "big" vacuum house directly from the upper intake to the MAP.

Again, note the words "dedicated", "big", and "directly".
Otherwise, you can't get an accurate vacuum signal for to the MAP.
If you don't have all three, you're screwed. It may or may nor work. In reality, it'd likely kinda/sorta work "some times". With the POS SD diags, you may never even see an error code.

FWIW: An Explorer intake on an '86 kicks *ss! :)
Four Eyes RULE! :)
 
DING, DING, DING!
We have a WINNER!!!!!!! :)

As I said, first fix the MAP problem! :)
BTW: Guess how I know! :)

FWIW: Depending on my mood, I run 4 diff EEC setups. :)
1) SD
2) MAF with 94/95 MAF
3) MAF with LMAF
4) MAF with GM MAF.

I ran the 98 Explorer intake for a while (no internal EGR passage). But, without the EGR, I failed smog. Then, I did an external EGR intake like the 94+ Stangs do. But, I had problems when I replaced my heater core hoses resting against the EGR intake pipe. Argg!

So, the Fox intake went back on. :-P That's better than puking my anti-freeze, overheating, and ruining the engine from a busted heater-core hose. It's a huge PITA to put that external EGR air intake on in my car. So, screw taking it on/off for smog (and risk stripping the EGR port - on my 94/95 header).

Oh well, I have only 2 more CT smog tests before I hit my 25 yr old smog exemption. Then, the 98 Explorer intake goes back on, and screw the EGR.

As I said, run a full-size dedicated vacuum line from the intake to the map - only! Use a vacuum gauge to make sure you have the right vacuum port. After you get that working, then worry about hooking up the othet vacuum lines.

Good Luck!
 
i tried the whole map thing all ready i used three different dedicated vac lines and two different map sensors to no avail, im gonna get a vacum gauge today and cheeck it, how much vac should i have? is there any other sensors that could cause this cause it was running a little rich with my old motor but nothing like this? By the way thanks to every one for all your help :nice:
 
Fix the code 22 first. The codes 41 and 91 may go away when you fix the code 22. Be sure to disconnect the battery for about 10 minutes when you replace or repair a sensor. This will clear the codes and reset the computer so that it "learns" the new sensor's input pattern.

Code 22 MAP (vacuum) or BARO signal out of range. The MAP or BARO sensor is pretty much the same sensor for both Mass Air & Speed Density cars. The main difference is where it is connected. Mass Air cars vent it to the atmosphere, while Speed Density cars connect it to the intake manifold vacuum. Its purpose is to help set a baseline for the air/fuel mixture by sensing changes in barometric pressure. The MAP or BAP sensor puts out a 5 volt square wave that changes frequency with variations in atmospheric pressure. The base is 154 HZ at 29.92" of mercury - dry sunny day at sea level, about 68-72 degrees. You need an oscilloscope or frequency meter to measure it. There is no way you can use a common cheap voltmeter or DVM to accurately measure the output signal.

The MAP/BARO sensor is mounted on the firewall behind the upper manifold.

Baro or MAP test using frequency meter - run the test key on engine off. The noise from the ignition system will likely upset the frequency meter. I used a 10 x oscilloscope probe connected from the frequency meter to the MAP/BAP to reduce the jitter in the meter's readout.

If it is defective, your air/fuel ratio will be off and the car’s performance & emissions will suffer

Some basic checks you can make to be sure that the sensor is getting power & ground:
Note that all resistance tests must be done with power off. Measuring resistance with a circuit powered on will give false readings and possibly damage the meter.
Check the resistance between the black/white wire on the MAP/BARO sensor and then the black/white wire on the EGR and the same wire on the TPS. It should be less than 1 ohm. Next check the resistance between the black/white wire and the negative battery cable. It should be less than 1.5 ohm.

The following power on check requires you to turn the ignition switch to the Run position.
Use a DVM to check for 5 volts on the orange/white wire. If it is missing, look for +5 volts at the orange/white wire on the TPS or EGR sensors. Use the black/white wire for the ground for the DVM.

Code 41 or 91 - O2 indicates system lean. Look for a vacuum leak or failing O2 sensor.

Code 41 is a RH side sensor,
code 91 is the LH side sensor.

The computer sees a lean mixture signal coming from the O2 sensors and tries to compensate by adding more fuel. Many times the end result is an engine that runs pig rich and stinks of unburned fuel.

The following is a Quote from Charles O. Probst, Ford fuel Injection & Electronic Engine control:
"When the mixture is lean, the exhaust gas has oxygen, about the same amount as the ambient air. So the sensor will generate less than 400 Millivolts. Remember lean = less voltage.

When the mixture is rich, there's less oxygen in the exhaust than in the ambient air , so voltage is generated between the two sides of the tip. The voltage is greater than 600 millivolts. Remember rich = more voltage.

Here's a tip: the newer the sensor, the more the voltage changes, swinging from as low as 0.1 volt to as much as 0.9 volt. As an oxygen sensor ages, the voltage changes get smaller and slower - the voltage change lags behind the change in exhaust gas oxygen.

Because the oxygen sensor generates its own voltage, never apply voltage and never measure resistance of the sensor circuit. To measure voltage signals, use an analog voltmeter with a high input impedance, at least 10 megohms. Remember, a digital voltmeter will average a changing voltage." End Quote

Testing the O2 sensors
Measuring the O2 sensor voltage at the computer will give you a good idea of how well they are working. You'll have to pull the passenger side kick panel off to gain access to the computer connector. Remove the plastic wiring cover to get to the back side of the wiring. Use a safety pin or paper clip to probe the connections from the rear. The computer pins are 29 (LH O2 with a dark green/pink wire) and 43 (RH O2 with a dark blue/pink wire). Use the ground next to the computer to ground the voltmeter. The O2 sensor voltage should switch between .2-.9 volt at idle.

Note that all resistance tests must be done with power off. Measuring resistance with a circuit powered on will give false readings and possibly damage the meter. Do not attempt to measure the resistance of the O2 sensors, it may damage them.

Testing the O2 sensor wiring harness
Most of the common multimeters have a resistance scale. Be sure the O2 sensors are disconnected and measure the resistance from the O2 sensor body harness to the pins on the computer.

The O2 sensor ground (orange wire with a ring terminal on it) is in the wiring harness for the fuel injection wiring. I grounded mine to one of the intake manifold bolts

Replace the O2 sensors in pairs if replacement is indicated. If one is weak or bad, the other one probably isn't far behind.

If you get only code 41 and have changed the sensor, look for vacuum leaks. This is especially true if you are having idle problems. The small plastic tubing is very brittle after many years of the heating it receives. Replace the tubing and check the PVC and the hoses connected to it.
A secondary problem with only a code 41 is for cars with an intact smog pump and cats. If the tube on the back of the heads clogs up the driver’s side, all the air from the smog pump gets dumped into one side. This excess air upsets the O2 sensor calibration and can set a false code 41. The cure is to remove the crossover tube and thoroughly clean the insides to that there is no carbon blocking the free flow of air to both heads.
 
i tried the whole map thing all ready i used three different dedicated vac lines and two different map sensors to no avail, im gonna get a vacuum gauge today and check it, how much vac should i have? is there any other sensors that could cause this cause it was running a little rich with my old motor but nothing like this? By the way thanks to every one for all your help :nice:

You must fix the MAP problem first.
You should have approx 18 to 22 at idle. When you blip the throttle, you should see the vacuum drop and quickly recover.

*NOTE*: If you rev the engine up to ~1.5K to 2K rpms, the vacuum should stay near 18 and 22 (when not in gear)! My guess is that you have the wrong vacuum port.
 
i just tried three different vac ports and still the same i have plenty of vacum and i left the batery unhooked over night and i dont know if this means any thing but the car will not idle with vacum to the egr but will idle almost perfect with a vac leak im goin nutts here what else could it be??????
 
The vaccum source may not be the point of your problem with the MAP sensor. Bad vacuum plumbing will not cause the code 22 to set. See the code 22 test path description I posted eariler.

If you are having EGR problems, you may not have the EGR vacuum plumbed correctly. Some basic theory to clarify how the EGR works is in order…

The EGR shuts off at Wide Open Throttle (WOT), so it has minimal effect on performance. The addition of exhaust gas drops combustion temperature, increases gas mileage and reduces the tendency of the engine to ping. It can also reduce HC emissions by reducing fuel consumption. The primary result of EGR usage is a reduction in NOx emissions.

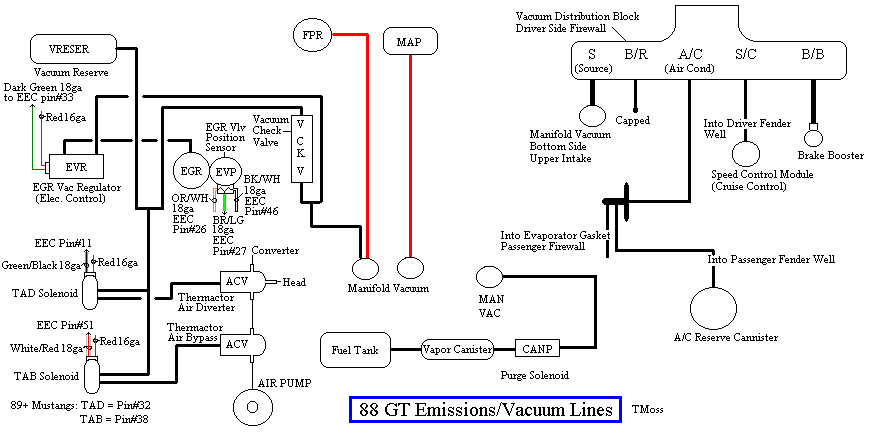
The EGR system has a vacuum source (line from the intake manifold) that goes to the EVR, computer operated electronic vacuum regulator. The EVR is located on the back of the passenger side shock strut tower. The computer uses RPM, Load. and some other factors to tell the EVR to pass vacuum to open the EGR valve. The EGR valve and the passages in the heads and intake manifold route exhaust gas to the EGR spacer (throttle body spacer). The EGR sensor tells the computer how far the EGR valve is open. Then computer adjusts the signal sent to the EVR to hold, increase or decrease the vacuum. The computer adds spark advance to compensate for the recirculated gases and the slower rate they burn at.


attachment.php


Troubleshooting:
There should be no vacuum at the EGR valve when at idle. If there is, the EVR (electronic vacuum regulator) mounted on the backside of the passenger side wheelwell is suspect. Check the vacuum line plumbing to make sure the previous owner didn’t cross the vacuum lines.

Diagram courtesy of Tmoss & Stang&2birds. (the diagram says 88 GT, but the EGR part is the same for 86-93 Mustangs)
88Stang5.0Vacuum.gif


The EGR sensor is basically a variable resistor, like the volume control on a radio. One end is 5 volt VREF power from the computer (red/orange wire). One end is computer signal ground (black/white), and the middle wire (brown/lt green) is the signal output from the EGR sensor. It is designed to always have some small voltage output from it anytime the ignition switch is the Run position. That way the computer knows the sensor & the wiring is OK. No voltage on computer pin 27 (brown/lt green wire) and the computer thinks the sensor is bad or the wire is broken and sets code 31. The voltage output can range from approximately .6-.85 volt.


EGR test procedure courtesy of cjones

to check the EGR valve:
bring the engine to normal temp.
connect a vacuum pump to the EGR Valve
apply 5in vacuum to the valve.
if engine stumbled or died then EGR Valve and passage(there is a passageway through the heads and intake) are good.
if engine did NOT stumble or die then either the EGR Valve is bad and/or the passage is blocked.
if engine stumbled, connect vacuum gauge to the hose coming off of the EGR Valve
snap throttle to 2500 RPM (remember snap the throttle don't hold it there).
did the vacuum gauge show about 2-5 in vacuum?

if not, check for manifold vacuum at the EGR vacuum valve.
if you have manifold vacuum then connect vacuum gauge to the EGR valve side of the vacuum valve and snap throttle to 2500 RPM.
should read about 2-5 in vacuum


Late Model Restoration has the Ford Racing M-12071-N302 kit with the EGR valve & sensor along with the ACT & ECT sensors for $45. See 86-93 SENSOR KIT, 5.0L EFI, INCLUDES EGR VALVE & SENSOR, COOLANT TEMP SENSOR, & AIR CHARGE TEMP SENSOR MUSTANG for more details
 
See the code 22 test path description I posted earlier.
I'll add that it's easier and cheaper to use a DVM that measures frequency to test the MAP. You can get them on Ebay, Sears, Radio Shack, Home Depot, and maybe even Wall-Mart. A DVM that measures freq will cost you between $25 and $60. Of course, the are much more expensive DVMs that have other features and abilities that many people wouldn't needed for an automotive test.

Look on youtube to see "How to use a DVM" or "How to use a VOM". Also, search Google.

After a quick search on ebay, I found a DVM that measures freq and isunder $20 *with* S&H. Do a search for "UT10A". I'm sure there are others. As I said. I found that one with a very quick search.

Do an ebay search on:
"Digital Multimeters"
and you'll see a lot of choices.