
So just replaced the ignition switch and got it starting again. Now it stalls when put into gear and with the IAC plugged in idles at 2k. With it unplugged lowest I could get was 1500 before it shuts off. Either way it doesnt leave neutral without stalling with a nasty lurch. Not sure where to start looking.
You are using an out of date browser. It may not display this or other websites correctly.
You should upgrade or use an alternative browser.
You should upgrade or use an alternative browser.
Engine 88 mustang gt stalls when put into gear
- Thread starter Crexun
- Start date
You need to perform the idle reset procedure.
Unplug iac and lower idle with idle set screw to 700-900rpm. Then unplug the battery for 30 min to reset the computer. Hook it back up and plug iac back in. Start car and let it idle two min. Then put in gear and let idle
Unplug iac and lower idle with idle set screw to 700-900rpm. Then unplug the battery for 30 min to reset the computer. Hook it back up and plug iac back in. Start car and let it idle two min. Then put in gear and let idle
You have a rather large vacuum leak somewhere...Wont go below 1800 no matter where the screw is set and iac unplugged.
Finding vacuum leaks
Revised 2 June 2017 to add picture of engine crankcase vent to throttle body
There is no easy way to find vacuum leaks. It is a time consuming job that requires close inspection of each and every hose and connection.
Small vacuum leaks may not show much change using a vacuum gauge. The range of "good readings" varies so much from engine to engine that it may be difficult to detect small leaks. The engine in my first Mustang pulled about 16.5" of vacuum at 650-725 RPM, which I consider rather low. It was a mass market remanufactured rebuild, so no telling what kind of camshaft it had. Average readings seem to run 16"-18" inches at idle and 18"-21" at 1000 RPM. The only sure comparison is a reading taken when your car was performing at its best through all the RPM ranges and what it is doing now. Use one of the spare ports on the vacuum tree that is mounted on the firewall near the windshield wiper motor.
Use a squirt can of motor oil to squirt around the mating surfaces of the manifold & TB. The oil will be sucked into the leaking area and the engine will change speed. Avoid using flammable substitutes for the oil such as starting fluid, propane or throttle body cleaner. Fire is an excellent hair removal agent, and no eyebrows is not cool...
After you have done the simple visual checks and the check for vacuum leak on the underside of the intake manifold, consider doing a smoke test.
Some of the guys here have built smoke machines used to find automotive vacuum leaks. They seem to work quite well and are made mostly with parts you would have laying around in your garage. Check out smoke machine vacuum leak - YouTube and see if there is one that you could build.
The vacuum line plumbing is old and brittle on many of these cars, so replacing the lines with new hose is a good plan. The common 1/8” and ¼” vacuum hose works well and isn’t expensive.
The PCV grommet and the power brake booster check valve grommet are two places that often get overlooked when checking for vacuum leaks. The rubber grommets get hard and lose their ability to seal properly. The PVC grommet is difficult to see if it is correctly seated and fitting snugly.
Fuel injector O rings can get old and hard. When they do, they are prone to leaking once the engine warms up. This can be difficult to troubleshoot, since it is almost impossible to get to the injectors to squirt oil into the fuel injector mounting bosses. If the plastic caps on the fuel injectors (pintle caps) are missing, the O rings will slide off the injectors and fall into the intake manifold.
Fuel injector seal kits with 2 O rings and a pintle cap (Borg-Warner P/N 274081) are available at Pep Boys auto parts. Cost is about $3-$4 per kit. The following are listed at the Borg-Warner site ( http://www.borg-warner.com ) as being resellers of Borg-Warner parts:
http://www.partsplus.com/ or http://www.autovalue.com/ or http://www.pepboys.com/ or http://www.federatedautoparts.com/
Most of the links above have store locators for find a store in your area.
Use motor oil on the O rings when you re-assemble them & everything will slide into place. The gasoline will wash away any excess oil that gets in the wrong places and it will burn up in the combustion chamber. Heat the pintle caps in boiling water to soften them to make them easier to install.
Diagram courtesy of Tmoss & Stang&2birds
Vacuum leak due to slipped lower intake manifold gasket...
Ask Nicoleb3x3 about the intake gasket that slipped out of place and caused idle and vacuum leak problems that could not be seen or found by external examination. I don't care what you spray with, you won't find the leak when it is sucking air from the lifter valley. It simply isn't possible to spray anything in there with the lower manifold bolted in place.
Determining if you have a leak due to a slipped intake gasket as shown above. This test is only good if you can get the engine to run somewhere in the 1000-1700 RPM range
If your valve cover oil filler & PVC systems are still in the original configuration, try this:
Cap or plug the hose from the intake manifold to the PVC valve with a bolt.
Cap or plug the PVC valve with a piece of hose with a plug or bolt in it.
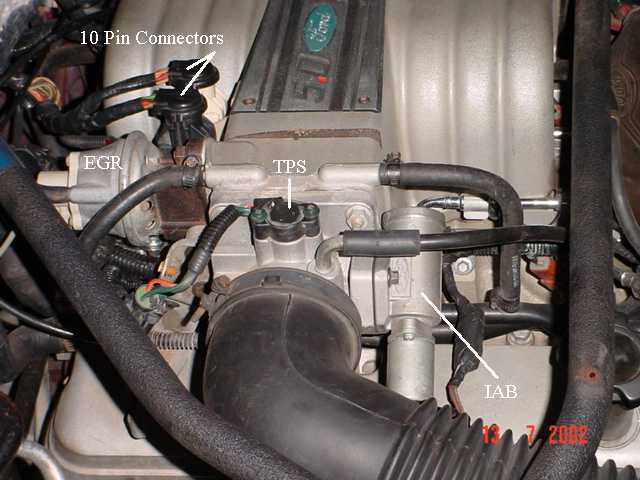
At that point the only vent for the crankcase is the tube from the oil filler neck to the throttle body.
Disconnect the tube that runs from the oil filler neck to the throttle body. Make sure the oil filler cap is on securely. Start the engine and put your thumb over the end of the tube that comes from the oil filler cap. If you feel suction, there is a leak. Another thing to do is to extend the tubing from the filler neck so that there is enough to stick the end in a jar or cup filled with motor oil. If it sucks up the oil, you definitely have a leak at the underside of intake manifold.
This isn't necessarily the definitive test, but it is the best thing I could come up with on short notice. If there is a lot of blowby, this obviously won't be of much help.
See the picture below to see the breather tube where in connects to the throttle body. It is close to the TPS and runs over the top of the IAC.
The following are diagrams courtesy of Tmoss & Stang&2birds
See the following website for some help from Tmoss (diagram designer) & Stang&2Birds (website host) for help on 88-95 wiring http://www.veryuseful.com/mustang/tech/engine/ Everyone should bookmark this site.
Ignition switch wiring
http://www.veryuseful.com/mustang/tech/engine/images/IgnitionSwitchWiring.gif
Fuel, alternator, A/C and ignition wiring
http://www.veryuseful.com/mustang/tech/engine/images/fuel-alt-links-ign-ac.gif
Complete computer, actuator & sensor wiring diagram for 88-91 Mass Air Mustangs
http://www.veryuseful.com/mustang/tech/engine/images/88-91_5.0_EEC_Wiring_Diagram.gif
Vacuum diagram 89-93 Mustangs
http://www.veryuseful.com/mustang/tech/engine/images/mustangFoxFordVacuumDiagram.jpg
HVAC vacuum diagram
http://www.veryuseful.com/mustang/tech/engine/images/Mustang_AC_heat_vacuum_controls.gif
TFI module differences & pinout
http://www.veryuseful.com/mustang/tech/engine/images/TFI_5.0_comparison.gif
Fuse box layout
http://www.veryuseful.com/mustang/tech/engine/images/MustangFuseBox.gif

Got it all back together except for the coal port or whatever it's called. Is it okay to plug that? Also car will not start or stay on if the vacuum line going from the MAP sensor to the intake is connected or even blowing the slightest bit of air into the sensor.
If it shuts off when either the vacuum line is connected to the MAP or if its plugged what does that mean?
It means that you need to dump the codes if you haven't already done so. Post the results of the code dump; there may be some helpful information in there.If it shuts off when either the vacuum line is connected to the MAP or if its plugged what does that mean?
Dump codes sticky
Look at the top of the 5.0 Tech forum where the sticky threads are posted. One of them is how to dump the computer codes. Codes may be present even if the CEL (Check Engine Light) isn’t on. You don’t need a code reader or scanner – all you need is a paper clip, or if your lady friend has a hair pin, that will do the job.
I highly suggest that you read it and follow the instructions to dump the codes. http://www.stangnet.com/mustang-forums/threads/how-to-pull-codes-from-eec4.889006/
As much as I would love to dump codes I have been unsuccessful. The resistances are all correct and there is no reason that it shouldn't be dumping codes as I've gone through your checklist on that a few times. I'm only able to obtain any information on testing that centers around no codes at this point.
The no code dump is a key issue that I was not aware of. That could be one of your major problems.
Computer will not go into diagnostic mode on 86-90 models 5.0 Mustangs .
Revised Dec 23 2107
1.) To clarify signal ground connections on the engine mounted fuel injector wiring harness and add diagram for the engine mounted fuel injector wiring harness
2.) To add warning about using an automatic transmission O2 sensor wiring harness with a A9L manual shift transmission computer.
Disconnect the battery positive terminal before making any resistance checks.
The voltage drop in the ground cable will cause incorrect resistance readings.
How it is supposed to work:
The black/white wire (pin 46) is signal ground for the computer. It provides a dedicated ground for the EGR, Baro, ACT, ECT, & TPS sensors as well as the ground to put the computer into self test mode. If this ground is bad, none of the sensors mentioned will work properly. That will severely affect the car's performance. You will have hard starting, low power and drivability problems. Since it is a dedicated ground, it passes through the computer on its way to the computer main power ground that terminates at the battery pigtail ground. It should read less than 1.5 ohms when measured from any signal ground on the engine mounted fuel injector harness with the battery pigtail ground as the other reference point for the ohmmeter probe.
Engine mounted fuel injector wiring harness sensors for a 5.0 mustang

What sometimes happens is that the test connector black/white wire gets jumpered to power which either burns up the wiring or burns the trace off the pc board inside the computer. That trace connects pins 46 to pins 40 & 60.
OR
If an O2 sensor harness from an automatic transmission Mustang is used with an A9L manual shift transmission computer. The 12 volts from the automatic transmission starter circuit will damage the A9L computer.
The STI (Self Test Input) is jumpered to ground to put the computer into test mode. Jumpering it to power can produce unknown results, including damage to the computer. The ohm test simply verifies that there are no breaks in the wiring between the test connector and the computer input.
How to test the wiring:
With the power off, measure the resistance between the computer test ground (black/white wire) on the self test connector and battery ground. You should see less than 1.5 ohms.
If that check fails, remove the passenger side kick panel and disconnect the computer connector. There is a 10 MM bolt that holds it in place. Measure the resistance between the black/white wire and pin 46 on the computer wiring connector: it should be less than 1.5 ohms. More than 1.5 ohms is a wiring problem. If it reads 1.5 ohms or less, then the computer is suspect. On the computer, measure the resistance between pin 46 and pins 40 & 60: it should be less than 1.5 ohms. More than that and the computer’s internal ground has failed, and the computer needs to be repaired or replaced.
While you have the computer connector disconnected from the computer, turn the ignition switch to the Start position and look for 12 volts on pin 46 of the computer wiring harness. If you see 12 volts then you have an automatic transmission O2 sensor harness. That will damage the A9L manual shift transmission computer.
See https://www.stangnet.com/mustang-forums/threads/computer-issue.749974/#post-7490537 for Joel5.0’s fix for the computer internal signal ground.
If the first ground check was good, there are other wires to check. Measure the resistance between the STI computer self test connector (red/white wire) and pin 48 on the computer main connector: it should be less than 1.5 ohms. More than 1.5 ohms is a wiring problem
The following is a view from the computer side of the computer wiring connector: it is for an A9L, A9P computer.


Diagram courtesy of Tmoss & Stang&2birds
Check out the diagram and notice all the places the black/white wire goes. Almost every sensor on the engine except the MAF is connected to it.

See the following website for some help from Tmoss (diagram designer) & Stang&2Birds
(website host) for help on 88-95 wiring http://www.veryuseful.com/mustang/tech/engine
See the graphic for the 10 pin connector circuit layout.

Computer will not go into diagnostic mode on 86-90 models 5.0 Mustangs .
Revised Dec 23 2107
1.) To clarify signal ground connections on the engine mounted fuel injector wiring harness and add diagram for the engine mounted fuel injector wiring harness
2.) To add warning about using an automatic transmission O2 sensor wiring harness with a A9L manual shift transmission computer.
Disconnect the battery positive terminal before making any resistance checks.
The voltage drop in the ground cable will cause incorrect resistance readings.
How it is supposed to work:
The black/white wire (pin 46) is signal ground for the computer. It provides a dedicated ground for the EGR, Baro, ACT, ECT, & TPS sensors as well as the ground to put the computer into self test mode. If this ground is bad, none of the sensors mentioned will work properly. That will severely affect the car's performance. You will have hard starting, low power and drivability problems. Since it is a dedicated ground, it passes through the computer on its way to the computer main power ground that terminates at the battery pigtail ground. It should read less than 1.5 ohms when measured from any signal ground on the engine mounted fuel injector harness with the battery pigtail ground as the other reference point for the ohmmeter probe.
Engine mounted fuel injector wiring harness sensors for a 5.0 mustang
What sometimes happens is that the test connector black/white wire gets jumpered to power which either burns up the wiring or burns the trace off the pc board inside the computer. That trace connects pins 46 to pins 40 & 60.
OR
If an O2 sensor harness from an automatic transmission Mustang is used with an A9L manual shift transmission computer. The 12 volts from the automatic transmission starter circuit will damage the A9L computer.
The STI (Self Test Input) is jumpered to ground to put the computer into test mode. Jumpering it to power can produce unknown results, including damage to the computer. The ohm test simply verifies that there are no breaks in the wiring between the test connector and the computer input.
How to test the wiring:
With the power off, measure the resistance between the computer test ground (black/white wire) on the self test connector and battery ground. You should see less than 1.5 ohms.
If that check fails, remove the passenger side kick panel and disconnect the computer connector. There is a 10 MM bolt that holds it in place. Measure the resistance between the black/white wire and pin 46 on the computer wiring connector: it should be less than 1.5 ohms. More than 1.5 ohms is a wiring problem. If it reads 1.5 ohms or less, then the computer is suspect. On the computer, measure the resistance between pin 46 and pins 40 & 60: it should be less than 1.5 ohms. More than that and the computer’s internal ground has failed, and the computer needs to be repaired or replaced.
While you have the computer connector disconnected from the computer, turn the ignition switch to the Start position and look for 12 volts on pin 46 of the computer wiring harness. If you see 12 volts then you have an automatic transmission O2 sensor harness. That will damage the A9L manual shift transmission computer.
See https://www.stangnet.com/mustang-forums/threads/computer-issue.749974/#post-7490537 for Joel5.0’s fix for the computer internal signal ground.
If the first ground check was good, there are other wires to check. Measure the resistance between the STI computer self test connector (red/white wire) and pin 48 on the computer main connector: it should be less than 1.5 ohms. More than 1.5 ohms is a wiring problem
The following is a view from the computer side of the computer wiring connector: it is for an A9L, A9P computer.
Diagram courtesy of Tmoss & Stang&2birds
Check out the diagram and notice all the places the black/white wire goes. Almost every sensor on the engine except the MAF is connected to it.
See the following website for some help from Tmoss (diagram designer) & Stang&2Birds
(website host) for help on 88-95 wiring http://www.veryuseful.com/mustang/tech/engine
See the graphic for the 10 pin connector circuit layout.
Last edited:
when I'm testing the black and white wire and the battery ground resistance with the battery positivity disconnected it either shows 0 or just slowly rises and falls. Never below 1.5 though.
See http://www.stangnet.com/mustang-forums/749974-computer-issue.html#post7490537 for Joel5.0’s fix for the computer internal signal ground.when I'm testing the black and white wire and the battery ground resistance with the battery positivity disconnected it either shows 0 or just slowly rises and falls. Never below 1.5 though.
Try https://www.stangnet.com/mustang-forums/threads/computer-issue.749974/#post-7490537Nothing there when I click the link.
Got around .290 volts slowly falling at pin 46 with computer disconnected and ignition in on position. I'm assuming I need to do that computer fix that you linked me too is there any further searching I need to do to find why it got burnt up? I know it's an original manual car so the only other common option was someone improperly jumpering for the test mode which I am unaware if that happened.
If someone jumpered the wrong connection when dumping codes, it will damage the computer.Got around .290 volts slowly falling at pin 46 with computer disconnected and ignition in on position. I'm assuming I need to do that computer fix that you linked me too is there any further searching I need to do to find why it got burnt up? I know it's an original manual car so the only other common option was someone improperly jumpering for the test mode which I am unaware if that happened.
The STI has a gray connector shell and a white/red wire. It comes from the same bundle of wires as the self test connector.
WARNING!!! There is a single dark brown connector with a black/orange wire. It is the 12 volt power to the under the hood light. Do not jumper it to the computer test connector. If you do, you will damage the computer.
Similar threads
- Replies
- 11
- Views
- 690
- Replies
- 7
- Views
- 248
- Replies
- 2
- Views
- 120
- Replies
- 10
- Views
- 256