Just traded this 91 for a jeep that I had a few days ago. Bored 30 over, roller rockers b cam and a bunch of other stuff. Very clean car just doesn't run right or have the power it should. It`s definitely running rich. Brakes are very stiff with not much power. When I mash the brakes in park, it wants to die. Second Fox Body for me. I did pull the codes of 81 82 84 and 85 which indicates a vacuum leak. To the naked eye/ear I cant locate it. Any suggestions where to start?
Those are emissions related codes. They do not necessarily point to a vacuum leak.
Code 81 – Secondary Air Injection Diverter Solenoid failure AM2. The solenoid valve located on the back side of the passenger side wheel well is not functional. Possible bad wiring, bad connections, missing or defective solenoid valve. Check the solenoid valve for +12 volts at the Red wire and look for the Lt Green/Black wire to switch from +12 volts to 1 volt or less. The computer controls the valve by providing a ground path on the LT Green/Black wire for the solenoid valve.
With the with the ignition on, look for 12 volts on the red wire on the solenoid connector. No 12 volts and you have wiring problems.
With the engine running, stick a safety pin in the LT Green/Black wire for the solenoid valve & ground it. That should turn the solenoid on and cause air to flow out the port that goes to the pipe connected to the cats. If it doesn't, the valve is bad. If it does cause the airflow to switch, the computer or wiring going to the computer is not signaling the solenoid valve to open.
Putting the computer into self test mode will cause the solenoid valve to toggle. If you listen carefully, you may hear it change states.
Code 82 – Secondary Air Injection Diverter Solenoid failure AM1. Possible bad wiring, bad connections, missing or defective solenoid valve. Check the solenoid valve for +12 volts at the Red wire and look for the Red/White wire to switch from +12 volts to 1 volt or less. The computer controls the valve by providing a ground path on the Red/White wire for the solenoid valve
With the engine running, stick a safety pin in the Red/White wire for the solenoid valve & ground it. That should turn the solenoid on and cause air to flow out the port that goes to the pipe connected to the heads. If it doesn't, the valve is bad. If it does cause the airflow to switch, the computer or wiring going to the computer is not signaling the solenoid valve to open.
Both 81 & 82 codes usually mean that some uneducated person removed the solenoid control valves for the Thermactor Air system in an attempt to make the car faster. It doesn't work that way: no working control valves can cause the cat converters to choke and clog. If you do not have cat converters on the car, you can ignore the 81 & 82 codes.
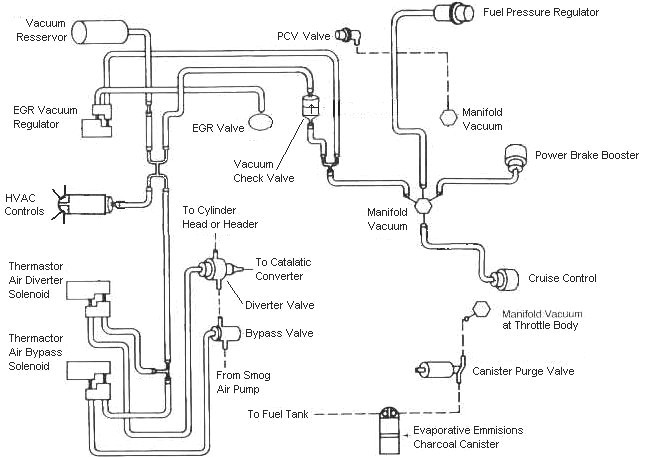
Code 84 EGR Vacuum Regulator failure – Broken vacuum lines, no +12 volts, regulator coil open circuit, missing EGR vacuum regulator. The EVR regulates vacuum to the EGR valve to maintain the correct amount of vacuum. The solenoid coil should measure 20-70 Ohms resistance. The regulator has a vacuum feed on the bottom which draws from the intake manifold. The other vacuum line is regulated vacuum going to the EGR valve. One side of the EVR electrical circuit is +12 volts anytime the ignition switch is in the run position. The other side of the electrical circuit is the ground path and is controlled by the computer. The computer switches the ground on and off to control the regulator solenoid.
Code 85 - CANP solenoid - The Carbon Canister solenoid is inoperative or missing. Check vacuum lines for leaks and cracks. Check electrical wiring for loose connections, damaged wiring and insulation. Check solenoid valve operation by grounding the gray/yellow wire to the solenoid and blowing through it.
The computer provides the ground for the solenoid. The red wire to the solenoid is always energized any time the ignition switch is in the run position.
Charcoal canister plumbing - one 3/8" tube from the bottom of the upper manifold to the rubber hose. Rubber hose connects to one side of the canister solenoid valve. Other side of the solenoid valve connects to one side of the canister. The other side of the canister connects to a rubber hose that connects to a line that goes all the way back to the gas tank. There is an electrical connector coming from the passenger side injector harness near #1 injector that plugs into the canister solenoid valve. It's purpose is to vent the gas tank. The solenoid valve opens at cruse to provide some extra fuel. The canister is normally mounted on the passenger side frame rail near the smog pump pulley.
It does not weigh but a pound or so and helps richen up the cruse mixture. It draws no HP & keeps the car from smelling like gasoline in a closed garage. So with all these good things and no bad ones, why not hook it up & use it?
The purge valve solenoid connector is a dangling wire that is near the ECT sensor and oil filler on the passenger side rocker cover. The actual solenoid valve is down next to the carbon canister. There is about 12"-16" of wire that runs parallel to the canister vent hose that comes off the bottom side of the upper intake manifold. That hose connects one port of the solenoid valve; the other port connects to the carbon canister.
The purge valve solenoid should be available at your local auto parts store.
Purge valve solenoid:
The carbon canister is normally mounted on the passenger side frame rail near the smog pump pulley.
Carbon Canister:
Finding vacuum leaks
Revised 04-Aug-2011 to add pintle cap, PCV grommet & power brake check valve grommet to checklist.
There is no easy way to find vacuum leaks. It is a time consuming job that requires close inspection of each and every hose and connection.
Small vacuum leaks may not show much change using a vacuum gauge. The range of "good readings" varies so much from engine to engine that it may be difficult to detect small leaks. The engine in my first Mustang pulled about 16.5" of vacuum at 650-725 RPM, which I consider rather low. It was a mass market remanufactured rebuild, so no telling what kind of camshaft it had. Average readings seem to run 16"-18" inches at idle and 18"-21" at 1000 RPM. The only sure comparison is a reading taken when your car was performing at its best through all the RPM ranges and what it is doing now. Use one of the spare ports on the vacuum tree that is mounted on the firewall near the windshield wiper motor.
Use a squirt can of motor oil to squirt around the mating surfaces of the manifold & TB. The oil will be sucked into the leaking area and the engine will change speed.
Avoid using flammable substitutes for the oil such as propane or throttle body cleaner. Fire is an excellent hair removal agent, and no eyebrows is not cool...
The vacuum line plumbing is old and brittle on many of these cars, so replacing the lines with new hose is a good plan. The common 1/8” and ¼” vacuum hose works well and isn’t expensive.
The PCV grommet and the power brake booster check valve grommet are two places that often get overlooked when checking for vacuum leaks. The rubber grommets get hard and lose their ability to seal properly. The PVC grommet is difficult to see if it is correctly seated and fitting snugly.
Fuel injector O rings can get old and hard. When they do, they are prone to leaking once the engine warms up. This can be difficult to troubleshoot, since it is almost impossible to get to the injectors to squirt oil into the fuel injector mounting bosses. If the plastic caps on the fuel injectors (pintle caps) are missing, the O rings will slide off the injectors and fall into the intake manifold.
Fuel injector seal kits with 2 O rings and a pintle cap (Borg-Warner P/N 274081) are available at Pep Boys auto parts. Cost is about $3-$4 per kit. The following are listed at the Borg-Warner site (
http://www.borg-warner.com ) as being resellers of Borg-Warner parts:
http://www.partsplus.com/ or
http://www.autovalue.com/ or
http://www.pepboys.com/ or
http://www.federatedautoparts.com/
Most of the links above have store locators for find a store in your area.
Use motor oil on the O rings when you re-assemble them & everything will slide into place. The gasoline will wash away any excess oil that gets in the wrong places and it will burn up in the combustion chamber. Heat the pintle caps in boiling water to soften them to make them easier to install.
Diagram courtesy of Tmoss & Stang&2birds
Vacuum leak due to slipped lower intake manifold gasket...
Ask Nicoleb3x3 about the intake gasket that slipped out of place and caused idle and vacuum leak problems that could not be seen or found by external examination. I don't care what you spray with, you won't find the leak when it is sucking air from the lifter valley. It simply isn't possible to spray anything in there with the lower manifold bolted in place.
See the following website for some help from Tmoss (diagram designer) & Stang&2Birds (website host) for help on 88-95 wiring
http://www.veryuseful.com/mustang/tech/engine/ Everyone should bookmark this site.
Ignition switch wiring
http://www.veryuseful.com/mustang/tech/engine/images/IgnitionSwitchWiring.gif
Fuel, alternator, A/C and ignition wiring
http://www.veryuseful.com/mustang/tech/engine/images/fuel-alt-links-ign-ac.gif
Complete computer, actuator & sensor wiring diagram for 88-91 Mass Air Mustangs
http://www.veryuseful.com/mustang/tech/engine/images/88-91_5.0_EEC_Wiring_Diagram.gif
Vacuum diagram 89-93 Mustangs
http://www.veryuseful.com/mustang/tech/engine/images/mustangFoxFordVacuumDiagram.jpg
HVAC vacuum diagram
http://www.veryuseful.com/mustang/tech/engine/images/Mustang_AC_heat_vacuum_controls.gif
TFI module differences & pinout
http://www.veryuseful.com/mustang/tech/engine/images/TFI_5.0_comparison.gif
Fuse box layout
http://www.veryuseful.com/mustang/tech/engine/images/MustangFuseBox.gif


 I'm jealous