Codes Galore - What happened?

tim281

New Member
Dec 18, 2005
125
1
0
Portland, OR
I am baffled with the wonderful suprise of codes that appeared this morning when I started up my car.
I got the following codes with the engine off:
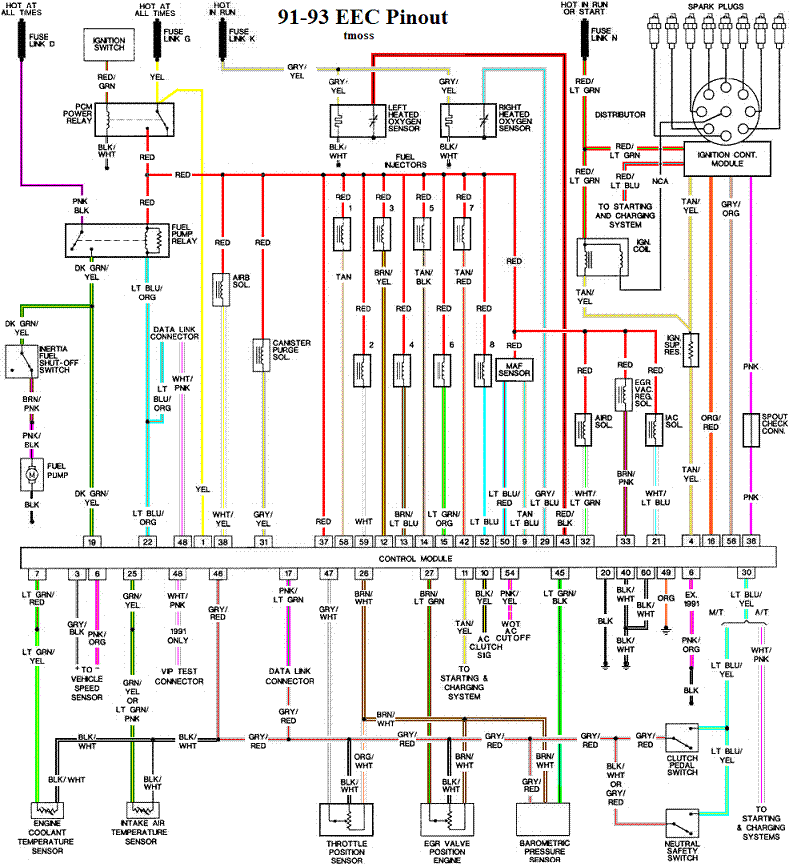
51(ECT above 4.6V)
22 (MAP/BP out of range)
53 (TPS above 4.5V)
54 (ACT is greater than 4.6V)
35 (EVP circuit above max).
67 (Park Neutral Safety Switch)

Plus, I can't pull the codes with the engine on.

All of the codes point to sensor voltages being greater than expected. So what happened? I checked my TPS sensor voltage last night by probing the sensor wire through the weather packed connector with a safety pin. Maybe the ground and signal return wire are now touching? Or maybe the ground is touching the +5V wire in the TPS? I am assuming all these sensors share a common ground.

It is obvious that all these sensors didnt' go bad at once, so I am guessing the following:
1.) TPS is bad after the probe insertion - shorting out all grounds.
2.) Bad main ground at the computer.
3.) ECU went belly up.
4.) Some voltage regulator blew out and is giving more voltage to sensors?

Any clues would be great......Thanx
 
Excellent start, here's some more help...

Troubleshooting loss of signal ground on 91-93 Mustangs.

The computer pin 46 signal ground is a critical component: it provides ground for the MAP/BARO, TPS, ECT, EGR position sensor and ACT. Signal ground is used in many circuits that have analog inputs to isolate the electrical noise. It is always separate from power ground, although both may have a common connection origination point. Signal ground usually has some conditioning that reduces the electrical noise to prevent false readings

The black/white or gray/red wire (pin 46) is signal ground for the computer. In 91-93 model cars it is black/white on the engine mounted sensors (EGR, ACT, ECT, & TPS) and gray/red on under hood diagnostic connector, Baro and Neutral Safety Switch.

It provides a dedicated ground for the EGR, Baro, ACT, ECT, & TPS sensors as well as the ground to put the computer into self test mode. If this ground is bad, none of the sensors mentioned will work properly. That will severely affect the car's performance. You will have hard starting, low power and drivability problems. What sometimes happens is that the test connector gray/red wire gets jumpered to power which either burns up the wiring or burns the trace off the pc board inside the computer. That trace connects pins 46 to pins 40 & 60. Only an experienced electronics technician can open the computer up & repair the trace if it burns up and creates an open circuit.

If the ground for the TPS goes bad, the TPS output voltage increases and the idle speed goes up.


Troubleshooting signal ground problems:
Note that all resistance tests must be done with power off. Measuring resistance with a circuit powered on will give false readings and possibly damage the meter.
1.) With the power off, measure the resistance between the computer test ground
gray/red wire) on the self test connector and battery ground. You should see less than
2.0 ohms. More than 2.0 ohms indicates a wiring problem or an open circuit inside the computer as described above.

attachment.php


2.) MAP circuit: Check the resistance between the gray/red wire on the MAP/BARO sensor and then the black/white wire on the EGR and the same wire on the TPS. It should be less than 1 ohms. Higher resistance than 1 ohms indicates a problem with the 10 pin connector or the splice inside the main harness where the wire from the 10 pin connectors joins the rest of the black/white wire. Next check the resistance between the gray/red wire and the negative battery cable. It should be less than 2.0 ohms. If the resistance check in step 1 was good this one should be too. More than 2.0 ohms indicates a wiring problem or an open circuit inside the computer as described above.


3.) Engine mounted sensor circuit: Check the resistance between the black/white wire on the TPS and battery ground. It should be less than 2.0 ohms. Higher resistance than 2.0 ohms indicates a problem with the 10 pin connector or the splice inside the main harness where the wire from the 10 pin connectors joins the rest of the gray/red wire.

attachment.php


harness02.gif


Diagram courtesy of Tmoss & Stang&2birds
91-93_5.0_EEC_Wiring_Diagram.gif


See the following website for some help from Tmoss (diagram designer) & Stang&2Birds
(website host) for help on 86-95 5.0 Mustang wiring Mustang FAQ - Engine Information Everyone should bookmark this site.


Ignition switch wiring
http://www.veryuseful.com/mustang/tech/engine/images/IgnitionSwitchWiring.gif

Fuel, alternator, A/C and ignition wiring
http://www.veryuseful.com/mustang/tech/engine/images/fuel-alt-links-ign-ac.gif

Complete computer, actuator & sensor wiring diagram for 88-91 5.0 Mass Air Mustangs
http://www.veryuseful.com/mustang/tech/engine/images/88-91_5.0_EEC_Wiring_Diagram.gif

Complete computer, actuator & sensor wiring diagram for 91-93 5.0 Mass Air Mustangs
http://www.veryuseful.com/mustang/tech/engine/images/91-93_5.0_EEC_Wiring_Diagram.gif

Complete computer, actuator & sensor wiring diagram for 94-95 5.0 Mass Air Mustangs
http://www.veryuseful.com/mustang/tech/engine/images/94-95_5.0_EEC_Wiring_Diagram.gif

Vacuum diagram 89-93 Mustangs
http://www.veryuseful.com/mustang/tech/engine/images/mustangFoxFordVacuumDiagram.jpg

HVAC vacuum diagram
http://www.veryuseful.com/mustang/tech/engine/images/Mustang_AC_heat_vacuum_controls.gif

TFI module differences & pinout
http://www.veryuseful.com/mustang/tech/engine/images/TFI_5.0_comparison.gif

Fuse box layout
http://www.veryuseful.com/mustang/tech/engine/images/MustangFuseBox.gif
 
Thanks JR! Looks like I have problem with that circuit because those are my codes. I will try to inspect it tomorrow and see what I can come up with. I hope I didn't burn a trace in the computer, that would be a pain to fix. I have some senior EE techincans here at work I could probably have inspect the computer if it looks like this is the problem.

All I did yesterday was check the TSP by probing the harness with safety pins. Then I tested the TPS ground to chassis with my ohm meter. I somehow may have broke something, or maybe it is coincidence....but I find it hard to believe it would just start acting up this morning if it was not from my TPS meddeling.
 
Was not the TPS....It is the computer! I found a burned track on the printed circuit board at pin 46. It looks like it is just past the terminal connector.
I could repair it with a small jumper wire?
Is this the best way to do it or can you actually repair a trace on a PCB?
 
Was not the TPS....It is the computer! I found a burned track on the printed circuit board at pin 46. It looks like it is just past the terminal connector.
I could repair it with a small jumper wire?
Is this the best way to do it or can you actually repair a trace on a PCB?

The computer's innards are repairable, you just have to be careful when you do it.

See http://forums.stangnet.com/749974-computer-issue.html for more help on fixing the computer innards.
 
Thanks JR. That is what I was going to try first as new computers are 230.00 dollars from LRS. I will make sure I don't over heat the components when I solder in my jumper wire.
My circuit looked identical to the burned one in the picture you sent.
Thanks for your help...you are a life saver. I followed your instructions you sent and easily pin pointed the problem within 15 minutes!
 
Was not the TPS....It is the computer! I found a burned track on the printed circuit board at pin 46. It looks like it is just past the terminal connector.
I could repair it with a small jumper wire?
Is this the best way to do it or can you actually repair a trace on a PCB?

Same thing happened to mine, I could not pull the codes without a workaround as the signal ground was toast (the signal ground was grounded to the battery). Too bad I did not know it was repairable until now. However, my mechanic tracked down a new computer (not rebuilt) for $170 canadian so not too bad.
 
Thanks JR. That is what I was going to try first as new computers are 230.00 dollars from LRS. I will make sure I don't over heat the components when I solder in my jumper wire.
My circuit looked identical to the burned one in the picture you sent.
Thanks for your help...you are a life saver. I followed your instructions you sent and easily pin pointed the problem within 15 minutes!

I am glad you were successful.

A lot of guys see a list of instructions and want to shortcut the process or find it too much information or too complicated. It is ofter surprising how quick an organized approach to troubleshooting a problem solves it.

Joe R.
 
I did still get a check engine light after start up. After the repair, all the codes I originally posted are gone! On KOER, my usual codes appeared 34,41, & 91......plus a new code 21. My KOEO code is only 34. It may have been that my coolant was not up to temp and that triggered the 21 (I didn't wait for any warm up). The odd thing is that I have never had the check engine light stay on permenantly after start up like it is now doing. The only difference is the new code 21 and I am assuming that is keeping the CEL on. I removed the computer again and verified that pin 7 still has a good trace, I was questioning it since the trace is right next to pin 46. Since the CEL never lit up the light at idle before, I am guessing the code 21 is doing it or my computer repair might have fixed one thing and broke another :-)
Code 21 is listed as (Cooling temperature sensor out of specified range or ECT out of range)
 
Code 21 or 116 – ECT sensor out of range. Broken or damaged wiring, bad ECT sensor.
Note that that if the outside air temp is below 50 degrees F that the test for the
ECT can be in error. This code may go away as the engine warms up, so don't dump the codes
on a cold engine


The ECT sensor has absolutely nothing to do with the temperature gauge. They are
different animals. The ECT sensor is normally located it the RH front of the engine in
the water feed tubes for the heater.

The ACT & ECT have the same thermistor, so the table values are the same

ACT & ECT test data:

Use Pin 46 on the computer for ground for both ECT & ACT to get most accurate
readings.

Pin 7 on the computer - ECT signal in. at 176 degrees F it should be .80 volts

Pin 25 on the computer - ACT signal in. at 50 degrees F it should be 3.5 volts. It is
a good number if the ACT is mounted in the inlet airbox. If it is mounted in the lower
intake manifold, the voltage readings will be lower because of the heat transfer.

Voltages may be measured across the ECT/ACT by probing the connector from
the rear. A pair of safety pins may be helpful in doing this. Use care in doing it
so that you don't damage the wiring or connector.

Here's the table :

50 degrees F = 3.52 v
68 degrees F = 3.02 v
86 degrees F = 2.62 v
104 degrees F = 2.16 v
122 degrees F = 1.72 v
140 degrees F = 1.35 v
158 degrees F = 1.04 v
176 degrees F = .80 v
194 degrees F = .61
212 degrees F = .47 v
230 degrees F = .36 v
248 degrees F = .28 v

Ohms measures at the computer with the computer disconnected, or at the sensor with the sensor disconnected.

50 degrees F = 58.75 K ohms
68 degrees F = 37.30 K ohms
86 degrees F = 27.27 K ohms
104 degrees F = 16.15 K ohms
122 degrees F = 10.97 K ohms
140 degrees F = 7.60 K ohms
158 degrees F = 5.37 K ohms
176 degrees F = 3.84 K ohms
194 degrees F = 2.80 K ohms
212 degrees F = 2.07 K ohms
230 degrees F = 1.55 K ohms
248 degrees F = 1.18 k ohms

Diagram courtesy of Tmoss & Stang&2birds

88-91_5.0_EEC_Wiring_Diagram.gif


See the following website for some help from Tmoss (diagram designer) & Stang&2Birds
(website host) for help on 88-95 wiring Mustang FAQ - Engine Information

Ignition switch wiring
http://www.veryuseful.com/mustang/tech/engine/images/IgnitionSwitchWiring.gif

Fuel, alternator, A/C and ignition wiring
http://www.veryuseful.com/mustang/tech/engine/images/fuel-alt-links-ign-ac.gif

Complete computer, actuator & sensor wiring diagram for 88-91 Mass Air Mustangs
http://www.veryuseful.com/mustang/tech/engine/images/88-91_5.0_EEC_Wiring_Diagram.gif

Vacuum diagram 89-93 Mustangs
http://www.veryuseful.com/mustang/tech/engine/images/mustangFoxFordVacuumDiagram.jpg
 
I checked my code 34 out a bit more. I measured 4.67volts when I probe the sensor ground & signal with the key on, engine off. Looks like I either have a wire short or an ECU short.
So I finally caved in and bought a new ECU from Rock Auto. The A-1 Cardone remanufacture unit is $120 after core return. I am hoping the code 34 disappears along with the code 21 since they are both on the same ground. If they don't dissapear, then I will start checking out the wiring harness.
It is kind of funny, the guy who owned the car before me recently replaced the EGR, EGR sensor, and EGR solenoid. It will be interesting to see if the computer was doing the code 34 all along or if it is in the wiring.
 
2.) MAP circuit: Check the resistance between the gray/red wire on the MAP/BARO sensor and then the black/white wire on the EGR and the same wire on the TPS. It should be less than 1 ohms. Higher resistance than 1 ohms indicates a problem with the 10 pin connector or the splice inside the main harness where the wire from the 10 pin connectors joins the rest of the black/white wire.

jrichker or anyone...please help me out,
I finally had some time to look into my ground issue today and found that:
1.) the black/white wire at EGR & TPS ohmed out at 330K ohms to the battery ground!
2.) gray/red wire on the MAP/BARO sensor ohmed out at 0.6 ohms to battery ground.
3.) So then I disconnected the white salt shaker connector and I measured the resistance between pin 1 of the white connector & batt and got only 0.6 ohms!

I have determined through ohming out the wires that my TPS, MAP, and BAR sensor have the same gray/red wire which all ohm out at 0.6 ohms to battery or to each other.
These connectors also have the same brown/white wire that all ohm out as continuous to each other, but they ohm out at around 362K ohms to battery!

Is this ok, or should it be less than 2 ohms.


Thanks,
Tim
 
Maybe this will straighten me out....
If I measure pin #1 to batt ground on the white salt shaker connector, then it should be less than 2 ohms.
Pin #2 should also measure less than 2 ohms to batt gnd also, right?
 
Maybe this will straighten me out....
If I measure pin #1 to batt ground on the white salt shaker connector, then it should be less than 2 ohms.
Pin #2 should also measure less than 2 ohms to batt gnd also, right?

Pin 1 is the signal ground for the engine mounter sensors. If pin 1 of the body side of the 10 pin connector measures 2 ohms or less to gground, that part of the wiring is good.
If you get more than 2 ohms at the TPS & EGR sensor, the engine mounted fuel injector wiring harness has some bad connections or broken wiring.

Pin 2, is VREF, the 5 volt reference voltage provided by the computer. Its resistance to ground should not be measured . Results will be unpredictable. With the ignition switch in the Run position, use the volts scale of your meter and measure the voltage from pin 2 to ground. It should be 5 volts +/= .25 volt.

attachment.php
 
i am having very similar problems with my 90 hatch, my situation is that the trace on the pcm board was definitely open so i repaired it and checked the signal ground wire for continuity to power with the battery disconnected and it checked out fine. i then put the pcm back in and tested voltage at the tps with koeo and everything was normal (.98v, 5vref, .001v.) i was getting like 2v at the tps circuit and signal ground before due to the open on the circuit board. I then started the car and seconds after the car ran ****ty like before. pulled the pcm and the circuit was burned open again, it seems that in only does it when running. any suggestions on testing this out? i obviously have voltage going to where it shouldnt. any help woud be so helpful.
 
i am having very similar problems with my 90 hatch, my situation is that the trace on the pcm board was definitely open so i repaired it and checked the signal ground wire for continuity to power with the battery disconnected and it checked out fine. i then put the pcm back in and tested voltage at the tps with koeo and everything was normal (.98v, 5vref, .001v.) i was getting like 2v at the tps circuit and signal ground before due to the open on the circuit board. I then started the car and seconds after the car ran ****ty like before. pulled the pcm and the circuit was burned open again, it seems that in only does it when running. any suggestions on testing this out? i obviously have voltage going to where it shouldnt. any help woud be so helpful.

First measure VREF (orange/white wire) on the BARO, TPS & EGR sensors. It should be 5 volts +/- .25 volts. If you find 7-12 volts, the computer is bad or you have some serious wiring problems.

There are three ways that I know of for the trace inside the computer to be damaged.
1.) The black/white wire on the diagnostic connector gets jumpered to the dark brown connector with a black/orange wire. The dark brown connector is the 12 volts to the under hood light.

2.) An engine mounted sensor or the BARO sensor has an internal short between the VREF power input and ground. The three sensors to check are the BARO, TPS, and EGR sensors. Use an Ohmmeter to measure the sensor resistances from the signal ground pin on the sensor to the VREF input pin on the sensor. You will need to examine the wiring to find the pin layout or use the computer wiring diagram I posted to determine which pin is which. Watch out for any reading less than 200 ohms between the sensor's VREF and signal ground pins.

3.) An internal short between the signal ground and either VREF or injector power inside the engine mounted fuel injection harness. Disconnect the 10 pin connectors and measure the resistance between pin 1 engine side white connector and pin 1 engine side black connector. You should see more than 1 megohm or an infinite open circuit.
Disconnect the TPS, ACT, ECT & EGR sensors and measure between the engine side white connector pin 1 and engine side white connector pin 2. You should see more than 1 megohm or an infinite open circuit.
 
all these test checked out ok, i had a spare pcm thinking on the chance it was the pcm, it did the same thing to that one, swapped injector harness from my 93, no change. my suspicion is i have a short to ground some where else and the signal ground being the easiest path to burn open. it seems to happen when the car is running. any other suggestions? whats the easiest way to check for power to ground? and what are tolerances?

by the way this is a car that was just a shell with the harness already in it i just put the drive train and pcm from my wrecked 93 in it, so i have no reference to previous wiring issues.

thanks for the input so far!!
 
Unhook the ECM and Find PIN 46.

Hook a volt meter to that PIN, and Check voltage with Key off, Key on, Key on Clutch Down( if you have a 5 speed), and Key On Clutch down cranking. Post up the Voltages. Should be minimal.....Very Minimal. Let us Know