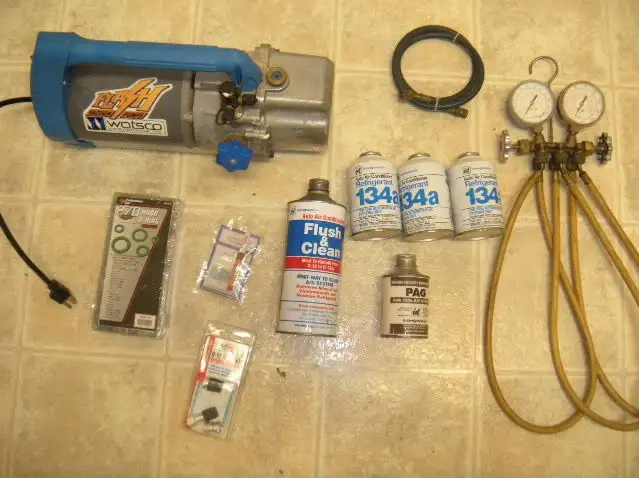
The only way to get all the refrigerant out of the can is to place the bottom of the can in a pan of hot water. The gas gets cold as it expands and the can pressure drops off below the pressure in the system.
Pour the oil in the low pressure side of the compressor prior to vacuuming down the system. use the almost the full 8.5 Oz and that will be good.
R134a Air Conditioner Conversion and recharge instructions
Tools and materials you will need:
R134a = $7-$10 a can – takes 2 - 2 ½ cans.
R134a compatible oil = $5-$7 for an 8 oz bottle – better get 2 bottles.
Gauge set for recharging = $20-$120 – check out the pawn shops for a bargain before you pay retail.
See
Harbor Freight Tools for an inexpensive gauge set.
Vacuum pump – I use an old refrigerator compressor = $20- $40 at used appliance stores, or go to the Dump and get one for free. Be sure to have some R12 compatible oil handy to keep it lubed up properly.
Pump to force cleaning fluid through the system $20-$50 (may use compressed air to do the same thing).
O ring seal kit = $8.
R134a charging adapter = $13 (I cut mine up to use it with the R12 gauge set that I have had for a long time).
Plastic tools to disconnect refrigerant lines - 1/2" & 5/8" = $4 each.
Flushing agent - Discount Auto Parts has some flushing solvent in a 1 gallon plastic bottle - try that first. Or use Mineral spirits = $4 a gallon, tetrachloroethylene =$5-$10 a gallon, takes 2 gallons of either one.
Miscellaneous hoses and fittings to adapt the flushing pump to the system, and the R134a adapter to the R12 gauge set = $15.
Replacement accumulator/dryer assembly with hose $55-$75
R134 Refrigerant charge is 26-28 Oz plus 6-8 Oz of PAG 100 oil.
Conversion Instructions:
I did a R134a conversion on my 89GT, and used all stock parts. You will need to replace the dryer/receiver (about $75 if you get the one with the hose made as part of the unit), and should replace all of the rubber "O" ring seals as well. You will need to drain all of the oil out of the compressor and replace it with new R134a compatible oil.
Keep in mind that to fulfill the requirements of the EPA, you are required by law to recover any refrigerant that still remains in the system. How (or wither or not) you accomplish this is up to you. Connect the charging gauge hoses to the service ports on the A/C (red gauge = high pressure, blue gauge = low pressure) and open the valves on the gauges to dump the remaining refrigerant (if any) into your "freon recovery system", whatever it may be. Disconnect the charging gauges since you are finished with them until you are ready to fill the system with R134a. Next comes the nasty part – in order to get all the old oil out of the system, you will need to flush it with special flushing solvent, or mineral spirits (ok) or tetrachloroethylene (better, but may be hard to get). If you leave the old oil in place it will congeal and reduce the heat transfer in the condenser and evaporator (read that it won’t cool good) and possibly damage the compressor.
Disconnect the compressor and remove it from its mount to flush it with cleaning solvent. Pour about a cup of solvent into the suction port and turn the compressor center hub about 10 turns while shaking the compressor to move the solvent around inside the compressor sump. Drain the flushing solvent out and continue to turn the center hub by hand to force out any remaining solvent. Then fill it with oil: add about 6-8 oz of the new oil to the compressor large suction fitting. Turn the compressor center hub about 20 turns as you turn the compressor face up and face down to distribute the new oil inside the compressor. Catch and replace any oil that comes out of the compressor.
Connect the pump (I had an electric sump pump I bought for $20) to the hose from the high-pressure side of the compressor. Alternately, you could use compressed air to force the cleaning fluid through the system. I didn’t like to do this since compressed air has lots of moisture in it, which is death to A/C systems. Pump the cleaning fluid through the system and let it come out the hose that was attached to the old dryer/receiver. I used 2 gallons of mineral spirits and pumped it all through the condenser and evaporator. The expansion valve is located near the firewall in the high-pressure line of the evaporator, and may cause the cleaning fluid to trickle through the lines at a very slow pace. You may want to pump cleaning fluid through the evaporator and condenser separately to speed up the process.
Next comes the changing of all the old "O" rings so that the chances for leaks is minimized. Use the plastic connector tools to separate the lines, place the extended collar part of the tool so that it faces the large part of the connector and push inwards: this expands the spring so that you can pull the tube apart. You may need a helper to push on the tool while you pull on the tubes to separate them. Install the new "O" rings: be sure to coat them with new oil when you put them in. Install the new dryer/receiver, R134a service port adapter, compressor, add about more 4oz of oil to high pressure line and tighten up all the lines. Close the hood, start the engine, let everything get warm under the hood, but don’t add the R134a or turn the A/C on. Connect the charging gauge hoses to the service ports on the A/C (red gauge = high pressure, blue gauge = low pressure) and open both valves, then connect the center hose to the vacuum pump. The purpose of this exercise is to heat up the system so that when you vacuum it all down (yes, you will need a vacuum pump- mine is an old refrigerator compressor), that all the air, vapor and moisture from the cleaning fluid vaporizes and is removed from the system. Vacuum it down for about 30 minutes, this should give you about 28" of vacuum or more inside the A/C system. I have a vacuum gauge "T" connected into the vacuum pump line so that I can accurately watch the vacuuming process. This is a good time to take a soda and sandwich break since it doesn’t go faster if you watch it.
Install the R134a service fittings on the system: the red goes on the high side and the blue on the low side. This will help others identify that a R134a conversion has been done on the system.
Typical low pressure side R134 coupling
Typical high pressure side R134 coupling
Charging instructions:
Remove the electrical connector from the dryer/receiver and jumper the two connections inside the wiring harness side of the connector together: this allows the compressor to engage in spite of low pressure/no gas in the system. Close both charging gauge valves, and then disconnect the center hose of the charging gauges from the vacuum pump and connect it to the R134a can tapper. Put the R134a can in the can tapper and screw it down with the can tapper valve closed, then open the valve. Loosen the hose at the center connection of the charging gauge set until the R134a squirts out: this purges the line of air and moisture. The refrigerant is added through the low pressure side of the system, so open the low pressure gauge valve to add the R134a. Start the car and take note of the idle speed, then set the idle speed up to about 1200-1500 rpm, and turn the A/C on inside and set the fan speed on high. Watch for the pressure on the low side to drop off as you are filling, and the R134a can will get warm and stay warm. This tells you the current can is empty and needs to be changed for a fresh one. Before you disconnect the can, be sure to close the valve on the R134a can tapper.
Watch the high side pressure on the charging gages and regulate the adding of gas to keep the high side pressure under 350 psi. You will probably need a fan in front of the car to keep the readings below 350 psi. I had to put the R134a can in hot water while I was charging the system with it, or else the can got so cold that it quit flowing. Use caution when you do this so that you don’t get water in the charging adapter when you change the cans. When you have added the 2 cans of gas, the high side will read about 250-300 psi and low side about 28-38 psi. Turn the idle speed back to where it was, turn the A/C off, disconnect the charging gauges, and re-install all the caps on the service ports. Remove the jumper from the low pressure switch harness and plug it back on the switch connectors. Then put the R134a Service Sticker on, secure all the loose wiring on the system and you are done.
The typical sticker looks like this, yours may be different.
I hope it cools good, mine doesn’t get quite as cold as it used to driving around town.
The above technical note is for informational purposes only, and the end user is responsible for any damages or injury. The end user bears all responsibility for proper recovery/disposal of any R12 refrigerant.
I have an EPA 609 MVAC certification. And yes, you can shortcut the process, but there are negative factors if you do. Sooner or later, something will cease to function like it should. Shoddy work is a time bomb ticking away, waiting to explode.