
So I failed the state inspection tonight, no check engine light with the key on. I'm searching through old threads and keep reading these speed density cars don't really have a functioning check engine light? Is that true? I pulled the cluster out and there was no bulb in the CEL spot on the cluster. The previous owner could have pulled it out though. I swapped bulbs out and even swapped whole clusters and couldn't get the light to come on with the key on. I did get the light to come on during cranking, but not KOEO. This is annoying, 5 more years and it won't even need to be inspected anymore...
You are using an out of date browser. It may not display this or other websites correctly.
You should upgrade or use an alternative browser.
You should upgrade or use an alternative browser.
Failed Inspection For No Check Engine Light 1988 Non-maf Car?
- Thread starter Fordfreak93
- Start date
Blown88GT
Founding Member
I know the '88 speed density didn't have a CEL, so no lamp.
Your sig says '93 which did have one.
A different EEC-IV could change that.
Your sig says '93 which did have one.
A different EEC-IV could change that.
I just bought a 1988 hatch, still speed density. I wonder how I'm going to explain this to the inspector tomorrow morning, lol.I know the '88 speed density didn't have a CEL, so no lamp.
Your sig says '93 which did have one.
A different EEC-IV could change that.
I just bought a 1988 hatch, still speed density. I wonder how I'm going to explain this to the inspector tomorrow morning, lol.
There's no reason why that car shouldn't pass inspection...
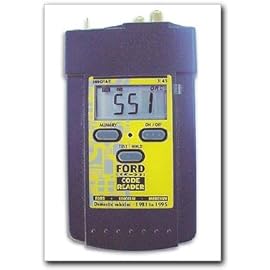
Plan on replacing the O2 sensors and possibly the MAP. Swing by walmart or get on amazon and buy an OBD1 code reader:
Amazon product ASIN B000EW0KHWView: https://www.amazon.com/INNOVA-3145-Ford-Digital-Reader/dp/B000EW0KHW/ref=sr_1_4?s=automotive&ie=UTF8&qid=1513385649&sr=1-4&keywords=obd1+code+reader+ford
You've probable got some associated vacuum hoses, gaskets, and seals that are sucking in air. Speed density is pretty tolerant of this but the stock tune will only take so much.
The car runs fine, it failed because the check engine light doesn't come on with the key on. Apparently there isn't one in the early speed density cars. I'm trying to figure out how to prove that.There's no reason why that car shouldn't pass inspection...
Plan on replacing the O2 sensors and possibly the MAP. Swing by walmart or get on amazon and buy an OBD1 code reader:
Amazon product ASIN B000EW0KHWView: https://www.amazon.com/INNOVA-3145-Ford-Digital-Reader/dp/B000EW0KHW/ref=sr_1_4?s=automotive&ie=UTF8&qid=1513385649&sr=1-4&keywords=obd1+code+reader+ford
You've probable got some associated vacuum hoses, gaskets, and seals that are sucking in air. Speed density is pretty tolerant of this but the stock tune will only take so much.

The car runs fine, it failed because the check engine light doesn't come on with the key on. Apparently there isn't one in the early speed density cars. I'm trying to figure out how to prove that.
"Plan A" You are correct; there is no CEL on 86-88 Mustangs Speed Density cars, The 88 California Mustangs had a MAF and a working CEL. Contact your local Ford dealer and they may be able to provide the Factory OEM data.
"Plan B" Here's some help ;
Copied from mustang88GT:
I have not finished it yet but I put the bulb in and it works. There are wires that you can tap into and run to the self test connector. The reason I have not run the wires yet is because I am tripping 2 codes because I did not run wires for the secondary fuel pump or speed senor yet for the MAF conversion... but it should be real easy to do here is
Adding a "Check Engine" light
Another difference between the speed density and MAF cars is that MAF cars have a "Check Engine" light in the dash to alert you to possible serious problems and it makes reading out self test codes much easier. The MAF cars have the "Check Engine" light located in the light panel on the lower right of the instrument cluster. Speed density cars don't have this window, but there is a "Check Engine" position for a light in the tachometer face, though there is no bulb installed. The wire from the EEC to the bulb (via the flex connector) is also missing.
In the '88 harness (not sure of other years), there is a tan and a black/blue wire connecting up to the 'Check Engine' circuit on the instrument cluster flex circuit. For MAF models, the tan wire hooks to the EEC STO/MIL line and the black/blue is for the lamp test out when you start the car. I don't know what these are connected to in an '88, but the test out feature does not work, and the STO/MIL line at the EEC-IV and self test connector is yellow/black. The wires connected to the check engine lamp probably end at some open connector somewhere, but I couldn't track it down, so I cut the tan and black/blue wires off the flex connector and ran a new wire to the STO/MIL wire on the self test connector under the hood (you could also tap in by the EEC-IV, but it was easier for me to go through the firewall. You can get a bulb socket from the HELP! rack at the local parts store, put in a N194 bulb, and voila, you now have a working check engine light.
"Plan C" Print this tech note off and show it to the test guy...
Dump the codes: Codes may be present even if the Check Engine Light (CEL) isn't on.
Dumping the computer diagnostic codes on 86-95 Mustangs
Revised 26-July-2011. Added need to make sure the clutch is pressed when dumping codes.
Codes may be present even if the check engine light hasn’t come on, so be sure to check for them.
Here's the way to dump the computer codes with only a jumper wire or paper clip and the check engine light, or test light or voltmeter. I’ve used it for years, and it works great. You watch the flashing test lamp or Check Engine Light and count the flashes.
Post the codes you get and I will post 86-93 model 5.0 Mustang specific code definitions and fixes. I do not have a complete listing for 94-95 model 5.0 Mustangs at this time.
Be sure to turn off the A/C, and put the transmission in neutral when dumping the codes. On a manual transmission car, be sure to press the clutch to the floor.
Fail to do this and you will generate a code 67 and not be able to dump the Engine Running codes.
Foxbody Diagnostic connector
Foxbody Diagnostic connector close up view
If your car is an 86-88 stang, you'll have to use the test lamp or voltmeter method. There is no functional check engine light on the 86-88's except possibly the Cali Mass Air cars.
The STI has a gray connector shell and a white/red wire. It comes from the same bundle of wires as the self test connector.
89 through 95 cars have a working Check Engine light. Watch it instead of using a test lamp.
The STI has a gray connector shell and a white/red wire. It comes from the same bundle of wires as the self test connector.
WARNING!!! There is a single dark brown connector with a black/orange wire. It is the 12 volt power to the under the hood light. Do not jumper it to the computer test connector. If you do, you will damage the computer.
What to expect:
You should get a code 11 (two single flashes in succession). This says that the computer's internal workings are OK, and that the wiring to put the computer into diagnostic mode is good. No code 11 and you have some wiring problems. This is crucial: the same wire that provides the ground to dump the codes provides signal ground for the TPS, EGR, ACT and Map/Baro sensors. If it fails, you will have poor performance, economy and driveablity problems
Some codes have different answers if the engine is running from the answers that it has when the engine isn't running. It helps a lot to know if you had the engine running when you ran the test.
Dumping the Engine Running codes: The procedure is the same, you start the engine with the test jumper in place. Be sure the A/C is off, and clutch (if present) is pressed to the floor, and the transmission is in neutral. You'll get an 11, then a 4 and the engine will speed up to do the EGR test. After the engine speed decreases back to idle, it will dump the engine running codes.
Trouble codes are either 2 digit or 3 digit, there are no cars that use both 2 digit codes and 3 digit codes.
Your 86-88 5.0 won't have a working Check Engine Light, so you'll need a test light.
See AutoZone Part Number: 25886 , $10

Alternate methods:
For those who are intimidated by all the wires & connections, see Actron® for what a typical hand scanner looks like. Normal retail price is about $30 or so at AutoZone or Wal-Mart.
Reader/dp/B000EW0KHW Equus - Digital Ford Code Reader 3145.
Or for a nicer scanner see www.midwayautosupply.com/Equus-Digital-Ford-Code-It has a 3 digit LCD display so that you don’t have to count flashes or beeps.. Cost is $22-$36.
Order it at Walmart for a better price and free shipping
Last edited:
That's a tough one to prove as there is no official documentation. But, you could always show this thread. I have an '88 and yes, like stated there is no check engine light on the 86-88 speed density cars.
There's a spot for it in the cluster, but it's non-functional. As part of my mass air conversion I intend to rewire it so it is functional.
Let me go check my 1988 owners manual and see what it says
There's a spot for it in the cluster, but it's non-functional. As part of my mass air conversion I intend to rewire it so it is functional.
Let me go check my 1988 owners manual and see what it says
Manual states check engine light is 2.3L and 1988 California only.


And just to show on my 1988, non-California....no check engine light with key to on

And just to show on my 1988, non-California....no check engine light with key to on
Last edited:

The inspection station should have a manual on what vehicles have check engine lights, he sees the 4cyl and cali cars have them, tell him to check the manual.
- Jul 12, 2017
- 2,474
- 1,348
- 173
I have a 88gt with no check engine light. I don’t even have check oil light light like Mustang5L5 does. Maybe the bulbs out?
I have a 88gt with no check engine light. I don’t even have check oil light light like Mustang5L5 does. Maybe the bulbs out?
Non-GT had it in the cluster. The 87-89 GT had that small 4-light warning pod on the right side that had the check oil light. These 4 lights should all light up when you turn key to on.
Low coolant
Low washer fluid
Low fuel
Check oil
That's what I was looking for, thanks! I showed him @jrichker 's post, but nobody believes the internet. I think the kid was willing to just pass it after I was deeply explaining the differences between speed density and mass air, his eyes were glazing over. The computer wouldn't take the inspection in the end, something about it already have been inspected in the last 90 days. I have to see the title office first. I dug through the car and look what I found under the spare tire though:Manual states check engine light is 2.3L and 1988 California only.
And just to show on my 1988, non-California....no check engine light with key to on
Let's talk about these lights for a second, I only have the seatbelt light right now. I'm assuming the battery bulb burnt out or my hacked up alternator harness has something to do with it. My oil light only comes on when cranking. Is this something I should investigate? I tracked down the MIL wire and I can hook up the check engine light if I want, but I'm pretty sure it's staying on right now, lol. I dumped codes and was getting a bunch of weird stuff so I pulled out the ECM to find this:Manual states check engine light is 2.3L and 1988 California only.
And just to show on my 1988, non-California....no check engine light with key to on
- Jul 12, 2017
- 2,474
- 1,348
- 173
Non-GT had it in the cluster. The 87-89 GT had that small 4-light warning pod on the right side that had the check oil light. These 4 lights should all light up when you turn key to on.
Low coolant
Low washer fluid
Low fuel
Check oil
That’s right, I do.
Let's talk about these lights for a second, I only have the seatbelt light right now. ]
Here's what should come on when key goes to ON. Now, I added the 4-pod warning lights to my LX (requires the add-on light pod to the gauge cluster and a hard to find module over the glove box) so I have extra lights. My check oil bulb is burned out there, but since I have two indicators it's not a top priority for me. My check oil light does come on while cranking as well.
After a few seconds, all lights turn off other than the AMP light and low fuel (because I only have a gallon of gas in tank)
My seat belt light only stays on for a few seconds more than the rest, and then turns off on its own even without plugging in the belt. Not sure this is right.
Let's talk about these lights for a second, I only have the seatbelt light right now. I'm assuming the battery bulb burnt out or my hacked up alternator harness has something to do with it. My oil light only comes on when cranking. Is this something I should investigate? I tracked down the MIL wire and I can hook up the check engine light if I want, but I'm pretty sure it's staying on right now, lol. I dumped codes and was getting a bunch of weird stuff so I pulled out the ECM to find this:


Dump the Hpertech. It's old school snake oil.
Pull codes again.
Blown88GT
Founding Member
Do you mean the low oil level light in the lower right cluster? Light on steady means 2qts low.Let's talk about these lights for a second, I only have the seatbelt light right now. I'm assuming the battery bulb burnt out or my hacked up alternator harness has something to do with it. My oil light only comes on when cranking. Is this something I should investigate? I tracked down the MIL wire and I can hook up the check engine light if I want, but I'm pretty sure it's staying on right now, lol. I dumped codes and was getting a bunch of weird stuff so I pulled out the ECM to find this: ...
4 indicators: low oil level, low coolant level, low fuel level, low washer fluid.
All driven by the low fluid monitor module.
Only one that still works on mine is low fuel level (not really that low, maybe 5 gal remaining). Low oil hasn't come since car was new & oil level actually was 2 qts low. You can see the sensor in the oil pan. Washer was removed. Coolant sensor in overflow replaced twice, they didn't last more than a year. You don't need any of these. I pay little attention to any of them.
You have the Manual to prove no CEL, next time you go for inspection. What state are you located in?
I am surprised that this is still on-going. I've run into this issue before and it never went further than a call or visit to the referee station.
Once I came armed with photo-copies from relevant sources only to find that the referee station had these sources too.
Are you in a state that has state inspection lanes or is it a state where you take it to garage X?
No state can make you modify the car from OEM.
Once I came armed with photo-copies from relevant sources only to find that the referee station had these sources too.
Are you in a state that has state inspection lanes or is it a state where you take it to garage X?
No state can make you modify the car from OEM.
Blown88GT
Founding Member
Similar threads
- Replies
- 3
- Views
- 307
- Replies
- 2
- Views
- 261
- Replies
- 29
- Views
- 1K
- Replies
- 3
- Views
- 321