
ok i got a mostly stock 93 notch V8 full length headers,H pipe no cats,cold air int,pullies... it started sputtering real bad and no acceleration just sputter so i rev it real high an it clears up so i put a fuel pump in it i put a 255 pump cause i just started on the car and will prob need it later well didnt fix it so i put adj fuel reg on today and it hasnt done it yet but it doesnt always act up just here n there i thaught the pump fixed it cause drove it around alot that day and no prob but then next day it did it O and plugs are lite not white but light grey that means lean right and i hear detenation @ high RPM so any suggestions also can i put 24# injectors on a mostly stock car ??? i can get a great deal on injectors ???
You are using an out of date browser. It may not display this or other websites correctly.
You should upgrade or use an alternative browser.
You should upgrade or use an alternative browser.
fuel prob ??
- Thread starter ybrik
- Start date
AnthonyR23
Member

You CAN put 24lb injectors on a mostly stock car but dont do it. If you can get a great deal on them, get them and re sell them.
When did it start doing this? Did you change anything and this started right after?
First thing you should do is as mentioned check for codes. I would check timing, check ALL vacuum lines for vacuum leaks. Check for stupid stuff like burnt plug wires or something. First get the codes though.
When did it start doing this? Did you change anything and this started right after?
First thing you should do is as mentioned check for codes. I would check timing, check ALL vacuum lines for vacuum leaks. Check for stupid stuff like burnt plug wires or something. First get the codes though.
Dumping The computer diagnostic codes on 86-95 Mustangs
Revised 19-May-2009 to update drawing for dumping the codes on 86-88 Mustangs with no check engine light.
Dump the codes and see what the computer says is wrong…Codes may be present in the computer even if the Check Engine light isn’t on.
Here's the way to dump the computer codes with only a jumper wire or paper clip and the check engine light, or test light or voltmeter. I’ve used it for years, and it works great. You watch the flashing test lamp or Check Engine Light and count the flashes.
Be sure to turn off the A/C, and put the transmission in neutral when dumping the codes. Fail to do this and you will generate a code 67 and not be able to dump the Engine Running codes.
Dumping the Engine Running codes: The procedure is the same, you start the engine with the test jumper in place. Be sure the A/C is off and the transmission is in neutral. You'll get an 11, then a 4 and the engine will speed up to do the EGR test. After the engine speed decreases back to idle, it will dump the engine running codes.
Here's the link to dump the computer codes with only a jumper wire or paper clip and the check engine light, or test light or voltmeter. I’ve used it for years, and it works great. You watch the flashing test lamp or Check Engine Light and count the flashes.
See Troublcodes.net Trouble Codes OBD & OBD2 Trouble Codes and Technical info & Tool Store. By BAT Auto Technical


If your car is an 86-88 stang, you'll have to use the test lamp or voltmeter method. There is no functional check engine light on the 86-88's except possibly the Cali Mass Air cars.

The STI has a gray connector shell and a white/red wire. It comes from the same bundle of wires as the self test connector.
89 through 95 cars have a working Check Engine light. Watch it instead of using a test lamp.

The STI has a gray connector shell and a white/red wire. It comes from the same bundle of wires as the self test connector.
WARNING!!! There is a single dark brown connector with a black/orange wire. It is the 12 volt power to the under the hood light. Do not jumper it to the computer test connector. If you do, you will damage the computer.
What to expect:
You should get a code 11 (two single flashes in succession). This says that the computer's internal workings are OK, and that the wiring to put the computer into diagnostic mode is good. No code 11 and you have some wiring problems.
Codes have different answers if the engine is running from the answers that it has when the engine isn't running. It helps a lot to know if you had the engine running when you ran the test.
Trouble codes are either 2 digit or 3 digit, there are no cars that use both 2 digit codes and 3 digit codes.
Alternate methods:
For those who are intimidated by all the wires & connections, see Actron® for what a typical hand scanner looks like. Normal retail price is about $30 or so at AutoZone or Wal-Mart.
Or for a nicer scanner see Digital Ford Code Reader (3145) – It has a 3 digit LCD display so that you don’t have to count flashes or beeps.. Cost is $30.
Revised 19-May-2009 to update drawing for dumping the codes on 86-88 Mustangs with no check engine light.
Dump the codes and see what the computer says is wrong…Codes may be present in the computer even if the Check Engine light isn’t on.
Here's the way to dump the computer codes with only a jumper wire or paper clip and the check engine light, or test light or voltmeter. I’ve used it for years, and it works great. You watch the flashing test lamp or Check Engine Light and count the flashes.
Be sure to turn off the A/C, and put the transmission in neutral when dumping the codes. Fail to do this and you will generate a code 67 and not be able to dump the Engine Running codes.
Dumping the Engine Running codes: The procedure is the same, you start the engine with the test jumper in place. Be sure the A/C is off and the transmission is in neutral. You'll get an 11, then a 4 and the engine will speed up to do the EGR test. After the engine speed decreases back to idle, it will dump the engine running codes.
Here's the link to dump the computer codes with only a jumper wire or paper clip and the check engine light, or test light or voltmeter. I’ve used it for years, and it works great. You watch the flashing test lamp or Check Engine Light and count the flashes.
See Troublcodes.net Trouble Codes OBD & OBD2 Trouble Codes and Technical info & Tool Store. By BAT Auto Technical
If your car is an 86-88 stang, you'll have to use the test lamp or voltmeter method. There is no functional check engine light on the 86-88's except possibly the Cali Mass Air cars.
The STI has a gray connector shell and a white/red wire. It comes from the same bundle of wires as the self test connector.
89 through 95 cars have a working Check Engine light. Watch it instead of using a test lamp.
The STI has a gray connector shell and a white/red wire. It comes from the same bundle of wires as the self test connector.
WARNING!!! There is a single dark brown connector with a black/orange wire. It is the 12 volt power to the under the hood light. Do not jumper it to the computer test connector. If you do, you will damage the computer.
What to expect:
You should get a code 11 (two single flashes in succession). This says that the computer's internal workings are OK, and that the wiring to put the computer into diagnostic mode is good. No code 11 and you have some wiring problems.
Codes have different answers if the engine is running from the answers that it has when the engine isn't running. It helps a lot to know if you had the engine running when you ran the test.
Trouble codes are either 2 digit or 3 digit, there are no cars that use both 2 digit codes and 3 digit codes.
Alternate methods:
For those who are intimidated by all the wires & connections, see Actron® for what a typical hand scanner looks like. Normal retail price is about $30 or so at AutoZone or Wal-Mart.
Or for a nicer scanner see Digital Ford Code Reader (3145) – It has a 3 digit LCD display so that you don’t have to count flashes or beeps.. Cost is $30.
Thanks i try that ! Now i do think i have a bad injector cause i was looking around for a possible vac leak and @ idle i heard a pssssst psssst if that makes sence and it was from one of the injectors so i grabbed a wood dowell so i could touch each injector and listen and they all just clicking like they should except that one and it was clicking and had a intermitten hisss .dont seem right to me ! anyone ??
now back to the 24# injectors is it safe now @ mostly stock cause if i have to buy new i rather buy 24#ers cause i will need them for sure in future ! THANKS FOR ALL INPUT AND REPLIES !!!!!
now back to the 24# injectors is it safe now @ mostly stock cause if i have to buy new i rather buy 24#ers cause i will need them for sure in future ! THANKS FOR ALL INPUT AND REPLIES !!!!!
If you install 24 lb injectors, you will need an aftermarket MAF calibrated to match the injectors or a custom Dyno tune chip to make them work properly. That will cost much more than fixing what you have. The stock injectors are good to 260-285 HP flywheel with some safety margin. You would need heads, cam and intake added to your current engine to make that kind of HP.
Fix your current problem before compounding it with different parts that may make it worst.
Locate which injector is defective or weak
Cylinder balance test:
Warm the car's engine up to normal operating temperature. Use a
jumper wire or paper clip to put the computer into test mode. Start
the engine and let it go through the normal diagnostic tests, then
quickly press the throttle to the floor. The engine RPM should exceed
2500 RPM's for a brief second. The engine RPM's will increase to about
1450-1600 RPM and hold steady. The engine will shut off power to each
injector, one at a time. When it has sequenced through all 8 injectors,
it will flash 9 for everything OK, or the number of the failing cylinder
such as 2 for cylinder #2. Quickly pressing the throttle again up to
2500 RPM’s will cause the test to re-run with smaller qualifying figures.
Do it a third time, and if the same cylinder shows up, the cylinder is
weak and isn’t putting out power like it should. See the Chilton’s Shop
manual for the complete test procedure
Dump the codes and see what the computer says is wrong…Codes may
be present in the computer even if the Check Engine light isn’t on.
Here's the link to dump the computer codes with only a jumper wire or paper clip and the check
engine light, or test light or voltmeter. I’ve used it for years, and it works great.
You watch the flashing test lamp or Check Engine Light and count the flashes.
Be sure to turn off the A/C, and put the transmission in neutral when dumping the codes.
Fail to do this and you will generate a code 67 and not be able to dump the Engine Running codes.
Dumping the Engine Running codes: The procedure is the same, you start the engine with
the test jumper in place. Be sure the A/C is off and the transmission is in neutral.
You'll get an 11, then a 4 and the engine will speed up to do the EGR test.
After the engine speed decreases back to idle, it will dump the engine running codes.
Here's the link to dump the computer codes with only a jumper wire or paper clip and the
check engine light, or test light or voltmeter. I’ve used it for years, and it works great.
You watch the flashing test lamp or Check Engine Light and count the flashes.
See Troublcodes.net Trouble Codes OBD & OBD2 Trouble Codes and Technical info & Tool Store. By BAT Auto Technical
If your car is an 86-88 stang, you'll have to use the test lamp or voltmeter method.
There is no functional check engine light on the 86-88's except possibly the Cali Mass Air cars.
The STI has a gray connector shell and a white/red wire. It comes from the same
bundle of wires as the self test connector.
89 through 95 cars have a working Check Engine light. Watch it instead of using a test lamp.
The STI has a gray connector shell and a white/red wire. It comes from the same
bundle of wires as the self test connector.
WARNING!!! There is a single dark brown connector with a black/orange wire.
It is the 12 volt power to the under the hood light. Do not jumper it to the computer test connector.
If you do, you will damage the computer.
What to expect:
You should get a code 11 (two single flashes in succession). This says that the computer's
internal workings are OK, and that the wiring to put the computer into diagnostic mode is good.
No code 11 and you have some wiring problems.
Do a compression test on all the cylinders.
Take special note of any cylinder that shows up as weak in the cylinder
balance test. Low compression on one of these cylinders rules out the
injectors as being the most likely cause of the problem. Look at cylinders
that fail the cylinder balance test but have good compression. These
cylinders either have a bad injector, bad spark plug or spark plug wire.
Move the wire and then the spark plug to another cylinder and run the
cylinder balance test again. If it follows the moved wire or spark plug,
you have found the problem. If the same cylinder fails the test again,
the injector is bad. If different cylinders fail the cylinder balance test,
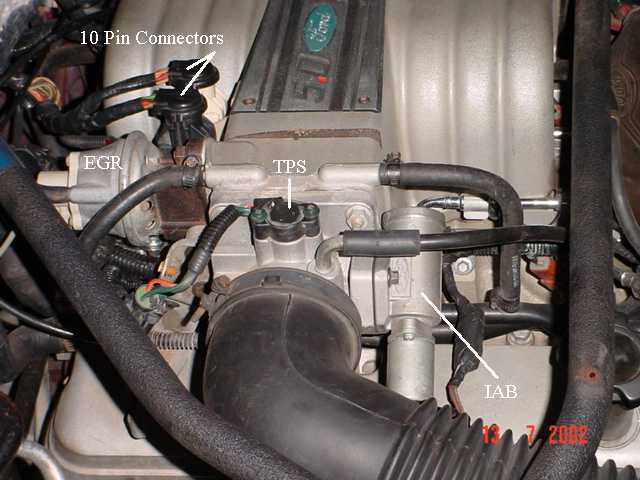
you have ignition problems or wiring problems in the 10 pin black &
white electrical connectors located by the EGR.
How to do a compression test:
Only use a compression tester with a screw in adapter for the spark
plug hole. The other type leaks too much to get an accurate reading.
Your local auto parts store may have a compression tester to rent.
If you do mechanic work on your own car on a regular basis, it would
be a good tool to add to your collection.
With the engine warmed up, remove all spark plugs and prop the
throttle wide open, crank the engine until it the gage reading stops
increasing. On a cold engine, it will be hard to tell what's good &
what's not. Some of the recent posts have numbers ranging from
140-170 psi. If the compression is low, squirt some oil in the cylinder
and do it again – if it comes up, the rings are worn. There should be
no more than 10% difference between cylinders. Use a blow down
leak test (puts compressed air inside cylinders) on cylinders that
have more than 10% difference.
See the link to my site for details on how to build your own blow
down type compression tester.
Find out if is an electrical problem or a mechanical problem with the suspect injector
Fuel injectors inoperative, one or more injectors either on all the time or will not squirt.
Revised 27-Jan-2008 to include expanded testing for proper power to injector wiring
Tools needed: Noid light, Multimeter (volts & ohms), 10 MM socket &
extension, & ratchet.
Note: Do all of the steps and do them in order. The results of the
subsequent tests are based on the prior tests being successfully passed.
1.) Each injector has a red power wire to provide power to the injector. Turn the ignition switch to Run and remove
each injector electrical connector and use the multimeter to check for 12 volts on the red wire. Each injector should
have 12 volts +/- .5 volt. More voltage is always better than less voltage. No 12 volts on a singe injector and the wiring
for that injector is broken inside the engine fuel injector harness.
No 12 volts on all injectors:
A.) Check for a bad connection at the 10 pin connector. Check for 12 volts at red wire on the MAF or TAD/TAB
solenoids mounted on the aft side of the passenger strut tower. Good 12 volts
there and you have a wiring problem with the 10 pin connectors or associated wiring.
See the graphic for the location of the 10 pin connectors:
Diagram courtesy of Tmoss & Stang&2birds
See the graphic for the 10 pin connector circuit layout.

The injector power pin is the VPWR pin in the black 10 pin connector.
B.) Bad ECC power relay. The relay is on top of the computer, it provides power to the fuel injector system.
It is somewhat difficult to get to, since it requires you to remove the computer from its 2 bolt mounting.. If the relay or
socket is bad, you will not have 12 volts on any of the red wires in the engine compartment or to pins
37/57 on the computer. The pins 37/57 are the main power feed to the computer.
Diagram courtesy of Tmoss & Stang&2birds
C.) Blown fuse link – The blue fuse link for the computer is up near the starter solenoid. Check for no 12 volts
on the ECC relay socket or computer black/orange wires. No 12 volts and the fuse link is blown open. If the fuse link blows,
there is no power for any of the computer functions.
D.) Bad wiring. Broken or damaged red wire to the chassis side of the 10 pin connectors.
Some basics about the computer:
Remember that the computer does not supply power for any
actuator or relay. It provides the ground necessary to complete the
circuit. That means one side of the circuit will always be hot, and the
other side will go to ground or below 1 volt as the computer
switches on that circuit.
2.) Get a noid light from AutoZone or other auto parts store, or even better
a set of them

This set is from http://www.toolking.com/ProductInfo.aspx?productid=12492 and costs about $12-$14.
3.) Use the noid light to determine that the injector pulses and isn’t stuck in the on position.
It you have a set of them install all of them and compare the pulse intensity. Install the noid lights,
turn the ignition switch to Run and crank the engine. A light that doesn’t pulse and stays on has a
short to ground in the computer side of the circuit. That can be either a wiring fault or a failed computer.
If this is the case, remove the passenger side lick panel and disconnect the computer connector.
There is one 10 MM bolt holding it in place. Pull the connector all the way out of the
computer so that you can see the computer side pins.

Use the list from the graphic below to find the fuel injector pins for the injectors that
didn’t turn the noid light off.
Diagram courtesy of Tmoss & Stang&2birds

4.) Set the multimeter to low scale Ohms and measure between the
computer ground located below the computer and the suspect fuel injector pins. You should
see greater than 100 K Ohms resistance. If you see less than 100 Ohms, the wiring
between the injector and the computer has a short to ground and needs service.
Check the harness and look for damage, kinks or frayed spots.
5.) A single noid light that never turns on is either a wiring fault, or a
failed computer. Either the injector has no DC power or the computer has
failed and cannot switch the injector circuit to ground. Determine if the
injector has power by using the multimeter to check for 12 volts on the red
wire on the suspect injector connector. No 12 volts and you have a wiring fault.
Check the harness and look for damage, kinks or frayed spots. Check the 10
pin salt & pepper shaker connectors for bent pins, corrosion and damage.
If none of the noid lights flash and you have 12 volts at each injector, check
to see that you have good spark. Before you even think about replacing the
computer, see step 6.
Next Check the fuel injector wiring end to end. Each fuel injector has a red
wire (power) and an non-read wire (computer controlled ground). Set the
multimeter to low ohms and measure each non red fuel injector wire from
the fuel injector connector to the matching pin on the computer connector.
You should see less than 2 Ohms. More than that means a bad connection
or bad wiring.
6.) Use an ohmmeter set on the low resistance scale and measure the resistance of
each injector across the two contacts inside the electrical connector. You should
see between 11-16 ohms. More or less than that is a bad injector. Next measure
between either one of the contacts and the metal on the injector body. You should
see greater than 100,000 ohms. Don’t hold the metal probe tips with your bare
hands when you make this measurement. It will give incorrect results if you do.
Once you have determined that the suspect injectors have good power and
good wiring, the computer is the likely suspect, since a ground is required
to complete a circuit and make it function. The computer provides the
ground: if doesn’t, then the noid light will not flash.
7) If you have gotten this far, then the problem is likely ignition
related. Remember the noid test using all of the noid lights? All of them
were supposed to be equally bright. Since you have already tested all the
electrical side of the fuel injector circuit, the one remaining common item is
the pip sensor inside the distributor. A failing pip sensor, damaged shutter
wheel or bent distributor shaft could all cause the pulse delivered to the
injectors to be faulty. A bad pip sensor will cause all the injectors not to fire
and you will have no spark. Dumping the codes will show a code 14.
8) Spark plugs indicate one or more cylinders not firing: use the
multimeter to measure the resistance of the spark plug wires. The wires
should measure 2000 ohms per foot of length. A 2 foot wire would be 4000
ohms and a 3 foot wire would be 6000 ohms. Some Taylor and Accel wires
have metal cores and will measure much less: that’s OK.
Next examine the spark plug wires very carefully for burn spots, cracks and
damaged insulation. One good thing to try is to start the engine while the
car is a very dark area, open the hood and look for sparks or blue glow.
They indicate the electricity is leaking out of the spark plug wires.
Thanks also to Ford Fuel Injection for some of the graphics.
See the following website for some help from Tmoss (diagram designer) & Stang&2Birds (website host) for help on 88-95 wiring Mustang FAQ - Engine Information Everyone should bookmark this site.
Ignition switch wiring
http://www.veryuseful.com/mustang/tech/engine/images/IgnitionSwitchWiring.gif
Fuel, alternator, A/C and ignition wiring
http://www.veryuseful.com/mustang/tech/engine/images/fuel-alt-links-ign-ac.gif
Complete computer, actuator & sensor wiring diagram for 88-91 Mass Air Mustangs
http://www.veryuseful.com/mustang/tech/engine/images/88-91_5.0_EEC_Wiring_Diagram.gif
Complete computer, actuator & sensor wiring diagram for 91-93 Mass Air Mustangs
http://www.veryuseful.com/mustang/tech/engine/images/91-93_5.0_EEC_Wiring_Diagram.gif
Complete computer, actuator & sensor wiring diagram for94-95 Mass Air Mustangs
http://www.veryuseful.com/mustang/tech/engine/images/94-95_5.0_EEC_Wiring_Diagram.gif
Vacuum diagram 89-93 Mustangs
http://www.veryuseful.com/mustang/tech/engine/images/mustangFoxFordVacuumDiagram.jpg
HVAC vacuum diagram
http://www.veryuseful.com/mustang/tech/engine/images/Mustang_AC_heat_vacuum_controls.gif
TFI module differences & pinout
http://www.veryuseful.com/mustang/tech/engine/images/TFI_5.0_comparison.gif
Fuse box layout
http://www.veryuseful.com/mustang/tech/engine/images/MustangFuseBox.gif
Fix your current problem before compounding it with different parts that may make it worst.
Locate which injector is defective or weak
Cylinder balance test:
Warm the car's engine up to normal operating temperature. Use a
jumper wire or paper clip to put the computer into test mode. Start
the engine and let it go through the normal diagnostic tests, then
quickly press the throttle to the floor. The engine RPM should exceed
2500 RPM's for a brief second. The engine RPM's will increase to about
1450-1600 RPM and hold steady. The engine will shut off power to each
injector, one at a time. When it has sequenced through all 8 injectors,
it will flash 9 for everything OK, or the number of the failing cylinder
such as 2 for cylinder #2. Quickly pressing the throttle again up to
2500 RPM’s will cause the test to re-run with smaller qualifying figures.
Do it a third time, and if the same cylinder shows up, the cylinder is
weak and isn’t putting out power like it should. See the Chilton’s Shop
manual for the complete test procedure
Dump the codes and see what the computer says is wrong…Codes may
be present in the computer even if the Check Engine light isn’t on.
Here's the link to dump the computer codes with only a jumper wire or paper clip and the check
engine light, or test light or voltmeter. I’ve used it for years, and it works great.
You watch the flashing test lamp or Check Engine Light and count the flashes.
Be sure to turn off the A/C, and put the transmission in neutral when dumping the codes.
Fail to do this and you will generate a code 67 and not be able to dump the Engine Running codes.
Dumping the Engine Running codes: The procedure is the same, you start the engine with
the test jumper in place. Be sure the A/C is off and the transmission is in neutral.
You'll get an 11, then a 4 and the engine will speed up to do the EGR test.
After the engine speed decreases back to idle, it will dump the engine running codes.
Here's the link to dump the computer codes with only a jumper wire or paper clip and the
check engine light, or test light or voltmeter. I’ve used it for years, and it works great.
You watch the flashing test lamp or Check Engine Light and count the flashes.
See Troublcodes.net Trouble Codes OBD & OBD2 Trouble Codes and Technical info & Tool Store. By BAT Auto Technical
If your car is an 86-88 stang, you'll have to use the test lamp or voltmeter method.
There is no functional check engine light on the 86-88's except possibly the Cali Mass Air cars.
The STI has a gray connector shell and a white/red wire. It comes from the same
bundle of wires as the self test connector.
89 through 95 cars have a working Check Engine light. Watch it instead of using a test lamp.
The STI has a gray connector shell and a white/red wire. It comes from the same
bundle of wires as the self test connector.
WARNING!!! There is a single dark brown connector with a black/orange wire.
It is the 12 volt power to the under the hood light. Do not jumper it to the computer test connector.
If you do, you will damage the computer.
What to expect:
You should get a code 11 (two single flashes in succession). This says that the computer's
internal workings are OK, and that the wiring to put the computer into diagnostic mode is good.
No code 11 and you have some wiring problems.
Do a compression test on all the cylinders.
Take special note of any cylinder that shows up as weak in the cylinder
balance test. Low compression on one of these cylinders rules out the
injectors as being the most likely cause of the problem. Look at cylinders
that fail the cylinder balance test but have good compression. These
cylinders either have a bad injector, bad spark plug or spark plug wire.
Move the wire and then the spark plug to another cylinder and run the
cylinder balance test again. If it follows the moved wire or spark plug,
you have found the problem. If the same cylinder fails the test again,
the injector is bad. If different cylinders fail the cylinder balance test,
you have ignition problems or wiring problems in the 10 pin black &
white electrical connectors located by the EGR.
How to do a compression test:
Only use a compression tester with a screw in adapter for the spark
plug hole. The other type leaks too much to get an accurate reading.
Your local auto parts store may have a compression tester to rent.
If you do mechanic work on your own car on a regular basis, it would
be a good tool to add to your collection.
With the engine warmed up, remove all spark plugs and prop the
throttle wide open, crank the engine until it the gage reading stops
increasing. On a cold engine, it will be hard to tell what's good &
what's not. Some of the recent posts have numbers ranging from
140-170 psi. If the compression is low, squirt some oil in the cylinder
and do it again – if it comes up, the rings are worn. There should be
no more than 10% difference between cylinders. Use a blow down
leak test (puts compressed air inside cylinders) on cylinders that
have more than 10% difference.
See the link to my site for details on how to build your own blow
down type compression tester.
Find out if is an electrical problem or a mechanical problem with the suspect injector
Fuel injectors inoperative, one or more injectors either on all the time or will not squirt.
Revised 27-Jan-2008 to include expanded testing for proper power to injector wiring
Tools needed: Noid light, Multimeter (volts & ohms), 10 MM socket &
extension, & ratchet.
Note: Do all of the steps and do them in order. The results of the
subsequent tests are based on the prior tests being successfully passed.
1.) Each injector has a red power wire to provide power to the injector. Turn the ignition switch to Run and remove
each injector electrical connector and use the multimeter to check for 12 volts on the red wire. Each injector should
have 12 volts +/- .5 volt. More voltage is always better than less voltage. No 12 volts on a singe injector and the wiring
for that injector is broken inside the engine fuel injector harness.
No 12 volts on all injectors:
A.) Check for a bad connection at the 10 pin connector. Check for 12 volts at red wire on the MAF or TAD/TAB
solenoids mounted on the aft side of the passenger strut tower. Good 12 volts
there and you have a wiring problem with the 10 pin connectors or associated wiring.
See the graphic for the location of the 10 pin connectors:
Diagram courtesy of Tmoss & Stang&2birds
See the graphic for the 10 pin connector circuit layout.
The injector power pin is the VPWR pin in the black 10 pin connector.
B.) Bad ECC power relay. The relay is on top of the computer, it provides power to the fuel injector system.
It is somewhat difficult to get to, since it requires you to remove the computer from its 2 bolt mounting.. If the relay or
socket is bad, you will not have 12 volts on any of the red wires in the engine compartment or to pins
37/57 on the computer. The pins 37/57 are the main power feed to the computer.
Diagram courtesy of Tmoss & Stang&2birds
C.) Blown fuse link – The blue fuse link for the computer is up near the starter solenoid. Check for no 12 volts
on the ECC relay socket or computer black/orange wires. No 12 volts and the fuse link is blown open. If the fuse link blows,
there is no power for any of the computer functions.
D.) Bad wiring. Broken or damaged red wire to the chassis side of the 10 pin connectors.
Some basics about the computer:
Remember that the computer does not supply power for any
actuator or relay. It provides the ground necessary to complete the
circuit. That means one side of the circuit will always be hot, and the
other side will go to ground or below 1 volt as the computer
switches on that circuit.
2.) Get a noid light from AutoZone or other auto parts store, or even better
a set of them
This set is from http://www.toolking.com/ProductInfo.aspx?productid=12492 and costs about $12-$14.
3.) Use the noid light to determine that the injector pulses and isn’t stuck in the on position.
It you have a set of them install all of them and compare the pulse intensity. Install the noid lights,
turn the ignition switch to Run and crank the engine. A light that doesn’t pulse and stays on has a
short to ground in the computer side of the circuit. That can be either a wiring fault or a failed computer.
If this is the case, remove the passenger side lick panel and disconnect the computer connector.
There is one 10 MM bolt holding it in place. Pull the connector all the way out of the
computer so that you can see the computer side pins.
Use the list from the graphic below to find the fuel injector pins for the injectors that
didn’t turn the noid light off.
Diagram courtesy of Tmoss & Stang&2birds
4.) Set the multimeter to low scale Ohms and measure between the
computer ground located below the computer and the suspect fuel injector pins. You should
see greater than 100 K Ohms resistance. If you see less than 100 Ohms, the wiring
between the injector and the computer has a short to ground and needs service.
Check the harness and look for damage, kinks or frayed spots.
5.) A single noid light that never turns on is either a wiring fault, or a
failed computer. Either the injector has no DC power or the computer has
failed and cannot switch the injector circuit to ground. Determine if the
injector has power by using the multimeter to check for 12 volts on the red
wire on the suspect injector connector. No 12 volts and you have a wiring fault.
Check the harness and look for damage, kinks or frayed spots. Check the 10
pin salt & pepper shaker connectors for bent pins, corrosion and damage.
If none of the noid lights flash and you have 12 volts at each injector, check
to see that you have good spark. Before you even think about replacing the
computer, see step 6.
Next Check the fuel injector wiring end to end. Each fuel injector has a red
wire (power) and an non-read wire (computer controlled ground). Set the
multimeter to low ohms and measure each non red fuel injector wire from
the fuel injector connector to the matching pin on the computer connector.
You should see less than 2 Ohms. More than that means a bad connection
or bad wiring.
6.) Use an ohmmeter set on the low resistance scale and measure the resistance of
each injector across the two contacts inside the electrical connector. You should
see between 11-16 ohms. More or less than that is a bad injector. Next measure
between either one of the contacts and the metal on the injector body. You should
see greater than 100,000 ohms. Don’t hold the metal probe tips with your bare
hands when you make this measurement. It will give incorrect results if you do.
Once you have determined that the suspect injectors have good power and
good wiring, the computer is the likely suspect, since a ground is required
to complete a circuit and make it function. The computer provides the
ground: if doesn’t, then the noid light will not flash.
7) If you have gotten this far, then the problem is likely ignition
related. Remember the noid test using all of the noid lights? All of them
were supposed to be equally bright. Since you have already tested all the
electrical side of the fuel injector circuit, the one remaining common item is
the pip sensor inside the distributor. A failing pip sensor, damaged shutter
wheel or bent distributor shaft could all cause the pulse delivered to the
injectors to be faulty. A bad pip sensor will cause all the injectors not to fire
and you will have no spark. Dumping the codes will show a code 14.
8) Spark plugs indicate one or more cylinders not firing: use the
multimeter to measure the resistance of the spark plug wires. The wires
should measure 2000 ohms per foot of length. A 2 foot wire would be 4000
ohms and a 3 foot wire would be 6000 ohms. Some Taylor and Accel wires
have metal cores and will measure much less: that’s OK.
Next examine the spark plug wires very carefully for burn spots, cracks and
damaged insulation. One good thing to try is to start the engine while the
car is a very dark area, open the hood and look for sparks or blue glow.
They indicate the electricity is leaking out of the spark plug wires.
Thanks also to Ford Fuel Injection for some of the graphics.
See the following website for some help from Tmoss (diagram designer) & Stang&2Birds (website host) for help on 88-95 wiring Mustang FAQ - Engine Information Everyone should bookmark this site.
Ignition switch wiring
http://www.veryuseful.com/mustang/tech/engine/images/IgnitionSwitchWiring.gif
Fuel, alternator, A/C and ignition wiring
http://www.veryuseful.com/mustang/tech/engine/images/fuel-alt-links-ign-ac.gif
Complete computer, actuator & sensor wiring diagram for 88-91 Mass Air Mustangs
http://www.veryuseful.com/mustang/tech/engine/images/88-91_5.0_EEC_Wiring_Diagram.gif
Complete computer, actuator & sensor wiring diagram for 91-93 Mass Air Mustangs
http://www.veryuseful.com/mustang/tech/engine/images/91-93_5.0_EEC_Wiring_Diagram.gif
Complete computer, actuator & sensor wiring diagram for94-95 Mass Air Mustangs
http://www.veryuseful.com/mustang/tech/engine/images/94-95_5.0_EEC_Wiring_Diagram.gif
Vacuum diagram 89-93 Mustangs
http://www.veryuseful.com/mustang/tech/engine/images/mustangFoxFordVacuumDiagram.jpg
HVAC vacuum diagram
http://www.veryuseful.com/mustang/tech/engine/images/Mustang_AC_heat_vacuum_controls.gif
TFI module differences & pinout
http://www.veryuseful.com/mustang/tech/engine/images/TFI_5.0_comparison.gif
Fuse box layout
http://www.veryuseful.com/mustang/tech/engine/images/MustangFuseBox.gif
OK still not fixed i stumped , checked codes got 12,21,41,91,34 12 ?????? i know 41 and 91 are O2sensors and 34 is egr wich i have a block off and EGR eliminater ordered but not sure what 12 extended idle means and 21 also tried ECM no fix i put injectors and MAF in also . car runs lean all the time mid and high rpm WTF ?? so tonight i pulled out air charge temp sensor aka IAT ( intake air temp sensor )
it was crusty bad it cant be working right so tomarrow i gonna replace that andcoolant temp sensor we see ! THANKS FOR REPLIES
it was crusty bad it cant be working right so tomarrow i gonna replace that andcoolant temp sensor we see ! THANKS FOR REPLIES
The ECT sensor may be the fix for your problem. Fix it first along with the IAT before chasing other rabbits.
Code 21 or 116 – ECT sensor out of range. Broken or damaged wiring, bad ECT sensor.
Note that that if the outside air temp is below 50 degrees F that the test for the
ECT can be in error. This code may go away as the engine warms up, so don't dump the codes
on a cold engine
The ECT sensor has absolutely nothing to do with the temperature gauge. They are
different animals. The ECT sensor is normally located it the RH front of the engine in
the water feed tubes for the heater.
The ACT & ECT have the same thermistor, so the table values are the same
ACT & ECT test data:
Use Pin 46 on the computer for ground for both ECT & ACT to get most accurate
readings.
Pin 7 on the computer - ECT signal in. at 176 degrees F it should be .80 volts
Pin 25 on the computer - ACT signal in. at 50 degrees F it should be 3.5 volts. It is
a good number if the ACT is mounted in the inlet airbox. If it is mounted in the lower
intake manifold, the voltage readings will be lower because of the heat transfer.
Voltages may be measured across the ECT/ACT by probing the connector from
the rear. A pair of safety pins may be helpful in doing this. Use care in doing it
so that you don't damage the wiring or connector.
Here's the table :
50 degrees F = 3.52 v
68 degrees F = 3.02 v
86 degrees F = 2.62 v
104 degrees F = 2.16 v
122 degrees F = 1.72 v
140 degrees F = 1.35 v
158 degrees F = 1.04 v
176 degrees F = .80 v
194 degrees F = .61
212 degrees F = .47 v
230 degrees F = .36 v
248 degrees F = .28 v
Ohms measures at the computer with the computer disconnected, or at the sensor with the sensor disconnected.
50 degrees F = 58.75 K ohms
68 degrees F = 37.30 K ohms
86 degrees F = 27.27 K ohms
104 degrees F = 16.15 K ohms
122 degrees F = 10.97 K ohms
140 degrees F = 7.60 K ohms
158 degrees F = 5.37 K ohms
176 degrees F = 3.84 K ohms
194 degrees F = 2.80 K ohms
212 degrees F = 2.07 K ohms
230 degrees F = 1.55 K ohms
248 degrees F = 1.18 k ohms
Diagram courtesy of Tmoss & Stang&2birds
See the following website for some help from Tmoss (diagram designer) & Stang&2Birds
(website host) for help on 88-95 wiring Mustang FAQ - Engine Information
Ignition switch wiring
http://www.veryuseful.com/mustang/tech/engine/images/IgnitionSwitchWiring.gif
Fuel, alternator, A/C and ignition wiring
http://www.veryuseful.com/mustang/tech/engine/images/fuel-alt-links-ign-ac.gif
Complete computer, actuator & sensor wiring diagram for 88-91 Mass Air Mustangs
http://www.veryuseful.com/mustang/tech/engine/images/88-91_5.0_EEC_Wiring_Diagram.gif
Vacuum diagram 89-93 Mustangs
http://www.veryuseful.com/mustang/tech/engine/images/mustangFoxFordVacuumDiagram.jpg
Code 12 -Idle Air Bypass motor not controlling idle properly (generally idle too low) - IAB dirty or not working. Take it off and clean it thoroughly with throttle body cleaner. Clean the electrical contacts with non flammable brake parts cleaner at the same time.
See the "Surging Idle Checklist for help with all your idle/stall problems. Everything you need to find and fix idle problems is in there.
The first two posts contain all the updates to the fixes. At last count there were 24 possible causes and fixes for surging idle/stall problems. I continue to update it as more people post fixes or ask questions.
fairmont79
New Member
- Jul 8, 2009
- 1
- 0
- 0
my car had same prob did everything u did new pump,press reg. turned out to be the ground wire going into the tank to the pump had a loose connection on the sending unit, it was pretty burnt up. i would check that forsure
Similar threads
- Replies
- 43
- Views
- 692
- Replies
- 16
- Views
- 615
- Replies
- 21
- Views
- 635
- Replies
- 9
- Views
- 307
- Replies
- 2
- Views
- 259