
I think my 87's fuel pump relay has kicked the bucket. I have ~11v at the red/black, orn/blu, and tan/grn wires going into the relay with the key on, but no voltage at the pink/blk wire. It literally just stopped priming one day, after being parked in my driveway for a week or two. Local auto parts stores only have a 5 terminal relay (mine is 4), for $12. Ford wants $33 for the stock relay, and I have to order it. Any harm in removing terminal 5 from the generic FPRelay and using it?
You are using an out of date browser. It may not display this or other websites correctly.
You should upgrade or use an alternative browser.
You should upgrade or use an alternative browser.
Fuel Pump Relay - will generic version work?
- Thread starter Bill Cool
- Start date
WhiteFox90
New Member
- Apr 27, 2009
- 14
- 0
- 0
The relay should click when you turn the key over...if it's the one under the seat you're talking about?....
It could be three things that's your problem...the relay, the fuel sending unit, or the fuel pump...I have about 3 relays laying around and also a good stock fuel pump, if you want it...I'll give it to you for free...where are you located?
It could be three things that's your problem...the relay, the fuel sending unit, or the fuel pump...I have about 3 relays laying around and also a good stock fuel pump, if you want it...I'll give it to you for free...where are you located?
The original is a SPST and the generic is probably a SPDT. Should be ok.
Do you have continuity to ground in the controlled-ground circuit? You could ground the fuel pump terminal at the self test connector to see if this is the issue.
Good luck.
Do you have continuity to ground in the controlled-ground circuit? You could ground the fuel pump terminal at the self test connector to see if this is the issue.
Good luck.
Fuel Pump Troubleshooting for 87-90 Mustangs
Clue – listen for the fuel pump to prime when you first turn the ignition switch on.
It should run for 2-5 seconds and shut off. This on and off again cycle helps to prevent
flooding the engine when cranking. To trick the fuel pump into running, find the ECC
test connector and jump the connector in the upper RH corner to ground.


If the fuse links are OK, you will have power to the pump. Check fuel pressure –
remove the cap from the Schrader valve behind the alternator and depress the
core. Fuel should squirt out, catch it in a rag. A tire pressure gauge can also be
used if you have one - look for 37-40 PSI. Beware of fire hazard when you do this.
No fuel pressure, possible failed items in order of their probability:
A.) Tripped inertia switch – press reset button on the inertia switch. The hatch
cars hide it under the plastic trim covering the driver's side taillight. Use the
voltmeter or test light to make sure you have power to both sides of the switch
B.) Fuel pump power relay – located under the driver’s seat in most stangs built
before 92.
C.) Clogged fuel filter
D.) Failed fuel pump
E.) Blown fuse link in wiring harness.
F.) Fuel pressure regulator failed. Remove vacuum line from regulator and inspect
for fuel escaping while pump is running.
The electrical circuit for the fuel pump has two paths, a control path and a power
path.
The control path consists of the inertia switch, the computer, and the fuel pump
relay coil. It turns the fuel pump relay on or off under computer control. The
switched power (red wire) from the ECC relay goes to the inertia switch
(red/black wire) then from the inertia switch to the relay coil and then from the
relay coil to the computer (tan/ Lt green wire). The computer provides the ground
path to complete the circuit. This ground causes the relay coil to energize and
close the contacts for the power path. Keep in mind that you can have voltage
to all the right places, but the computer must provide a ground. If there is no
ground, the relay will not close the power contacts.
The power path picks up from a fuse link near the starter relay. Fuse links are like
fuses, except they are pieces of wire and are made right into the wiring harness.
The feed wire from the fuse link (orange/ light blue wire) goes to the fuel pump
relay contacts. When the contacts close because the relay energizes, the power
flows through the contacts to the fuel pump (light pink/black wire). Notice that
pin 19 on the computer is the monitor to make sure the pump has power.
The fuel pump has a black wire that supplies the ground to complete the circuit.
Remember that the computer does not source any power to actuators, relays
or injectors, but provides the ground necessary to complete the circuit. That
means one side of the circuit will always be hot, and the other side will go to
ground or below 1 volt as the computer switches on that circuit.
Diagram courtesy of AutoZone

Now that you have the theory of how it works, it’s time to go digging.
Look for 12 volts at the Orange/Lt. Blue wire (power source for fuel pump relay).
No voltage or low voltage, bad fuse link, bad wiring, bad ignition switch or ignition
switch wiring or connections. There is a mystery connector somewhere under the
driver’s side kick panel, between the fuel pump relay and the fuse link.
Turn on the key and jumper the fuel pump test connector to ground as previously
described. Look for 12 volts at the Light Pink/Black wire (relay controlled power
for the fuel pump). No voltage there means that the relay has failed, or there is a
broken wire in the relay control circuit.
Check the Red/black wire, it should have 12 volts. No 12 volts there, either the
inertia switch is open or has no power to it. Check both sides of the inertia
switch: there should be power on the Red wire and Red/Black wire. Power on the
Red wire and not on the Red/Black wire means the inertia switch is open.
Make sure that the power is off the circuit before making any resistance checks.
If the circuit is powered up, your resistance measurements will be inaccurate.

You will have to drop the tank to inspect the pump power and ground connector
and the pump wiring chassis ground.
Pump wiring: Anytime the ignition switch is in the Run position and the test
point is jumpered to ground, there should be at least 12 volts present on the
black/pink wire. You should see less than 1 Ohm between the black wire(s)
and ground. The chassis ground is up near the spare tire shell. To get some
idea of what a good reading is, short the two meter leads together and
observe the reading. It should only be slightly higher when you measure
the black wire to ground resistance.
The Tan/Lt Green wire provides a ground path for the relay power. With the test
connector jumpered to ground, there should be less than .75 volts. Use a test
lamp with one side connected to battery power and the other side to the
Tan/Lt Green wire. The test light should glow brightly. No glow and you have a
broken wire or bad connection between the test connector and the relay. To test
the wiring from the computer, remove the passenger side kick panel and
disconnect the computer connector. It has a 10 MM bolt that holds it in place.
With the test lamp connected to power, jumper pin 22 to ground and the test
lamp should glow. No glow and the wiring between the computer and the fuel
pump relay is bad.
Computer: If you got this far and everything else checked out good, the computer is suspect.
Remove the test jumper from the ECC test connector located under the hood.
Probe computer pin 22 with a safety pin and ground it to chassis. Make sure the computer
and everything else is connected. Turn the ignition switch to the Run position and observe
the fuel pressure. The pump should run at full pressure.
If it doesn't, the wiring between pin 22 on the computer and the fuel pump relay is bad.
If it does run at full pressure, the computer may have failed.
Keep in mind that the computer only runs the fuel pump for about 2-3 seconds when you turn
the key to the Run position. This can sometimes fool you into thinking the computer has died.
Connect one lead of the test light to power and the other lead to computer pin 22 with a safety pin.
With the ignition switch Off, jumper the computer into self test mode like you are going to dump
the codes. Turn the ignition switch to the Run position. The light will flicker when the computer
does the self test routine. A flickering light is a good computer. No flickering light is a bad computer.
Remove the test jumper from the ECC test connector located under the hood.
Fuel pump runs continuously: The fuel pump relay contacts are stuck together or the Tan/Lt Green wire
has shorted to ground. Remove the fuel pump relay from its socket. Then disconnect the computer and use
an ohmmeter to check out the resistance between the Tan/Lt Green wire and ground. You should see
more than 10 K Ohms (10,000 ohms) or an infinite open circuit. Be sure that the test connector isn’t
jumpered to ground.
If the wiring checks out good, then the computer is the likely culprit.
Prior to replacing the computer, check the computer power ground. The computer has its own
dedicated power ground that comes off the ground pigtail on the battery ground wire. Due to
it's proximity to the battery, it may become corroded by acid fumes from the battery. It is a
black cylinder about 2 1/2" long by 1" diameter with a black/lt green wire. You'll find it up
next to the starter solenoid where the wire goes into the wiring harness
If all of the checks have worked OK to this point, then the computer is bad. The
computers are very reliable and not prone to failure unless there has been
significant electrical trauma to the car. Things like lightning strikes and putting
the battery in backwards or connecting jumper cables backwards are about the
only thing that kills the computer.
See the following website for some help from Tmoss (diagram designer) &
Stang&2Birds (website host)
http://www.veryuseful.com/mustang/tech/engine/images/IgnitionSwitchWiring.gif
http://www.veryuseful.com/mustang/tech/engine/images/fuel-alt-links-ign-ac.gif
http://www.veryuseful.com/mustang/tech/engine/images/88-91eecPinout.gif
Clue – listen for the fuel pump to prime when you first turn the ignition switch on.
It should run for 2-5 seconds and shut off. This on and off again cycle helps to prevent
flooding the engine when cranking. To trick the fuel pump into running, find the ECC
test connector and jump the connector in the upper RH corner to ground.
If the fuse links are OK, you will have power to the pump. Check fuel pressure –
remove the cap from the Schrader valve behind the alternator and depress the
core. Fuel should squirt out, catch it in a rag. A tire pressure gauge can also be
used if you have one - look for 37-40 PSI. Beware of fire hazard when you do this.
No fuel pressure, possible failed items in order of their probability:
A.) Tripped inertia switch – press reset button on the inertia switch. The hatch
cars hide it under the plastic trim covering the driver's side taillight. Use the
voltmeter or test light to make sure you have power to both sides of the switch
B.) Fuel pump power relay – located under the driver’s seat in most stangs built
before 92.
C.) Clogged fuel filter
D.) Failed fuel pump
E.) Blown fuse link in wiring harness.
F.) Fuel pressure regulator failed. Remove vacuum line from regulator and inspect
for fuel escaping while pump is running.
The electrical circuit for the fuel pump has two paths, a control path and a power
path.
The control path consists of the inertia switch, the computer, and the fuel pump
relay coil. It turns the fuel pump relay on or off under computer control. The
switched power (red wire) from the ECC relay goes to the inertia switch
(red/black wire) then from the inertia switch to the relay coil and then from the
relay coil to the computer (tan/ Lt green wire). The computer provides the ground
path to complete the circuit. This ground causes the relay coil to energize and
close the contacts for the power path. Keep in mind that you can have voltage
to all the right places, but the computer must provide a ground. If there is no
ground, the relay will not close the power contacts.
The power path picks up from a fuse link near the starter relay. Fuse links are like
fuses, except they are pieces of wire and are made right into the wiring harness.
The feed wire from the fuse link (orange/ light blue wire) goes to the fuel pump
relay contacts. When the contacts close because the relay energizes, the power
flows through the contacts to the fuel pump (light pink/black wire). Notice that
pin 19 on the computer is the monitor to make sure the pump has power.
The fuel pump has a black wire that supplies the ground to complete the circuit.
Remember that the computer does not source any power to actuators, relays
or injectors, but provides the ground necessary to complete the circuit. That
means one side of the circuit will always be hot, and the other side will go to
ground or below 1 volt as the computer switches on that circuit.
Diagram courtesy of AutoZone
Now that you have the theory of how it works, it’s time to go digging.
Look for 12 volts at the Orange/Lt. Blue wire (power source for fuel pump relay).
No voltage or low voltage, bad fuse link, bad wiring, bad ignition switch or ignition
switch wiring or connections. There is a mystery connector somewhere under the
driver’s side kick panel, between the fuel pump relay and the fuse link.
Turn on the key and jumper the fuel pump test connector to ground as previously
described. Look for 12 volts at the Light Pink/Black wire (relay controlled power
for the fuel pump). No voltage there means that the relay has failed, or there is a
broken wire in the relay control circuit.
Check the Red/black wire, it should have 12 volts. No 12 volts there, either the
inertia switch is open or has no power to it. Check both sides of the inertia
switch: there should be power on the Red wire and Red/Black wire. Power on the
Red wire and not on the Red/Black wire means the inertia switch is open.
Make sure that the power is off the circuit before making any resistance checks.
If the circuit is powered up, your resistance measurements will be inaccurate.
You will have to drop the tank to inspect the pump power and ground connector
and the pump wiring chassis ground.
Pump wiring: Anytime the ignition switch is in the Run position and the test
point is jumpered to ground, there should be at least 12 volts present on the
black/pink wire. You should see less than 1 Ohm between the black wire(s)
and ground. The chassis ground is up near the spare tire shell. To get some
idea of what a good reading is, short the two meter leads together and
observe the reading. It should only be slightly higher when you measure
the black wire to ground resistance.
The Tan/Lt Green wire provides a ground path for the relay power. With the test
connector jumpered to ground, there should be less than .75 volts. Use a test
lamp with one side connected to battery power and the other side to the
Tan/Lt Green wire. The test light should glow brightly. No glow and you have a
broken wire or bad connection between the test connector and the relay. To test
the wiring from the computer, remove the passenger side kick panel and
disconnect the computer connector. It has a 10 MM bolt that holds it in place.
With the test lamp connected to power, jumper pin 22 to ground and the test
lamp should glow. No glow and the wiring between the computer and the fuel
pump relay is bad.
Computer: If you got this far and everything else checked out good, the computer is suspect.
Remove the test jumper from the ECC test connector located under the hood.
Probe computer pin 22 with a safety pin and ground it to chassis. Make sure the computer
and everything else is connected. Turn the ignition switch to the Run position and observe
the fuel pressure. The pump should run at full pressure.
If it doesn't, the wiring between pin 22 on the computer and the fuel pump relay is bad.
If it does run at full pressure, the computer may have failed.
Keep in mind that the computer only runs the fuel pump for about 2-3 seconds when you turn
the key to the Run position. This can sometimes fool you into thinking the computer has died.
Connect one lead of the test light to power and the other lead to computer pin 22 with a safety pin.
With the ignition switch Off, jumper the computer into self test mode like you are going to dump
the codes. Turn the ignition switch to the Run position. The light will flicker when the computer
does the self test routine. A flickering light is a good computer. No flickering light is a bad computer.
Remove the test jumper from the ECC test connector located under the hood.
Fuel pump runs continuously: The fuel pump relay contacts are stuck together or the Tan/Lt Green wire
has shorted to ground. Remove the fuel pump relay from its socket. Then disconnect the computer and use
an ohmmeter to check out the resistance between the Tan/Lt Green wire and ground. You should see
more than 10 K Ohms (10,000 ohms) or an infinite open circuit. Be sure that the test connector isn’t
jumpered to ground.
If the wiring checks out good, then the computer is the likely culprit.
Prior to replacing the computer, check the computer power ground. The computer has its own
dedicated power ground that comes off the ground pigtail on the battery ground wire. Due to
it's proximity to the battery, it may become corroded by acid fumes from the battery. It is a
black cylinder about 2 1/2" long by 1" diameter with a black/lt green wire. You'll find it up
next to the starter solenoid where the wire goes into the wiring harness
If all of the checks have worked OK to this point, then the computer is bad. The
computers are very reliable and not prone to failure unless there has been
significant electrical trauma to the car. Things like lightning strikes and putting
the battery in backwards or connecting jumper cables backwards are about the
only thing that kills the computer.
See the following website for some help from Tmoss (diagram designer) &
Stang&2Birds (website host)
http://www.veryuseful.com/mustang/tech/engine/images/IgnitionSwitchWiring.gif
http://www.veryuseful.com/mustang/tech/engine/images/fuel-alt-links-ign-ac.gif
http://www.veryuseful.com/mustang/tech/engine/images/88-91eecPinout.gif
The relay should click when you turn the key over...if it's the one under the seat you're talking about?....
It could be three things that's your problem...the relay, the fuel sending unit, or the fuel pump...I have about 3 relays laying around and also a good stock fuel pump, if you want it...I'll give it to you for free...where are you located?
Yes it's the one under the seat WhiteFox. It doesn't click, and the fuel pump doesn't prime. I've tested the voltage at all wires, and have nothing at the pink/black wire (the "power out" to the fuel pump).
The original is a SPST and the generic is probably a SPDT. Should be ok.
Do you have continuity to ground in the controlled-ground circuit? You could ground the fuel pump terminal at the self test connector to see if this is the issue.
I swear my DVM continuity check doesn't work, and I can't for the life of me figure out why. Regardless, I did ground the fuel pump terminal at the self-test connector, and the pump primed (though it was a much lower volume than I've ever heard). I took this to mean that the fuel pump relay was bad, if the pump primed when grounding the self-test...
See bold below...
Clue – listen for the fuel pump to prime when you first turn the ignition switch on.
It should run for 2-5 seconds and shut off. This on and off again cycle helps to prevent
flooding the engine when cranking. To trick the fuel pump into running, find the ECC
test connector and jump the connector in the upper RH corner to ground.
I did this, and the fuel pump ran.
If the fuse links are OK, you will have power to the pump. Check fuel pressure –
remove the cap from the Schrader valve behind the alternator and depress the
core. Fuel should squirt out, catch it in a rag. A tire pressure gauge can also be
used if you have one - look for 37-40 PSI. Beware of fire hazard when you do this.
Fuel does come out, but it doesn't "squirt" out...it moreso "pours" out at a relatively rapid pace. Using my cheapo tire pressure gauge registered no PSI, nor did using the fuel pressure gauge I rented from AutoZone (it's entirely possible I'm using that one wrong, but it seems pretty straightforward to me).
No fuel pressure, possible failed items in order of their probability:
A.) Tripped inertia switch – press reset button on the inertia switch. The hatch
cars hide it under the plastic trim covering the driver's side taillight. Use the
voltmeter or test light to make sure you have power to both sides of the switch
Power OK to both sides.
B.) Fuel pump power relay – located under the driver’s seat in most stangs built
before 92.
See first post.
C.) Clogged fuel filter
Just replaced the fuel filter ~15 miles ago. I double checked the flow direction. I suppose it's possible that gunk in the tank has totally clogged the filter already (car sat for 5 years), but that wouldn't explain the pump not priming.
D.) Failed fuel pump
E.) Blown fuse link in wiring harness.
Where is this link?
F.) Fuel pressure regulator failed. Remove vacuum line from regulator and inspect
for fuel escaping while pump is running.
The electrical circuit for the fuel pump has two paths, a control path and a power
path.
The control path consists of the inertia switch, the computer, and the fuel pump
relay coil. It turns the fuel pump relay on or off under computer control. The
switched power (red wire) from the ECC relay goes to the inertia switch
(red/black wire) then from the inertia switch to the relay coil and then from the
relay coil to the computer (tan/ Lt green wire). The computer provides the ground
path to complete the circuit. This ground causes the relay coil to energize and
close the contacts for the power path. Keep in mind that you can have voltage
to all the right places, but the computer must provide a ground. If there is no
ground, the relay will not close the power contacts.
The power path picks up from a fuse link near the starter relay. Fuse links are like
fuses, except they are pieces of wire and are made right into the wiring harness.
The feed wire from the fuse link (orange/ light blue wire) goes to the fuel pump
relay contacts. When the contacts close because the relay energizes, the power
flows through the contacts to the fuel pump (light pink/black wire). Notice that
pin 19 on the computer is the monitor to make sure the pump has power.
The fuel pump has a black wire that supplies the ground to complete the circuit.
Remember that the computer does not source any power to actuators, relays
or injectors, but provides the ground necessary to complete the circuit. That
means one side of the circuit will always be hot, and the other side will go to
ground or below 1 volt as the computer switches on that circuit.
Diagram courtesy of AutoZone
Now that you have the theory of how it works, it’s time to go digging.
Look for 12 volts at the Orange/Lt. Blue wire (power source for fuel pump relay).
Have 12 volts
No voltage or low voltage, bad fuse link, bad wiring, bad ignition switch or ignition
switch wiring or connections. There is a mystery connector somewhere under the
driver’s side kick panel, between the fuel pump relay and the fuse link.
Turn on the key and jumper the fuel pump test connector to ground as previously
described. Look for 12 volts at the Light Pink/Black wire (relay controlled power
for the fuel pump). No voltage there means that the relay has failed, or there is a
broken wire in the relay control circuit.
I did not check for 12 volts while jumping the self-test connector...
The relay should click when you turn the key over...if it's the one under the seat you're talking about?....
It could be three things that's your problem...the relay, the fuel sending unit, or the fuel pump...I have about 3 relays laying around and also a good stock fuel pump, if you want it...I'll give it to you for free...where are you located?
That would be awesome dude, thanks! I live in Derby, CT - near New Haven. If you're not local, I'd be happy to pay for shipping, and even for the relay itself.
You really need to keep going on the relay testing. If you have priming with the self-test FP wire grounded, the EEC might not be sending a ground signal to the relay.
This would be separate than an issue with fuel pressure or volume but you really need to be sure the electrical side is ok first. The gauges can be finicky. Sometimes you have to be sure the little one-way valve inside the gauge's connector (that the adapter screws into) is being depressed. Otherwise it's like checking tire pressure but not pushing the tire gauge all the way onto the Schraeder valve.
This would be separate than an issue with fuel pressure or volume but you really need to be sure the electrical side is ok first. The gauges can be finicky. Sometimes you have to be sure the little one-way valve inside the gauge's connector (that the adapter screws into) is being depressed. Otherwise it's like checking tire pressure but not pushing the tire gauge all the way onto the Schraeder valve.
Turn on the key and jumper the fuel pump test connector to ground as previously described. Look for 12 volts at the Light Pink/Black wire (relay controlled power for the fuel pump). No voltage there means that the relay has failed, or there is a broken wire in the relay control circuit.
Look for 12 volts on each side of the fuel pump power wiring with the pump running. Check the Orange/lt blue wire - less than 12 volts and the fuse link or power feed wiring to the fuel pump is bad. The fuse link is in the wiring harness up near the starter solenoid or relay.
12 volts good at Orange/lt blue wire on the fuel pump relay - check 12 volts on the Pink/Black wire.
Less than 12 volts and the realy contact or relay wiring socket is bad. Check the relay socket for broken wiring or corrosion in thes socket contacts.
Fuse link diagram
Diagrams courtesy of Tmoss & Stang&2birds
See the following website for some help from Tmoss (diagram designer) & Stang&2Birds
(website host) for help on 86-95 5.0 Mustang wiring Mustang FAQ - Engine Information Everyone should bookmark this site.
Ignition switch wiring
http://www.veryuseful.com/mustang/tech/engine/images/IgnitionSwitchWiring.gif
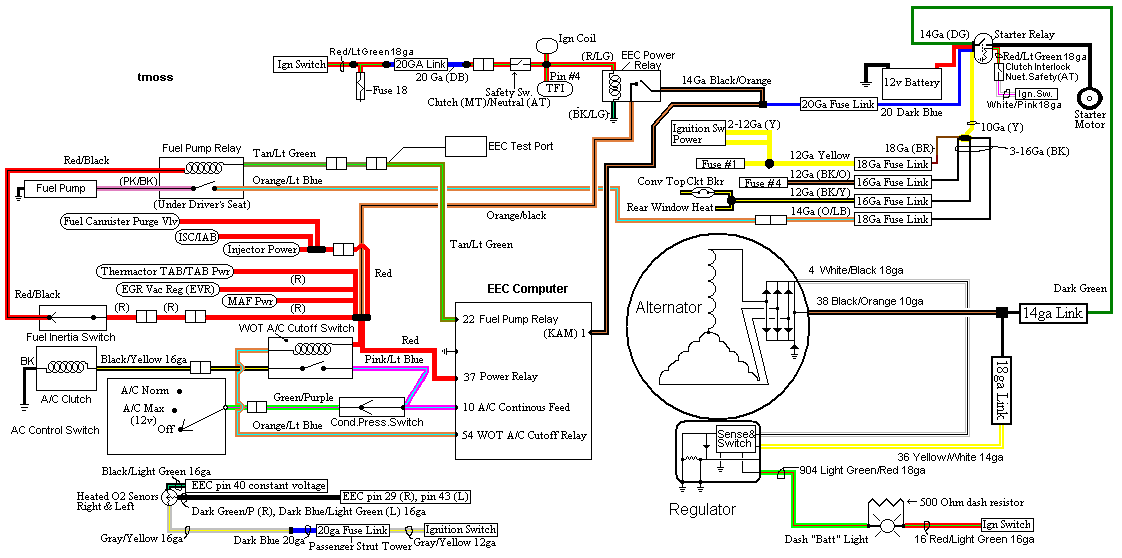
Fuel, alternator, A/C and ignition wiring
http://www.veryuseful.com/mustang/tech/engine/images/fuel-alt-links-ign-ac.gif
Complete computer, actuator & sensor wiring diagram for 88-91 5.0 Mass Air Mustangs
http://www.veryuseful.com/mustang/tech/engine/images/88-91_5.0_EEC_Wiring_Diagram.gif
Complete computer, actuator & sensor wiring diagram for 91-93 5.0 Mass Air Mustangs
http://www.veryuseful.com/mustang/tech/engine/images/91-93_5.0_EEC_Wiring_Diagram.gif
Complete computer, actuator & sensor wiring diagram for 94-95 5.0 Mass Air Mustangs
http://www.veryuseful.com/mustang/tech/engine/images/94-95_5.0_EEC_Wiring_Diagram.gif
Vacuum diagram 89-93 Mustangs
http://www.veryuseful.com/mustang/tech/engine/images/mustangFoxFordVacuumDiagram.jpg
HVAC vacuum diagram
http://www.veryuseful.com/mustang/tech/engine/images/Mustang_AC_heat_vacuum_controls.gif
TFI module differences & pinout
http://www.veryuseful.com/mustang/tech/engine/images/TFI_5.0_comparison.gif
Fuse box layout
http://www.veryuseful.com/mustang/tech/engine/images/MustangFuseBox.gif
Look for 12 volts on each side of the fuel pump power wiring with the pump running. Check the Orange/lt blue wire - less than 12 volts and the fuse link or power feed wiring to the fuel pump is bad. The fuse link is in the wiring harness up near the starter solenoid or relay.
12 volts good at Orange/lt blue wire on the fuel pump relay - check 12 volts on the Pink/Black wire.
Less than 12 volts and the realy contact or relay wiring socket is bad. Check the relay socket for broken wiring or corrosion in thes socket contacts.
Fuse link diagram
Diagrams courtesy of Tmoss & Stang&2birds
See the following website for some help from Tmoss (diagram designer) & Stang&2Birds
(website host) for help on 86-95 5.0 Mustang wiring Mustang FAQ - Engine Information Everyone should bookmark this site.
Ignition switch wiring
http://www.veryuseful.com/mustang/tech/engine/images/IgnitionSwitchWiring.gif
Fuel, alternator, A/C and ignition wiring
http://www.veryuseful.com/mustang/tech/engine/images/fuel-alt-links-ign-ac.gif
Complete computer, actuator & sensor wiring diagram for 88-91 5.0 Mass Air Mustangs
http://www.veryuseful.com/mustang/tech/engine/images/88-91_5.0_EEC_Wiring_Diagram.gif
Complete computer, actuator & sensor wiring diagram for 91-93 5.0 Mass Air Mustangs
http://www.veryuseful.com/mustang/tech/engine/images/91-93_5.0_EEC_Wiring_Diagram.gif
Complete computer, actuator & sensor wiring diagram for 94-95 5.0 Mass Air Mustangs
http://www.veryuseful.com/mustang/tech/engine/images/94-95_5.0_EEC_Wiring_Diagram.gif
Vacuum diagram 89-93 Mustangs
http://www.veryuseful.com/mustang/tech/engine/images/mustangFoxFordVacuumDiagram.jpg
HVAC vacuum diagram
http://www.veryuseful.com/mustang/tech/engine/images/Mustang_AC_heat_vacuum_controls.gif
TFI module differences & pinout
http://www.veryuseful.com/mustang/tech/engine/images/TFI_5.0_comparison.gif
Fuse box layout
http://www.veryuseful.com/mustang/tech/engine/images/MustangFuseBox.gif
Similar threads
- Replies
- 4
- Views
- 97
- Replies
- 12
- Views
- 733
- Replies
- 7
- Views
- 298
- Replies
- 1
- Views
- 457
- Replies
- 33
- Views
- 2K