
You are using an out of date browser. It may not display this or other websites correctly.
You should upgrade or use an alternative browser.
You should upgrade or use an alternative browser.
HELP CODE 92, how to test egr circuit?
- Thread starter jssblues
- Start date
We don't need an individual tech thread for each Code.
You have codes 34, 84 and 92
All you need is one thread
You have codes 34, 84 and 92
All you need is one thread
what would you do if fuel pressure was too high??????
Check to see if it is high before you worry about that.
Check fuel pressure – remove the cap from the Schrader valve behind the alternator and connect fuel pressure test gauge
to Schrader valve. The fuel pressure regulator is located on the passenger side of the car behind the throttle body.
Disconnect the small vacuum line from the fuel pressure regulator and plug the line. Leave the port where you removed the
line uncapped and open to the atmosphere.
Start the car and observe the pressure: you should see 37-41 PSI at idle.
Be sure to unplug and reconnect the vacuum line to the fuel pressure regulator when you have finished your tests.
Fuel pressure test gauge are available for rent/loan at most major auto parts stores like AutoZone.
You got a 92 which means ony the driver's side bank of cylinders has a problem.
Look for a cylinder with a bad spark plug, bad spark plug wire or leaking injector.
Do a cylinder balance test to try and isolate the defective cylinder(s)
Cylinder balance test:
Warm the car's engine up to normal operating temperature. Use a
jumper wire or paper clip to put the computer into test mode. Start
the engine and let it go through the normal diagnostic tests, then
quickly press the throttle to the floor. The engine RPM should exceed
2500 RPM's for a brief second. The engine RPM's will increase to about
1450-1600 RPM and hold steady. The engine will shut off power to each
injector, one at a time. When it has sequenced through all 8 injectors,
it will flash 9 for everything OK, or the number of the failing cylinder
such as 2 for cylinder #2. Quickly pressing the throttle again up to
2500 RPM’s will cause the test to re-run with smaller qualifying figures.
Do it a third time, and if the same cylinder shows up, the cylinder is
weak and isn’t putting out power like it should. See the Chilton’s Shop
manual for the complete test procedure
Dump the codes and see what the computer says is wrong…Codes may be present in the computer
even if the Check Engine light isn’t on.
Here's the link to dump the computer codes with only a jumper wire or paper clip and the check
engine light, or test light or voltmeter. I’ve used it for years, and it works great. You watch the flashing
test lamp or Check Engine Light and count the flashes.
See Troublcodes.net Trouble Codes OBD & OBD2 Trouble Codes and Technical info & Tool Store. By BAT Auto Technical


If your car is an 86-88 stang, you'll have to use the test lamp or voltmeter method. There is no
functional check engine light on the 86-88's except possibly the Cali Mass Air cars.
The STI has a gray connector shell and a white/red wire. It comes from the same
bundle of wires as the self test connector.
89 through 95 cars have a working Check Engine light. Watch it instead of using a test lamp.
The STI has a gray connector shell and a white/red wire. It comes from the same
bundle of wires as the self test connector.
Do not jumper anything to the single dark brown connector. It is the power for the
under the hood light. It is in another bundle of wires near the windshield wiper.
Do a compression test on all the cylinders.
Take special note of any cylinder that shows up as weak in the cylinder
balance test. Low compression on one of these cylinders rules out the
injectors as being the most likely cause of the problem. Look at cylinders
that fail the cylinder balance test but have good compression. These
cylinders either have a bad injector, bad spark plug or spark plug wire.
Move the wire and then the spark plug to another cylinder and run the
cylinder balance test again. If it follows the moved wire or spark plug,
you have found the problem. If the same cylinder fails the test again,
the injector is bad. If different cylinders fail the cylinder balance test,
you have ignition problems or wiring problems in the 10 pin black &
white electrical connectors located by the EGR.
How to do a compression test:
Only use a compression tester with a screw in adapter for the spark
plug hole. The other type leaks too much to get an accurate reading.
Your local auto parts store may have a compression tester to rent.
If you do mechanic work on your own car on a regular basis, it would
be a good tool to add to your collection.
With the engine warmed up, remove all spark plugs and prop the
throttle wide open, crank the engine until it the gage reading stops
increasing. On a cold engine, it will be hard to tell what's good &
what's not. Some of the recent posts have numbers ranging from
140-170 psi. If the compression is low, squirt some oil in the cylinder
and do it again – if it comes up, the rings are worn. There should be
no more than 10% difference between cylinders. Use a blow down
leak test (puts compressed air inside cylinders) on cylinders that
have more than 10% difference.
See the link to my site for details on how to build your own blow
down type compression tester.
Beasty306GT
Active Member
once again another day wasted and once again...CODE 84
all circuits test fine, such a mystery and i cant seem to get alot of help on here, just the same old egr diagram over and again. i have been tinkering with this all damn weekend, replaced egr,checked vaccum lines etc..
all circuits test fine, such a mystery and i cant seem to get alot of help on here, just the same old egr diagram over and again. i have been tinkering with this all damn weekend, replaced egr,checked vaccum lines etc..
Code 34 Or 334 - EGR voltage above closed limit - Failed sensor, carbon between EGR pintle valve and seat holding the valve off its seat. Remove the EGR valve and clean it with carbon remover. Prior to re-installing see if you can blow air through the flange side of the EGR by mouth. If it leaks, there is carbon stuck on the pintle valve seat, replace the EGR valve ($85-$95).
If the blow by test passes, and you have replaced the sensor, then you have electrical ground problems. Check the resistance between the black/white wire on the MAP/BARO sensor and then the black/white wire on the EGR and the same wire on the TPS. It should be less than 1.5 ohm. Next check the resistance between the black/white wire and the negative battery post. It should be less than 1.5 ohm.
Note that all resistance tests must be done with power off. Measuring resistance with a circuit powered on will give false readings and possibly damage the meter.
Let’s put on our Inspector Gadget propeller head beanies and think about how this works:
The EGR sensor is a variable resistor with ground on one leg and Vref (5 volts) on the other. Its’ resistance ranges from 4000 to 5500 Ohms measured between Vref & ground, depending on the sensor. The center connection of the variable resistor is the slider that moves in response to the amount of vacuum applied. The slider has some minimum value of resistance greater than 100 ohms so that the computer always sees a voltage present at its’ input. If the value was 0 ohms, there would be no voltage output. Then the computer would not be able to distinguish between a properly functioning sensor and one that had a broken wire or bad connection. The EGR I have in hand reads 700 Ohms between the slider (EPV) and ground (SIG RTN) at rest with no vacuum applied. The EGR valve or sensor may cause the voltage to be above closed limits due to the manufacturing tolerances that cause the EGR sensor to rest at a higher position than it should.
The following sensors are connected to the white 10 pin connector (salt & pepper engine harness connectors)

This will affect idle quality by diluting the intake air charge
Late Model Restoration has the Ford Racing M-12071-N302 kit with the EGR valve & sensor along with the ACT & ECT sensors for $45. See * * * N/A * * * 86-93 SENSOR KIT, 5.0L EFI, INCLUDES EGR VALVE & SENSOR, COOLANT TEMP SENSOR, & AIR CHARGE TEMP SENSOR MUSTANG for more details
Code 84 EGR Vacuum Regulator failure – Broken vacuum lines, no +12 volts, regulator coil open circuit. The EVR regulates vacuum to the EGR valve to maintain the correct amount of vacuum. The solenoid coil should measure 20-70 Ohms resistance. The regulator has a vacuum feed on the bottom which draws from the intake manifold. The other vacuum line is regulated vacuum going to the EGR valve. One side of the EVR electrical circuit is +12 volts anytime the ignition switch is in the run position. The other side of the electrical circuit is the ground path and is controlled by the computer. The computer switches the ground on and off to control the regulator solenoid.
Code 42 & 92 (engine running) System rich - Fuel control or (memory) System was rich for 15 seconds or more (no HO2S switching) - Fuel control. Look for leaking injectors, fuel pressure too high, cylinder(s) not firing due to bad ignition.
Code 42 is the RH side sensor,
Code 92 is the LH side sensor.
Testing the O2 sensors
Measuring the O2 sensor voltage at the computer will give you a good idea of how well they are working. You'll have to pull the passenger side kick panel off to gain access to the computer connector. Remove the plastic wiring cover to get to the back side of the wiring. Use a safety pin or paper clip to probe the connections from the rear. The computer pins are 29 (LH O2 with a dark green/pink wire) and 43 (RH O2 with a dark blue/pink wire). Use the ground next to the computer to ground the voltmeter. The O2 sensor voltage should switch between .2-.9 volt at idle.
There is a fuse link for the O2 sensor heater power. According to Ranchero50, it is in the wiring near the passenger side hood hinge. Measuring the voltages will give a clue if it has shorted to the O2 sensor signal lead. The O2 sensor voltage should switch between .2-.9 volt at idle.
EGR Theory and operation
Some basic theory to clarify how things work is in order…
The EGR shuts off at Wide Open Throttle (WOT), so it has minimal effect on performance. The addition of exhaust gas drops combustion temperature, increases gas mileage and reduces the tendency of the engine to ping. It can also reduce HC emissions by reducing fuel consumption. The primary result of EGR usage is a reduction in NOx emissions.
The EGR system has a vacuum source (line from the intake manifold) that goes to the EVR, computer operated electronic vacuum regulator. The EVR is located on the back of the passenger side shock strut tower. The computer uses RPM, Load. and some other factors to tell the EVR to pass vacuum to open the EGR valve. The EGR valve and the passages in the heads and intake manifold route exhaust gas to the EGR spacer (throttle body spacer). The EGR sensor tells the computer how far the EGR valve is open. Then computer adjusts the signal sent to the EVR to hold, increase or decrease the vacuum. The computer adds spark advance to compensate for the recirculated gases and the slower rate they burn at.

Troubleshooting:
There should be no vacuum at the EGR valve when at idle. If there is, the EVR (electronic vacuum regulator) mounted on the backside of the passenger side wheelwell is suspect. Check the vacuum line plumbing to make sure the previous owner didn’t cross the vacuum lines.
Diagram courtesy of Tmoss & Stang&2birds. (the diagram says 88 GT, but the EGR part is the same for 86-93 Mustangs)
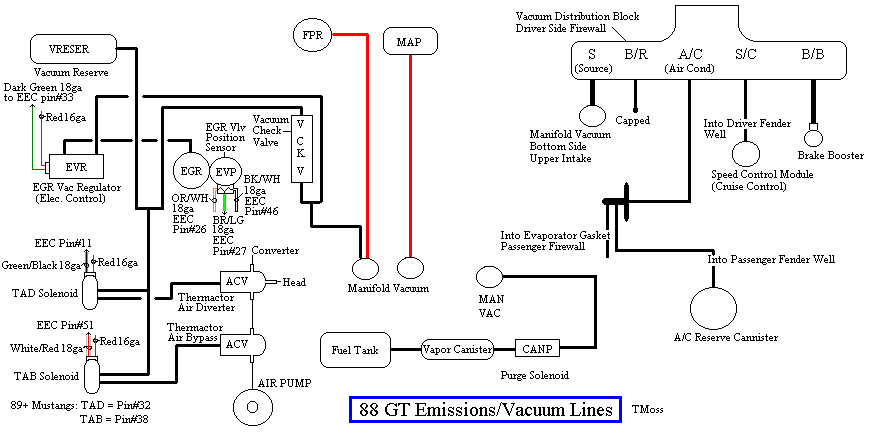
The EGR sensor is basically a variable resistor, like the volume control on a radio. One end is 5 volt VREF power from the computer (red/orange wire). One end is computer signal ground (black/white), and the middle wire (brown/lt green) is the signal output from the EGR sensor. It is designed to always have some small voltage output from it anytime the ignition switch is the Run position. That way the computer knows the sensor & the wiring is OK. No voltage on computer pin 27 (brown/lt green wire) and the computer thinks the sensor is bad or the wire is broken and sets code 31. The voltage output can range from approximately .6-.85 volt.
EGR test procedure courtesy of cjones
to check the EGR valve:
bring the engine to normal temp.
connect a vacuum pump to the EGR Valve
apply 5in vacuum to the valve.
if engine stumbled or died then EGR Valve and passage(there is a passageway through the heads and intake) are good.
if engine did NOT stumble or die then either the EGR Valve is bad and/or the passage is blocked.
if engine stumbled, connect vacuum gauge to the hose coming off of the EGR Valve
snap throttle to 2500 RPM (remember snap the throttle don't hold it there).
did the vacuum gauge show about 2-5 in vacuum?
if not, check for manifold vacuum at the EGR vacuum valve.
if you have manifold vacuum then connect vacuum gauge to the EGR valve side of the vacuum valve and snap throttle to 2500 RPM.
should read about 2-5 in vacuum
Late Model Restoration has the Ford Racing M-12071-N302 kit with the EGR valve & sensor along with the ACT & ECT sensors for $45. See http://www.latemodelrestoration.com/iwwida.pvx?;item?item_no=M12071N302 1&comp=LRS for more details
If the blow by test passes, and you have replaced the sensor, then you have electrical ground problems. Check the resistance between the black/white wire on the MAP/BARO sensor and then the black/white wire on the EGR and the same wire on the TPS. It should be less than 1.5 ohm. Next check the resistance between the black/white wire and the negative battery post. It should be less than 1.5 ohm.
Note that all resistance tests must be done with power off. Measuring resistance with a circuit powered on will give false readings and possibly damage the meter.
Let’s put on our Inspector Gadget propeller head beanies and think about how this works:
The EGR sensor is a variable resistor with ground on one leg and Vref (5 volts) on the other. Its’ resistance ranges from 4000 to 5500 Ohms measured between Vref & ground, depending on the sensor. The center connection of the variable resistor is the slider that moves in response to the amount of vacuum applied. The slider has some minimum value of resistance greater than 100 ohms so that the computer always sees a voltage present at its’ input. If the value was 0 ohms, there would be no voltage output. Then the computer would not be able to distinguish between a properly functioning sensor and one that had a broken wire or bad connection. The EGR I have in hand reads 700 Ohms between the slider (EPV) and ground (SIG RTN) at rest with no vacuum applied. The EGR valve or sensor may cause the voltage to be above closed limits due to the manufacturing tolerances that cause the EGR sensor to rest at a higher position than it should.
The following sensors are connected to the white 10 pin connector (salt & pepper engine harness connectors)
This will affect idle quality by diluting the intake air charge
Late Model Restoration has the Ford Racing M-12071-N302 kit with the EGR valve & sensor along with the ACT & ECT sensors for $45. See * * * N/A * * * 86-93 SENSOR KIT, 5.0L EFI, INCLUDES EGR VALVE & SENSOR, COOLANT TEMP SENSOR, & AIR CHARGE TEMP SENSOR MUSTANG for more details
Code 84 EGR Vacuum Regulator failure – Broken vacuum lines, no +12 volts, regulator coil open circuit. The EVR regulates vacuum to the EGR valve to maintain the correct amount of vacuum. The solenoid coil should measure 20-70 Ohms resistance. The regulator has a vacuum feed on the bottom which draws from the intake manifold. The other vacuum line is regulated vacuum going to the EGR valve. One side of the EVR electrical circuit is +12 volts anytime the ignition switch is in the run position. The other side of the electrical circuit is the ground path and is controlled by the computer. The computer switches the ground on and off to control the regulator solenoid.
Code 42 & 92 (engine running) System rich - Fuel control or (memory) System was rich for 15 seconds or more (no HO2S switching) - Fuel control. Look for leaking injectors, fuel pressure too high, cylinder(s) not firing due to bad ignition.
Code 42 is the RH side sensor,
Code 92 is the LH side sensor.
Testing the O2 sensors
Measuring the O2 sensor voltage at the computer will give you a good idea of how well they are working. You'll have to pull the passenger side kick panel off to gain access to the computer connector. Remove the plastic wiring cover to get to the back side of the wiring. Use a safety pin or paper clip to probe the connections from the rear. The computer pins are 29 (LH O2 with a dark green/pink wire) and 43 (RH O2 with a dark blue/pink wire). Use the ground next to the computer to ground the voltmeter. The O2 sensor voltage should switch between .2-.9 volt at idle.
There is a fuse link for the O2 sensor heater power. According to Ranchero50, it is in the wiring near the passenger side hood hinge. Measuring the voltages will give a clue if it has shorted to the O2 sensor signal lead. The O2 sensor voltage should switch between .2-.9 volt at idle.
EGR Theory and operation
Some basic theory to clarify how things work is in order…
The EGR shuts off at Wide Open Throttle (WOT), so it has minimal effect on performance. The addition of exhaust gas drops combustion temperature, increases gas mileage and reduces the tendency of the engine to ping. It can also reduce HC emissions by reducing fuel consumption. The primary result of EGR usage is a reduction in NOx emissions.
The EGR system has a vacuum source (line from the intake manifold) that goes to the EVR, computer operated electronic vacuum regulator. The EVR is located on the back of the passenger side shock strut tower. The computer uses RPM, Load. and some other factors to tell the EVR to pass vacuum to open the EGR valve. The EGR valve and the passages in the heads and intake manifold route exhaust gas to the EGR spacer (throttle body spacer). The EGR sensor tells the computer how far the EGR valve is open. Then computer adjusts the signal sent to the EVR to hold, increase or decrease the vacuum. The computer adds spark advance to compensate for the recirculated gases and the slower rate they burn at.
Troubleshooting:
There should be no vacuum at the EGR valve when at idle. If there is, the EVR (electronic vacuum regulator) mounted on the backside of the passenger side wheelwell is suspect. Check the vacuum line plumbing to make sure the previous owner didn’t cross the vacuum lines.
Diagram courtesy of Tmoss & Stang&2birds. (the diagram says 88 GT, but the EGR part is the same for 86-93 Mustangs)
The EGR sensor is basically a variable resistor, like the volume control on a radio. One end is 5 volt VREF power from the computer (red/orange wire). One end is computer signal ground (black/white), and the middle wire (brown/lt green) is the signal output from the EGR sensor. It is designed to always have some small voltage output from it anytime the ignition switch is the Run position. That way the computer knows the sensor & the wiring is OK. No voltage on computer pin 27 (brown/lt green wire) and the computer thinks the sensor is bad or the wire is broken and sets code 31. The voltage output can range from approximately .6-.85 volt.
EGR test procedure courtesy of cjones
to check the EGR valve:
bring the engine to normal temp.
connect a vacuum pump to the EGR Valve
apply 5in vacuum to the valve.
if engine stumbled or died then EGR Valve and passage(there is a passageway through the heads and intake) are good.
if engine did NOT stumble or die then either the EGR Valve is bad and/or the passage is blocked.
if engine stumbled, connect vacuum gauge to the hose coming off of the EGR Valve
snap throttle to 2500 RPM (remember snap the throttle don't hold it there).
did the vacuum gauge show about 2-5 in vacuum?
if not, check for manifold vacuum at the EGR vacuum valve.
if you have manifold vacuum then connect vacuum gauge to the EGR valve side of the vacuum valve and snap throttle to 2500 RPM.
should read about 2-5 in vacuum
Late Model Restoration has the Ford Racing M-12071-N302 kit with the EGR valve & sensor along with the ACT & ECT sensors for $45. See http://www.latemodelrestoration.com/iwwida.pvx?;item?item_no=M12071N302 1&comp=LRS for more details
joel5.0
Member
Code 33 is a result of 84 (EVR solenoid circuit failure). To fix 33, you need to make sure the EVR solenoid is OK, installed, and vacuum lines routed as required. For code 92, I suggest switching O2 sensors from sides....... if code 42 shows up afterwards, instead of 92, that O2 sensor is at fault.
i have been after my code 84 problem for some time now, cant seem to figure it out
Test your EVR. It's on the passenger side Shock tower. It is the larger of the 3 items on the back side of the shock tower, usually above the other two.
It is a 2 wire hookup, with 2 vaccum lines also. Like JR stated above, if you do a koeo test, while having a test light hooked up to both wires of the EVR, you'll see the light come on when the computer tests it's function. If you don't get a light you probably have a wiring issue.
If the light comes on, you can hook a vacuum gauge to the vacuum line off the EGR valve. While the computer tests the EVR, you should see vacuum on the gauge. If you don't, you either have a bad/broken vacuum line to or from the EVR, or a bad EVR.
Unplug the EVR and check the resistance across it's two connectors. Make sure it is within the spec that JR provided. If not, you need to replace the EVR.
the only thing is the car doesnt die out when you manually apply vaccum to the egr
Test out your new EVR because new doesn't always mean good.
When you apply vacuum to the EGR can you see it move? If it has a punctured diaphram it won't move under vacuum and you'll need to replace the EGR valve.
If it does move and the motor doesn't die or drop in RPMs, you have blocked EGR passages, either unintentionally because there is crap that's built up in the passages, or they were intentionally blocked.
There may be a blockoff plate under the EGR valve at the spacer, or someone may have blocked the EGR passage between the lower intake manifold and the head.
EDIT: It's also possible that the car has non-egr heads, with no EGR passages. The EGR can also be blocked between the upper and lower intake manifolds, or between the upper intake and the EGR spacer.
i did notice something different about my heads, i had them worked by the shop that did my engine work, but when i hooked everything back up to the motor, one hole for my alternator bracket and one hole for the power steering bracket was all of the sudden bigger, i kept all my bolts organized during takedown, had to heli-coil the hole......strange
i did notice something different about my heads, i had them worked by the shop that did my engine work, but when i hooked everything back up to the motor, one hole for my alternator bracket and one hole for the power steering bracket was all of the sudden bigger, i kept all my bolts organized during takedown, had to heli-coil the hole......strange
I would have you say you did not recieve the same heads you dropped off.
Similar threads
- Replies
- 4
- Views
- 302
- Replies
- 12
- Views
- 694
- Replies
- 1
- Views
- 58
- Replies
- 41
- Views
- 498
- Replies
- 3
- Views
- 255