How To Install A Door Skin

I searched and couldn't find much info so I thought people here might be interested in seeing what it takes to install a door skin.

View attachment 392077
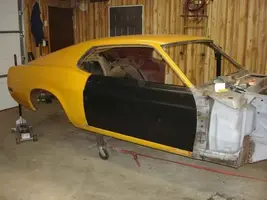
Front corner of the door

View attachment 392079
rear corner of the door

Not too bad, but someone had already put a skin on this door so I decided not to mess around with it.

View attachment 392081
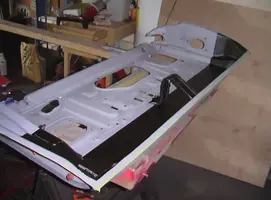
The body guy who put the skin on did it wrong - you can see where he welded the edges of the skin to the door. Not good. The fact that it rusted out almost as bad as the orginal door on the other side, it was installed wrong with some parts not even welded as they should be and there was a skim coat on the entire bottom of the new skin a 1/4 inch thick was further proof it was time for a new skin.

Use a high speed sander to separate the skin from the door.

View attachment 392083
The skin will split and then it comes off easy. Just grind the welds off the flange of the shell and you're done.
 
View attachment 392065
Here's the rusty inner shell. I taped some shop rags around the window guides to protect them.

View attachment 392067
welded up some pinholes - i already blasted the jams on the door.

View attachment 392069
ground it down saving the orginal contours. A skim coat and it will look like new.

View attachment 392071
View attachment 392073
This is what it looks like after I sandblasted it again. inside and out. The brace the window rests on when it's fully rolled down was broken so I welded that up.

View attachment 392075
A coat of POR15 inside the shell will keep it from rusting away any time soon.
 
Fit your skin on the door to make sure it's all good.

View attachment 392051
Once you're happy with how it's going to fit drill some holes in the flange so you can plug weld it in place later. I used a punch - it's a lot quicker.:D

View attachment 392053
Grind the sealer off around the holes you'll be welding.

You can glue the door in place but I like to do things old school and use the welder.

View attachment 392055

View attachment 392057

View attachment 392059

View attachment 392061
The top of the door skin has a structure that attaches inside the shell. Make sure they are clean of paint before you install the skin so you can weld them later. The body guy who originally re-skinned the door didn't bother to weld these back in place.:nonono: Actually, i htink they were brazed at the factory, not welded.

You can shoot some weld-through primer on at the this point to keep it from rusting.
 
View attachment 392043
Once I got the skin on I put a self-tapping sheet metal screw in the top of the skin to hold it in place.

View attachment 392045
Get the shell inside the flanges of the skin and got to work. All you'll need are a hammer, heel dolly and maybe a pliers. be careful not to distort the outside of the skin as you work the flanges over the door shell. Some guys like to grind the bends in the flange to get them fold over easier but I don't like to do this because it makes the metal thinner. I like a nice, thick edge on the skin.

View attachment 392047

View attachment 392049

When the flange is bent over it should look like this. Work slowly around the door, back and forth bending the flange over a little more each time as you work around the door. Don't bend it all once!
 
View attachment 392037
Make your plug welds. If you do it right you'll fill the hole and only have to grind a little bit off the top of each weld. Don't forget to weld those inner pieces!

View attachment 392039
Bolt the windo tracks to the new skin.

door009.webp


It's not aligned yet but it looks great!

Still need to brush some seam sealer on the seam inside the door, but that's easy.

I'm sure each body guy has their own way of installing door skins, this is just the way i did it. The skin pretty much locates itself on the shell I tried a test fit but realized it was going to go where it wanted no matter what, so just put your skin on worry about aligning it to the quarter panel later.

Make sure your hinge pins don't have any play in them, bolt the door on and get the door aligned to the rocker first, then line it up with the quarter.

I figure I have 6-8 hours into re-skinning one door. Add in rebuilding the hinges (had to weld up the holes because the bushings had worn out and ovaled out the holes in the steel hinge) and disassembling and reassembling the guts to the door, aligning it, mudwork and painting it and you have an idea why it costs so much to get a good paint job done on your car.

Hope this is all clear and I hope this helps everyone!
 

Attachments

  • door009.webp
    door009.webp
    32.9 KB · Views: 185
great write up...I personally would have NEVER skinned that door, i would have repaired it. I dont trust these cheap stamped steel pieces. Most bodyshops would have repaired it to. But major props for taking that on by yourself!!
 
great write up...I personally would have NEVER skinned that door, i would have repaired it. I dont trust these cheap stamped steel pieces. Most bodyshops would have repaired it to. But major props for taking that on by yourself!!

No, this was too bad. The previous install was total crap, the bottom seam was fat with rust and there was no way to repair the welding they'd done on the seam. I skinned both doors and sandblasted the insides and coated them POR15. They should last a long time.

I'll skin a door but I wouldn't use those repop shells - they're a nightmare to fit to the car. :bang:
 
did you plug weld all the way around the shell? better hope that one never needs replaced... most bodyshops will put a thin bead of panel adhesive down before they crimp the skin over (i think it keeps moisture from getting into the seam) and skip most of the welds.
 
I just did the same thing to my doors except I coated the bottom third of the interior of the interior door with a rubberized undercoat and applied Damplifier sound deadener to the skin before I put it on.

DoorRepair-28.webp


DoorRepair-24.webp
 

Attachments

  • DoorRepair-28.webp
    DoorRepair-28.webp
    22 KB · Views: 174
  • DoorRepair-24.webp
    DoorRepair-24.webp
    26.9 KB · Views: 178