
I have 90 lx that cold starts fine and runs great, then after a little while it will idle surge and run at about1250 rpm. Then I will shut it off and it it won't start unless I matt it then it surges to about 3000 ,comes down to 1250 or so then stutters on take off. I have ran the list of everything to change and check and still have the problem. Help please!
You are using an out of date browser. It may not display this or other websites correctly.
You should upgrade or use an alternative browser.
You should upgrade or use an alternative browser.
Idle Surge On Fox Body
- Thread starter BigRob
- Start date
Have you tried the surging idle checklist? Follow it step by step for a accurate result everytime.
http://forums.stangnet.com/showthread.php?t=698148
http://forums.stangnet.com/showthread.php?t=698148
I don't have a code reader yet, trying to locate one now.You've run the engine codes?
Sounds like it's loading up on fuel at idle and running rich

That's awesome, and you can't beat the price. Thanks, I'm ordering it now. When I get it I'll let y'all know what it tells me. I'm sure I'll need some more help.

Okay , got my code reader. Got a few codes. 21,31,10,51,and96. To me it sounds like 96 fuel pump secondary circuit fail, high speed fuel pump relay open. How can I fix this? Please help.
You have 2 ECT problems (code 21 & code 51) which seem to indicate a wiring or connection problem.
Code 21 – ECT sensor out of range. Broken or damaged wiring, bad ECT sensor.
[color= blue]Revised 6-Apr-2017 to add diagrams and resistance check for ECT wiring.[/color]
Note that that if the outside air temp is below 50 degrees F that the test for the ECT can be in error. Warm the engine up until you get good hot air from the heater and then dump the codes again.
The computer Engine Coolant Temperature sensor has absolutely nothing to do with the temperature gauge. They are different animals. The ECT sensor is normally located it the passenger side front of the engine in the water feed tubes for the heater. It has two wires that connect by a weathertight plastic connector.
The water temperature sender for the temp gauge is located in the driver's side lower intake manifold. It has a single wire that connects by a push on connector on the temp sender.
If you have replaced the ECT sensor and are still having ECT like problem symptoms, check the ECT wiring .
See the graphic for the 10 pin connector circuit layout.
Check the resistance of the green wire on the ECT connector to the green wire on pin 7 of the computer connector. You should see less that 1 Ω (ohm)
The ACT & ECT have the same thermistor, so the table values are the same
ACT & ECT test data:
Use Pin 46 on the computer for ground for both ECT & ACT to get most accurate readings.
Pin 7 on the computer - ECT signal in. At 176 degrees F it should be .80 volts
Pin 25 on the computer - ACT signal in. At 50 degrees F it should be 3.5 volts. It is a good number if the ACT is mounted in the inlet airbox. If it is mounted in the lower intake manifold, the voltage readings will be lower because of the heat transfer.
Voltages may be measured across the ECT/ACT by probing the connector from the rear. A pair of safety pins may be helpful in doing this. Use care in doing it so that you don't damage the wiring or connector.
Here's the table :
50 degrees F = 3.52 v
68 degrees F = 3.02 v
86 degrees F = 2.62 v
104 degrees F = 2.16 v
122 degrees F = 1.72 v
140 degrees F = 1.35 v
158 degrees F = 1.04 v
176 degrees F = .80 v
194 degrees F = .61
212 degrees F = .47 v
230 degrees F = .36 v
248 degrees F = .28 v
Ohms measures at the computer with the computer disconnected, or at the sensor with the sensor disconnected.
50 degrees F = 58.75 K ohms
68 degrees F = 37.30 K ohms
86 degrees F = 27.27 K ohms
104 degrees F = 16.15 K ohms
122 degrees F = 10.97 K ohms
140 degrees F = 7.60 K ohms
158 degrees F = 5.37 K ohms
176 degrees F = 3.84 K ohms
194 degrees F = 2.80 K ohms
212 degrees F = 2.07 K ohms
230 degrees F = 1.55 K ohms
248 degrees F = 1.18 k ohms
Diagram courtesy of Tmoss & Stang&2birds

See the following website for some help from Tmoss (diagram designer) & Stang&2Birds
(website host) for help on 88-95 wiring http://www.veryuseful.com/mustang/tech/engine/
Ignition switch wiring
http://www.veryuseful.com/mustang/tech/engine/images/IgnitionSwitchWiring.gif
Fuel, alternator, A/C and ignition wiring
http://www.veryuseful.com/mustang/tech/engine/images/fuel-alt-links-ign-ac.gif
Complete computer, actuator & sensor wiring diagram for 88-91 Mass Air Mustangs
http://www.veryuseful.com/mustang/tech/engine/images/88-91_5.0_EEC_Wiring_Diagram.gif
Vacuum diagram 89-93 Mustangs
http://www.veryuseful.com/mustang/tech/engine/images/mustangFoxFordVacuumDiagram.jpg
CODE: 31 (KOEO) - EVP circuit below minimum voltage. Vref (5 volt reference voltage supplied by the computer) missing or broken wire or bad connection in circuit.
Revised 06-Aug-2016 to add clarification of the 10 pin connector possible problems
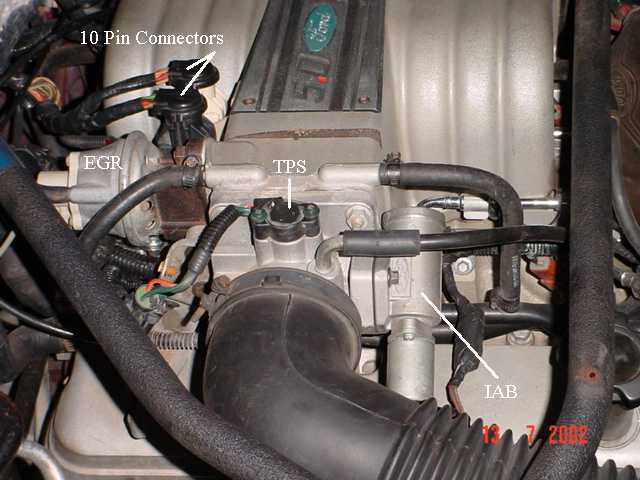
Use a DVM to check for 5 volts on the orange/white wire. If it is missing, look for +5 volts at the orange/white wire on the TPS or MAP sensor located on the firewall near the center of the car. Use the black/white wire for the ground for the DVM.
With the sensor removed from the EGR and still connected, press the plunger and watch the voltage change on the brown/lt green wire. Pull the passenger side kick panel and measure the voltage at the computer. You will need to remove the plastic cover over the wires and probe them from the backside. A safety pin may prove very useful for this task. Use pin 27, EVR input (brown/lt green wire) and pin 46, signal ground (black/white wire) to measure the voltage. The orange/white wire is Vref and should always be 5 volts -/+ .25 volt. Be sure to measure Vref at the EGR sensor to rule out any broken wires or bad connections.
Measuring the voltage at the computer helps you spot broken wiring and intermittent connections. The 10 pin connectors are especially prone to connection problems, If the voltage checks at the EGR sensor are good but not at the computer, the 10 pin connector is suspect.
See the graphic for the 10 pin connector circuit layout.
Code 51 Engine Coolant Temperature (ECT) sensor signal is/was too high -
[color= blue]Revised 6-Apr-2017 to add diagrams and resistance check for ECT wiring.[/color]
Possible bad ECT sensor or wiring. Possible missing signal ground – black/wire broken or bad connection. With the power off, measure the resistance between the black/white wire and battery ground. You should see less than 1 ohm. Check the same black /white wire on the TPS and MAP sensor. More than 1 ohm there and the wire is probably broken in the harness between the engine and the computer. The 10 pin connectors pass the black/white wire back to the computer, and can cause problems.
The computer Engine Coolant Temperature sensor has absolutely nothing to do with the temperature gauge. They are different animals. The ECT sensor is normally located it the passenger side front of the engine in the water feed tubes for the heater. It has two wires that connect by a weathertight plastic connector.
The water temperature sender for the temp gauge is located in the driver's side lower intake manifold. It has a single wire that connects by a push on connector on the temp sender.
If you have replaced the ECT sensor and are still having ECT like problem symptoms, check the ECT wiring .
See the graphic for the 10 pin connector circuit layout.
Check the resistance of the green wire on the ECT connector to the green wire on pin 7 of the computer connector. You should see less that 1 Ω (ohm)
Use Pin 46 on the computer for ground for both ECT & ACT tests to get most accurate readings.
Pin 7 on the computer - ECT signal in. At 176 degrees F it should be .80 volts
Pin 25 on the computer - ACT signal in. At 50 degrees F it should be 3.5 volts. It is a good number if the ACT is mounted in the inlet airbox. If it is mounted in the lower intake manifold, the voltage readings will be lower because of the heat transfer.
50 degrees F = 3.52 v
68 degrees F = 3.02 v
86 degrees F = 2.62 v
104 degrees F = 2.16 v
122 degrees F = 1.72 v
140 degrees F = 1.35 v
158 degrees F = 1.04 v
176 degrees F = .80 v
194 degrees F = .61
212 degrees F = .47 v
230 degrees F = .36 v
248 degrees F = .28 v
Ohms measures at the computer with the computer disconnected, or at the sensor with the sensor disconnected.
50 degrees F = 58.75 K ohms
68 degrees F = 37.30 K ohms
86 degrees F = 27.27 K ohms
104 degrees F = 16.15 K ohms
122 degrees F = 10.97 K ohms
140 degrees F = 7.60 K ohms
158 degrees F = 5.37 K ohms
176 degrees F = 3.84 K ohms
194 degrees F = 2.80 K ohms
212 degrees F = 2.07 K ohms
230 degrees F = 1.55 K ohms
248 degrees F = 1.18 k ohms
Diagram courtesy of Tmoss & Stang&2birds
See the following website for some help from Tmoss (diagram designer) & Stang&2Birds (website host) for help on 88-95 wiring http://www.veryuseful.com/mustang/tech/engine/
http://www.veryuseful.com/mustang/tech/engine/images/IgnitionSwitchWiring.gif
http://www.veryuseful.com/mustang/tech/engine/images/fuel-alt-links-ign-ac.gif
http://www.veryuseful.com/mustang/tech/engine/images/88-91_5.0_EEC_Wiring_Diagram.gif
Code 96 for 86-90 model 5.0 Mustang – KOEO- Fuel pump monitor circuit shows no power - Fuel pump relay or battery power feed was open - Power / Fuel Pump Circuits. The fuel pump lost power at some time while the ignition switch was in the run position. The main power feed to the pump is what is losing power.
Look for a failing fuel pump relay, bad connections or broken wiring. The fuel pump relay is located under the passenger seat. On Mass Air Conversions, the signal lead that tells the computer that the fuel pump has power may not have been wired correctly.
See http://www.stangnet.com/tech/maf/massairconversion.html
Look for power at the fuel pump - the fuel pump has a connector at the rear of the car with a pink/black wire and a black wire that goes to the fuel pump. The pink/black wire should be hot when the test connector is jumpered to the test position. . To trick the fuel pump into running, find the ECC test connector and jump the connector in the lower RH corner to ground.
86-90 Models:
Using the diagram, check the red/black wire from the fuel pump relay: you should see 12 volts or so. If not, check the inertia switch: on a hatch it is on the drivers side by the taillight. Look for a black rubber plug that pops out: if you don't find it, then loosen up the plastic trim. Check for voltage on both sides of the switch. If there is voltage on both sides, then check the Pink/black wire on the fuel pump relay: it is the power feed to the fuel pump. Good voltage there, then the fuel pump body to tank wiring harness connector is the likely culprit since it is getting power. No voltage there, check the Orange/Lt blue wire, it is the power feed to the fuel pump relay & has a fuse link in it. Good voltage there & at the Pink/black wire, swap the relay.
Keep in mind that the relay wiring and socket can also cause intermittent problems. Clean the relay socket with non-flammable brake parts cleaner or electrical contact cleaner. If you find damaged wiring at the relay socket, replacement pigtail socket assemblies are available at the auto parts stores. Be sure to solder the wires and cover the solder joints with heat shrink tubing if you replace the relay socket.
Last edited:
Similar threads
- Replies
- 22
- Views
- 676
- Replies
- 6
- Views
- 408
- Replies
- 16
- Views
- 902
- Replies
- 1
- Views
- 110