Need help from 69/70 owners with Shelby rear fiberglass!!!!!

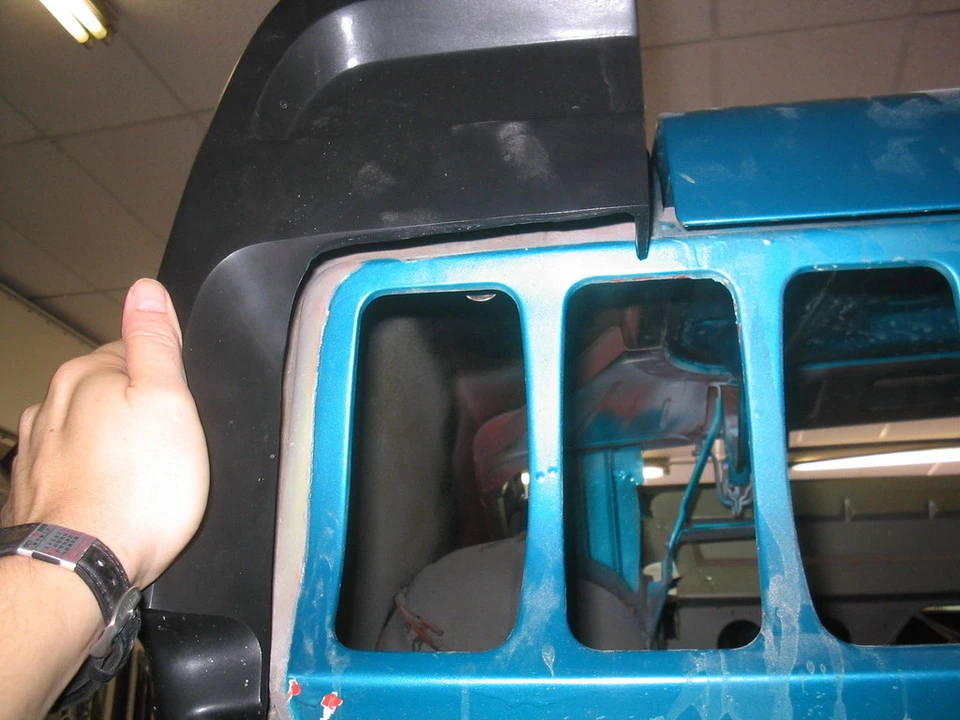
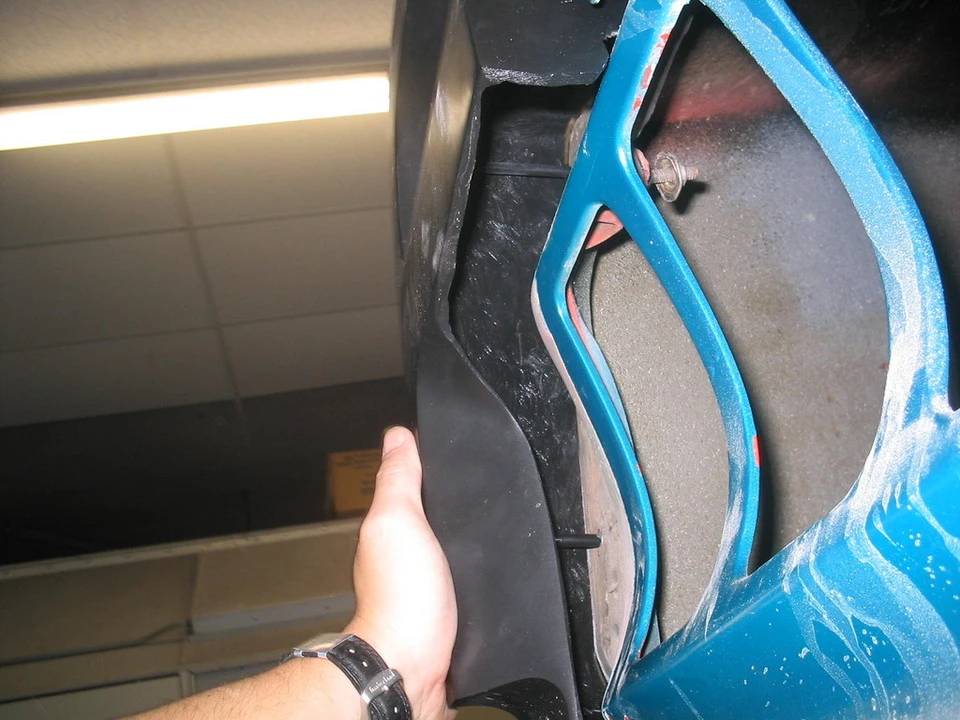
OK here's the deal, I got in my Shelby deck lid and end caps finally but as I fit them I find severe differences from stock. I could swear that I have seen both coupes and verts with the Shelby duck tail fiberglass added to them while retaining the stock tail panel and lights. Yet these pictures tell quite a different story, like I either MUST use the Shelby tail panel also or I have to live with giant rat holes from the under side and against the panel body. Or I guess have them custom filled in.

CAN ANYONE PROVIDE ME WITH SOME EXPERIENCE!??!?!?!?!??!?!?
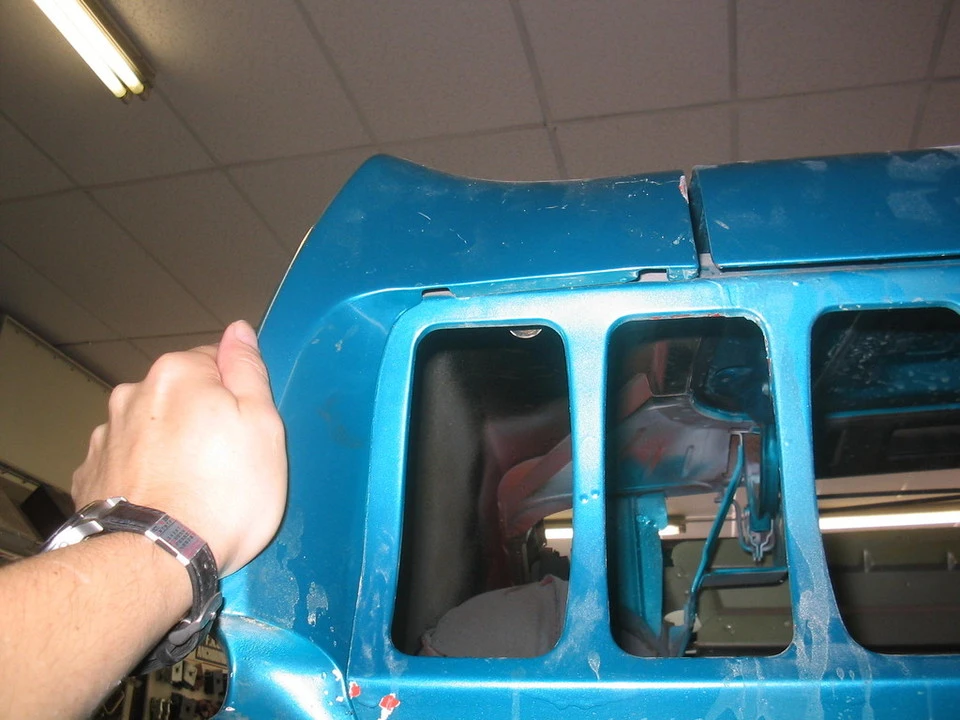
101_0184.webp


101_0185.webp


101_0186.webp
 

Attachments

  • 101_0184.webp
    101_0184.webp
    97 KB · Views: 160
  • 101_0185.webp
    101_0185.webp
    98 KB · Views: 159
  • 101_0186.webp
    101_0186.webp
    122.2 KB · Views: 142
pak, you know i just realized why you have that gap. the shelbys had the taiilight panel for the t-bird lights, and it didn't have the stock curve of the 69. probably the only way to fill the gap would be to use fiberglass to build it in that area. shouldn't too hard though, just make a carb board template to fit the area the then use some glass cloth to make a piece that fills the gap and bond it to the end cap.

gee i'm glad you found this problem before i did. at least i steered you away from the bad side scoops, though
 
The end caps seem too big

I was just down in the garage looking at my GT500. The entire center section of the rear panel frame was cut out & the fiberglass panel put in it's place which squares the rear off & the end caps attach onto the new light panel. The end caps from the top are exactly 5.5 inches from the rear end to the top body seam. Yours seem a lot bigger than that, it looks as if it might still be too big with the correct Shelby panel. How long are your end caps?
 
Hey Beatnik, no-doi. :D (J/K bud)

Yeah I do realize that, I guess I just never realized that the Shelby tail panel was that big or that it was an underlay instead of an overlay. Any cars I have seen left stock with the Shelby piece added have never mentioned anything about fabricating more glass onto it to make it line up. See the pics of the comp cam car link for what I mean, I see no extra visible fabrication. Basically I know that is my only choice, I just hope that it's not going to look ridiculously huge now. I guess had I gone with their custom piece instead of the Shelby, the stock fit would have been closer to the original lines than this one. I can't afford to wait another 14 weeks though.:rolleyes: So what did you think of the quality of it by the pics B? Do you think my side scoops looked better than yours too?

RGS0907: OK, thanks for the info. I'll have to wait until Friday when I go back to the body shop to figure out what we do to fix it to measure it. I do not know how different the convertible is from the sportsroof you have if at all but this is supposed to be an exact replica so we will see. So is the bottom lip of your end cap and trunk hollow too? Granted you would only see this when the car is at eye level but it looks unfinished to me.:shrug:
 
I believe the spoiler trunk and end caps are available both ways, to fit a stock 69-70, and for the Shelby tailight panel.( maybe from different vendors) If you think you have a gap now on the end caps, wait till you fit the trunk, I think there is a 1" difference in the center in the trunk lock area.
 
mr-fixit said:
I believe the spoiler trunk and end caps are available both ways, to fit a stock 69-70, and for the Shelby tailight panel.( maybe from different vendors) If you think you have a gap now on the end caps, wait till you fit the trunk, I think there is a 1" difference in the center in the trunk lock area.

Well, I know they make a non Shelby looking piece to fit a stock stang as seen on Steve Kleva's car time and again but they do not make a Shelby reproduction to fit the stock mustang, I am almost certain but I would love it if you could prove me wrong on this.

I hope to hell you are wrong about the trunk lock but that is conceiled so I am sure that won't be as hard to solve.

BTW Bryan, I went back and looked up the pics that Sharp had posted in the summer about his unit for sale. Unfortunately he only has one pic showing the end caps. I do not know what the heck he was filling in on the top surface of the one to the right but the back surface of the one on the left looks like he faced the same exact problem and attempted to bridge the gap with new glass.

https://photos.buckeye-express.com/pictures.cfm/2600

2600
 
This is just a suggestion, you could find two stock quater extensions,(your's look too nice to hack up) with the two bolted in place you could trim to fit the gap ,then bond the two together with 3m adhesive to make a single piece ,also in the lock area ,perhaps you could extend the rod ,or just order a Shelby one, I looked online ,thinking that some one would supply these pieces made to fit the stock panel, but no.
 
[QUOTE='69Mach1]This is just a suggestion, you could find two stock quater extensions,(your's look too nice to hack up) with the two bolted in place you could trim to fit the gap ,then bond the two together with 3m adhesive to make a single piece ,also in the lock area ,perhaps you could extend the rod ,or just order a Shelby one, I looked online ,thinking that some one would supply these pieces made to fit the stock panel, but no.[/QUOTE]

Good ideas, I will defintitly use the stock piece as a guide in some fashion. The one in the pic may look to nice to hack, but the other side sure aint.:rolleyes: :nonono:

109505_62.jpg


These items are not easy to come by stock either except from a junk yard, that was a main factor in the decision to upgrade to Shelby. I think instead of hacking though I plan to just make a template which I can test fit with and then eventually make a glass extension for.
 
Pakrat said:
Well, I know they make a non Shelby looking piece to fit a stock stang as seen on Steve Kleva's car time and again but they do not make a Shelby reproduction to fit the stock mustang, I am almost certain but I would love it if you could prove me wrong on this.

I hope to hell you are wrong about the trunk lock but that is conceiled so I am sure that won't be as hard to solve.

BTW Bryan, I went back and looked up the pics that Sharp had posted in the summer about his unit for sale. Unfortunately he only has one pic showing the end caps. I do not know what the heck he was filling in on the top surface of the one to the right but the back surface of the one on the left looks like he faced the same exact problem and attempted to bridge the gap with new glass.

https://photos.buckeye-express.com/pictures.cfm/2600

2600


wow i never saw the pics of the end caps. that one on the right looks like it broke or something and he tried to put it back together. the problem i see with what he trying to do is that he was trying to build up the area on the part itself. much better to make a template and then bond the piece on afterwards. another problem was the was using glass matt, which is ok for reinforcing the area but the outer layer should have been cloth instead.
 
bnickel said:
wow i never saw the pics of the end caps. that one on the right looks like it broke or something and he tried to put it back together. the problem i see with what he trying to do is that he was trying to build up the area on the part itself. much better to make a template and then bond the piece on afterwards. another problem was the was using glass matt, which is ok for reinforcing the area but the outer layer should have been cloth instead.

Exactly how I plan to do it, by template and then affix it later and smooth out.

So now you have led me to the follow up part, which is exactly what materials should I use like cloth etc... to do this? Where should I get them? Basic auto parts store?
 
i would use cloth exclusively. as for the resins and stuff i'd consider using an epoxy resin instead of the standard stuff. i would get the stuff from a paint store, the stuff they sell at parts stores is usually just one of the little bondo kits which are ok, but for body pieces i'd use the better stuff.
 
bnickel said:
i would use cloth exclusively. as for the resins and stuff i'd consider using an epoxy resin instead of the standard stuff. i would get the stuff from a paint store, the stuff they sell at parts stores is usually just one of the little bondo kits which are ok, but for body pieces i'd use the better stuff.

OK, and is the cloth ridgid or flaccid? I'm just trying to imagine how I get it to hold bends and contours unless I can apply it directly on top of say a cardboard template or something that will retain the shape until it cures without having access to an actual mold.

Hmm, maybe that is an idea in itself, I wonder If I can't make some type of negative casting off of the section of my stock piece that mates up to the surface and then lay the glass and resin into it to mold the piece like they did with the parts to begin with. I would probably just need to figure out what type of release agent to use.

It would be just like my old custom action figure days only larger.:rolleyes:

http://www.toymania.com/customcorner/moldp1.shtml

Only probably use a a 1 part silcone based mold instead of a plaster based 2 part as it might be easier to remove with fiberglass.
 
if the contours of the stock piece are correct you should just be able to make a negative mold of the stock piece of course using a release agent and then make a piece using the negative mold, i see no need to use silicone or plaster. just use fiberglass. a fiberglass mold is all you'd need.