Need help getting car to run.

BK_CAULEY

it's built for speed not longevity, woman
Dec 26, 2006
0
10
49
Thomasville, ga
well people i cant get this dang cr to run to save my life. it will act like it wants to run but wont. it keeps back firing and stuttering but it just wont run. i know its getting fire nd fuel. i pulled all of my plugs and they where covered in gas and fouled. and i tested each wire for spark. so far here is what ive tested.

Tested for fire.and yes ive made sure timing was on. TDC on compression stroke, balancer on 10 degrees and rotor on number one.

swapped ecu's for one i know works

obviously have fuel. strong fuel smell when trying to start.

TPS is in range

everything is plugged up also.

Is there any way to test to make sure mass air is working properly. im thinking some of the wires might have got pulled loose because i did extened them. if they did would it cause the car to not run at all. im talking not even start up. im going to try and pull codes tomm also. i just dont want to take the fender off and undo those wires to the mass air if there is a way to test.

other than that im stumped. and i cannot get it to run to save my life. please help.
 
Back to basics diagnosis...

Dump the codes and see what the computer says is wrong…Codes may be present in the computer even if the Check Engine light isn’t on.

Here's the link to dump the computer codes with only a jumper wire or paper clip and the check engine light, or test light or voltmeter. I’ve used it for years, and it works great. You watch the flashing test lamp or Check Engine Light and count the flashes.

See Troublcodes.net Trouble Codes OBD & OBD2 Trouble Codes and Technical info & Tool Store. By BAT Auto Technical

B.jpg


F.jpg


If your car is an 86-88 stang, you'll have to use the test lamp or voltmeter method. There is no functional check engine light on the 86-88's except possibly the Cali Mass Air cars.

attachment.php


The STI has a gray connector shell and a white/red wire. It comes from the same bundle of wires as the self test connector.

89 through 95 cars have a working Check Engine light. Watch it instead of using a test lamp.

attachment.php


The STI has a gray connector shell and a white/red wire. It comes from the same bundle of wires as the self test connector.

There is a single dark brown connector with a black/orange wire. It is the 12 volt power to the under the hood light. Do not jumper it to the computer test connector. If you do, you will damage the computer.

What to expect:
You should get a code 11 (two single flashes in succession). This says that the computer's internal workings are OK, and that the wiring to put the computer into diagnostic mode is good. No code 11 and you have some wiring problems.

Codes have different answers if the engine is running from the answers that it has when the engine isn't running. It helps a lot to know if you had the engine running when you ran the test.

Trouble codes are either 2 digit or 3 digit, there are no cars that use both 2 digit codes and 3 digit codes.

Alternate methods:
For those who are intimidated by all the wires & connections, see Actron® for what a typical hand scanner looks like. Normal retail price is about $30 or so at AutoZone or Wal-Mart.

Or for a nicer scanner see EQUUS DIGITAL FORD CODE READER (3145) – It has a 3 digit LCD display so that you don’t have to count flashes or beeps.. Cost is $30.
 
Pulling codes is the definite first step. Even if the motor isnt running, there could be some error codes there.

Have you changed anything since the last time the motor ran?? If so, go back and undo that change and see if it runs.
 
i just pulled the codes THREE TIMES. i got some weird codes but i counted 3 different times and got the same ones everytime.

i know you are gonna think i miss counted but i didnt.

i got 81, 82, 84, 85 all 2.3 TC codes. so WTF
 
Code 81 – Secondary Air Injection Diverter Solenoid failure AM2. The solenoid valve located on the back side of the passenger side wheel well is not functional. Possible bad wiring, bad connections, missing or defective solenoid valve. Check the solenoid valve for +12 volts at the Red wire and look for the Lt Green/Black wire to switch from +12 volts to 1 volt or less. The computer controls the valve by providing a ground path on the LT Green/Black wire for the solenoid valve.

With the with the ignition on, look for 12 volts on the red wire on the solenoid connector. No 12 volts and you have wiring problems.

With the engine running, stick a safety pin in the LT Green/Black wire for the solenoid valve & ground it. That should turn the solenoid on and cause air to flow out the port that goes to the pipe connected to the cats. If it doesn't, the valve is bad. If it does cause the airflow to switch, the computer or wiring going to the computer is not signaling the solenoid valve to open.

Putting the computer into self test mode will cause the solenoid valve to toggle. If you listen carefully, you may hear it change states.

Code 82 – Secondary Air Injection Diverter Solenoid failure AM1. Possible bad wiring, bad connections, missing or defective solenoid valve. Check the solenoid valve for +12 volts at the Red wire and look for the Red/White wire to switch from +12 volts to 1 volt or less. The computer controls the valve by providing a ground path on the Red/White wire for the solenoid valve

With the engine running, stick a safety pin in the Red/White wire for the solenoid valve & ground it. That should turn the solenoid on and cause air to flow out the port that goes to the pipe connected to the heads. If it doesn't, the valve is bad. If it does cause the airflow to switch, the computer or wiring going to the computer is not signaling the solenoid valve to open.

Both 81 & 82 codes usually mean that some uneducated person removed the solenoid control valves for the Thermactor Air system in an attempt to make the car faster. It doesn't work that way: no working control valves can cause the cat converters to choke and clog.

Code 84 EGR Vacuum Regulator failure – Broken vacuum lines, no +12 volts, regulator coil open circuit. The EVR regulates vacuum to the EGR valve to maintain the correct amount of vacuum. The solenoid coil should measure 20-70 Ohms resistance. The regulator has a vacuum feed on the bottom which draws from the intake manifold. The other vacuum line is regulated vacuum going to the EGR valve. One side of the EVR electrical circuit is +12 volts anytime the ignition switch is in the run position. The other side of the electrical circuit is the ground path and is controlled by the computer. The computer switches the ground on and off to control the regulator solenoid.

Code 85 - CANP solenoid - The Carbon Canister solenoid is inoperative or missing. Check vacuum lines for leaks and cracks. Check electrical wiring for loose connections, damaged wiring and insulation. Check solenoid valve operation by grounding the gray/yellow wire to the solenoid and blowing through it.
The computer provides the ground for the solenoid. The red wire to the solenoid is always energized any time the ignition switch is in the run position.

Charcoal canister plumbing - one 3/8" tube from the bottom of the upper manifold to the rubber hose. Rubber hose connects to one side of the canister solenoid valve. Other side of the solenoid valve connects to one side of the canister. The other side of the canister connects to a rubber hose that connects to a line that goes all the way back to the gas tank. There is an electrical connector coming from the passenger side injector harness near #1 injector that plugs into the canister solenoid valve. It's purpose is to vent the gas tank. The solenoid valve opens at cruse to provide some extra fuel.

It does not weigh but a pound or so and helps richen up the cruse mixture. It draws no HP & keeps the car from smelling like gasoline in a closed garage. So with all these good things and no bad ones, why not hook it up & use it?

What this means: someone disabled the smog gear. The vacuum plumbing may not be correctly connected, resulting in a vacuum leak. If the carbon canister solenoid was bypassed, the engine could suck fuel or air through the tank vent system.

Diagram courtesy of Tmoss & Stang&2birds
mustangFoxFordVacuumDiagram.webp


See the following website for some help from Tmoss (diagram designer) & Stang&2Birds (website host) for help on 88-95 wiring Mustang FAQ - Engine Information Everyone should bookmark this site.

Ignition switch wiring
http://www.veryuseful.com/mustang/tech/engine/images/IgnitionSwitchWiring.gif

Fuel, alternator, A/C and ignition wiring
http://www.veryuseful.com/mustang/tech/engine/images/fuel-alt-links-ign-ac.gif

Complete computer, actuator & sensor wiring diagram for 88-91 Mass Air Mustangs
http://www.veryuseful.com/mustang/tech/engine/images/88-91_5.0_EEC_Wiring_Diagram.gif

Vacuum diagram 89-93 Mustangs
http://www.veryuseful.com/mustang/tech/engine/images/mustangFoxFordVacuumDiagram.jpg

HVAC vacuum diagram
http://www.veryuseful.com/mustang/tech/engine/images/Mustang_AC_heat_vacuum_controls.gif

TFI module differences & pinout
http://www.veryuseful.com/mustang/tech/engine/images/TFI_5.0_comparison.gif

Fuse box layout
http://www.veryuseful.com/mustang/tech/engine/images/MustangFuseBox.gif

The 81 & 82 codes won't hurt anything if you don't have a cat converter H pipe. If you do, they need to be fixed. Make a post requesting smog pump help and I will put up the Thermactor Air System theory and troubleshooting tech note. Or you can do a search on Thermactor and it will come up.
 
i no longer have those solenoids. or my egr stuff. it wasnt working properly and i was planning on having the egr custom tuned out. but i thought those solenoids only controled the smog equipment.

either way i had the car running before and those solenoids werent on the car. so why wont it run now? it doesnt make any sense. The car ran fine other than rough idle because of no egr. i pulled the 302 installed the 351 and now it wont run.
 
Did you try moving the advancing/retarding the distributor a few degrees and then try to start it? When you advance/retard it, does the motor turn easier or harder?

Is everything wired the exact same way as it was when you had the 302 in it??

What did you do for the distributor??

Did you try cleaning the MAF??

As I said before, exactly what is different now with the 351 than when it was running with the 302??

msd dizzy and i even swapped in a 89 f150 to check that. im getting good fire. and yes i have tried retarding and advancing it. and everything is exactly the same. i pulled motors swapped them out and now it wont run. the mass air meter is a new ( 3 weeks old) anderson unit.
 
Backfiring problem: the reason I posted a vacuum diagram was that there was a strong possiblity you have a vacuum leak.

Backfiring out the intake is either a valve stuck open or a lean mixture or spark plug wire(s) connected to the wrong cylinder(s). Check compression on all cylinders and then look for vacuum hoses loose, cracked, or misconnected. Check the line for the vapor recirculation system – it is easy to knock loose and not see it when you connect the air pump plumbing. If the vacuum line for the EGR valve and the air pump are cross connected, some very strange things can happen. Check the mass air flow electrical connection and see that it is tight, the same goes for the fuel injection wiring harness connectors up on top of the manifold near the firewall.

Sticking valves: If a intake valve is bent, has a bad spring or is misadjusted, the engine will sometimes backfire through the intake. Use a vacuum gauge connected to any convenient spot on the intake manifold. Run the engine at 1000 RPM & look for 18-21 inches of vacuum with a steady needle. A problem intake valve will make the vacuum gauge needle sweep 5-10 inches.

Lean fuel mixture breaks out into several sub categories:
A.). Vacuum leaks
B.) Air entering the intake without passing through the MAF on Mass Air cars (89-95 models).
C.) Failure of the MAF, BAP/MAP (Baro or Manifold Air Pressure, same sensor, different name), ACT (air charge temp), or ECT (engine coolant temp). These should set a code in the computer.
D.) Leaking exhaust gases from EGR valve at WOT or EGR opening when it should not be open.
E.) Poor fuel delivery due to bad fuel pump, clogged filter or bad fuel pump wiring. Look for low pressure or fluctuating pressure. Standard injector pressure is 39 PSI at idle, with the vacuum line disconnected from the regulator and capped.
F.) Clogged fuel injectors.- see the cylinder balance test below
H.) Fuel injector wiring problems causing injector not to deliver rated flow.
I.) Computer problems: (computer problems are not common like sensor problems)
J.). ROM has bad data in fuel or timing table. This should also set a code in the computer.
K.) Failure of one or more of the computer's driver transistors for the fuel injectors. No code set on this one. Use a noid test light to test the injector wiring & injector drivers,
L.) MAF calibration off or mismatched to injectors.
M.) ACT or ECT bad. Sometimes the sensors will be off calibration, but not bad enough to set a code. If they falsely read too high a temp, the engine will back off fuel delivery.

Cylinder balance test:
Warm the car's engine up to normal operating temperature. Use a jumper wire or paper clip to put the computer into test mode. Start the engine and let it go through the normal diagnostic tests, then quickly press the throttle to the floor. The engine RPM should exceed 2500 RPM's for a brief second. The engine RPM's will increase to about 1450-1600 RPM and hold steady. The engine will shut off power to each injector, one at a time. When it has sequenced through all 8 injectors, it will flash 9 for everything OK, or the number of the failing cylinder such as 2 for cylinder #2. Quickly pressing the throttle again up to 2500 RPM’s will cause the test to re-run with smaller qualifying figures. Do it a third time, and if the same cylinder shows up, the cylinder is weak and isn’t putting out power like it should. See the Chilton’s Shop manual for the complete test procedure

Dump the codes and see what the computer says is wrong…Codes may be present in the computer even if the Check Engine light isn’t on.

Here's the link to dump the computer codes with only a jumper wire or paper clip and the check engine light, or test light or voltmeter. I’ve used it for years, and it works great.

See Troublcodes.net Trouble Codes OBD & OBD2 Trouble Codes and Technical info & Tool Store. By BAT Auto Technical

B.jpg


F.jpg


If your car is an 86-88 stang, you'll have to use the test lamp or voltmeter method. There is no functional check engine light on the 86-88's except possibly the Cali Mass Air cars.

attachment.php


89 through 95 cars have a working Check Engine light. Watch it instead of using a test lamp.

attachment.php


Codes have different answers if the engine is running from the answers that it has when the engine isn't running. It helps a lot to know if you had the engine running when you ran the test.

Trouble codes are either 2 digit or 3 digit, there are no cars that use both 2 digit codes and 3 digit codes.

For those who are intimidated by all the wires & connections, see Actron® for what a typical hand scanner looks like. Normal retail price is about $30 or so at AutoZone or Wal-Mart.

Or for a nicer scanner see EQUUS DIGITAL FORD CODE READER (3145) – It has a 3 digit LCD display so that you don’t have to count flashes or beeps.. Cost is $30.


Distributor installation:
Putting the distributor back in is fairly simple. Pull #1 sparkplug, put your finger in the sparkplug hole,
crank the engine until you feel compression. Then line up the TDC mark on the balancer with the pointer
on the engine block.

The distributor starts out with the #1 plug wire lined up at about 12:00 with you facing it. Align the rotor
to about 11:00, since it will turn clockwise as it slides into place.

Align the distributor rotor up with the #1 position marked on the cap, slide the distributor down into the block,
(you may have to wiggle the rotor slightly to get the gear to engage) and then note where the rotor is pointing.
If it still lines up with #1 position on the cap, install the clamp and bolt. If not, pull it out and turn 1 tooth forwards
or backwards and try again. Put the #1 spark plug back in and tighten it down, put the clamp on the distributor,
but don't tighten it too much, as you will have to move the distributor to set the timing. Note that if it doesn't
align perfectly with #1 position, you can turn the distributor until it does. The only problem is that if you are too
far one way or the other, you can't turn the distributor enough to get the 10-14 degree optimum timing range.

At this point hook up all the wires, get out the timing light and start the engine. Set the timing where your car
runs best. Don't forget to disconnect the SPOUT jumper connector when you set the timing, and plug it back
in when you finish.

The HO firing order is 1-3-7-2-6-5-4-8.
Non HO firing order is 1-5-4-2-6-3-7-8

attachment.php
 
i have checked my firing order. and no the cam is not out of the 302 it is a lunatti cam. and it was specifically made for my engine.

Jrichker- my car is backfiring through the exhaust.

and i cant do a cylinder balance test as the car will not run. the fuel pump and filter are both new and as of right now its getting to much fuel. i keep fouling plugs and have already had to change my oil because of flooding,
 
Make sure that you do not have too much fuel pressure.
Hook up the fuel pressure test gauge to the Schrader valve pressure test port.

Turn the ignition switch on and watch for leaks. You may want to use a helper inside the car
to cut the switch off quickly if you have a leak. To trick the fuel pump into running, find the ECC test
connector and jump the connector in the Upper RH corner to ground.
attachment.php
.

Fuel pressure exceeds 40 PSI with engine not running - look for kinks or obstructions
in the fuel pressure regulator return line.

Fuel pressure test passes Ok, then goto next step.

Fuel injectors inoperative, one or more injectors either on all the time or will not squirt.

Revised 27-Jan-2008 to include expanded testing for proper power to injector wiring


Tools needed: Noid light, Multimeter (volts & ohms), 10 MM socket &
extension, & ratchet.

Note: Do all of the steps and do them in order. The results of the
subsequent tests are based on the prior tests being successfully passed.


1.) Each injector has a red power wire to provide power to the injector. Turn the ignition switch to Run and remove
each injector electrical connector and use the multimeter to check for 12 volts on the red wire. Each injector should
have 12 volts +/- .5 volt. More voltage is always better than less voltage. No 12 volts on a singe injector and the wiring
for that injector is broken inside the engine fuel injector harness.

No 12 volts on all injectors:
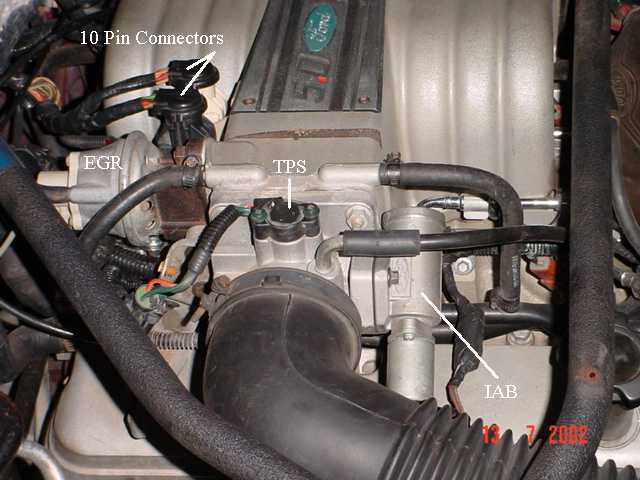
A.) Check for a bad connection at the 10 pin connector. Check for 12 volts at red wire on the MAF or TAD/TAB
solenoids mounted on the aft side of the passenger strut tower. Good 12 volts
there and you have a wiring problem with the 10 pin connectors or associated wiring.

See the graphic for the location of the 10 pin connectors:
TPS_IAB_Pic.jpg


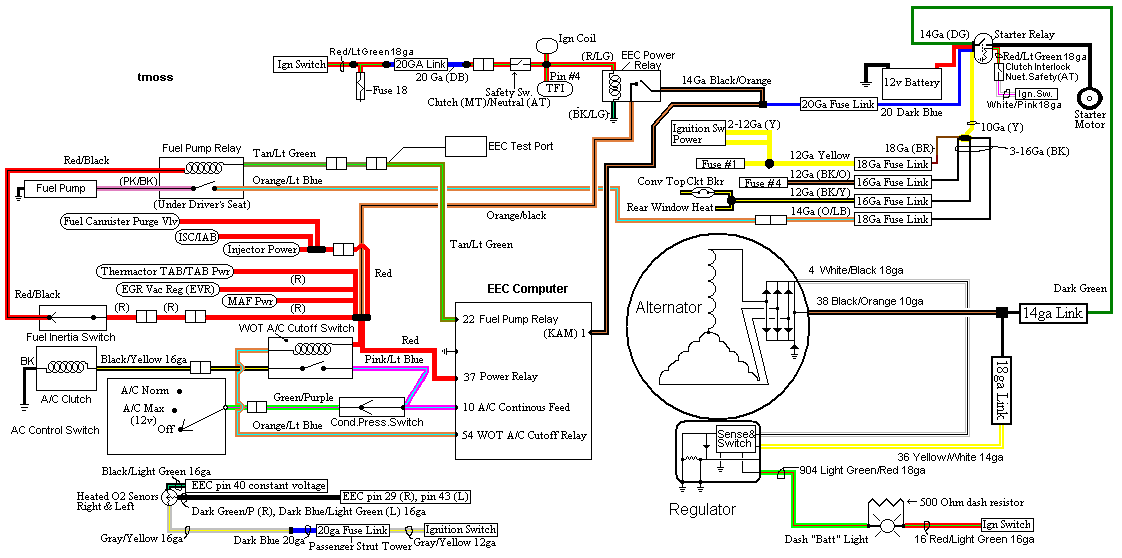
See the graphic for the 10 pin connector circuit layout.
harness02.gif


The injector power pin is the VPWR pin in the black 10 pin connector.


B.) Bad ECC power relay. The relay is on top of the computer, it provides power to the fuel injector system.
It is somewhat difficult to get to, since it requires you to remove the computer from its 2 bolt mounting.. If the relay or
socket is bad, you will not have 12 volts on any of the red wires in the engine compartment or to pins
37/57 on the computer. The pins 37/57 are the main power feed to the computer.
fuel-alt-links-ign-ac.gif


C.) Blown fuse link – The blue fuse link for the computer is up near the starter solenoid. Check for no 12 volts
on the ECC relay socket or computer black/orange wires. No 12 volts and the fuse link is blown open. If the fuse link blows,
there is no power for any of the computer functions.

D.) Bad wiring. Broken or damaged red wire to the chassis side of the 10 pin connectors.


Some basics about the computer:
Remember that the computer does not supply power for any
actuator or relay. It provides the ground necessary to complete the
circuit. That means one side of the circuit will always be hot, and the
other side will go to ground or below 1 volt as the computer
switches on that circuit.


2.) Get a noid light form AutoZone or other auto parts store, or even better
a set of them
big22132.jpg

This set is from http://www.toolking.com/ProductInfo.aspx?productid=12492 and costs about $12-$14.

3.) Use the noid light to determine that the injector pulses and isn’t stuck in the on position.
It you have a set of them install all of them and compare the pulse intensity. Install the noid lights,
turn the ignition switch to Run and crank the engine. A light that doesn’t pulse and stays on has a
short to ground in the computer side of the circuit. That can be either a wiring fault or a failed computer.
If this is the case, remove the passenger side lick panel and disconnect the computer connector.
There is one 10 MM bolt holding it in place. Pull the connector all the way out of the
computer so that you can see the computer side pins.
eec04.gif


Use the list from the graphic below to find the fuel injector pins for the injectors that
didn’t turn the noid light off.

88-91_5.0_EEC_Wiring_Diagram.gif


4.) Set the multimeter to low scale Ohms and measure between the
computer ground located below the computer and the suspect fuel injector pins. You should
see greater than 100 K Ohms resistance. If you see less than 100 Ohms, the wiring
between the injector and the computer has a short to ground and needs service.
Check the harness and look for damage, kinks or frayed spots.

5.) A single noid light that never turns on is either a wiring fault, or a
failed computer. Either the injector has no DC power or the computer has
failed and cannot switch the injector circuit to ground. Determine if the
injector has power by using the multimeter to check for 12 volts on the red
wire on the suspect injector connector. No 12 volts and you have a wiring fault.
Check the harness and look for damage, kinks or frayed spots. Check the 10
pin salt & pepper shaker connectors for bent pins, corrosion and damage.

If none of the noid lights flash and you have 12 volts at each injector, check
to see that you have good spark. Before you even think about replacing the
computer, see step 6.

Next Check the fuel injector wiring end to end. Each fuel injector has a red
wire (power) and an non-read wire (computer controlled ground). Set the
multimeter to low ohms and measure each non red fuel injector wire from
the fuel injector connector to the matching pin on the computer connector.
You should see less than 2 Ohms. More than that means a bad connection
or bad wiring.


6.) Use an ohmmeter set on the low resistance scale and measure the resistance of
each injector across the two contacts inside the electrical connector. You should
see between 11-16 ohms. More or less than that is a bad injector. Next measure
between either one of the contacts and the metal on the injector body. You should
see greater than 100,000 ohms. Don’t hold the metal probe tips with your bare
hands when you make this measurement. It will give incorrect results if you do.

Once you have determined that the suspect injectors have good power and
good wiring, the computer is the likely suspect, since a ground is required
to complete a circuit and make it function. The computer provides the
ground: if doesn’t, then the noid light will not flash.

7) If you have gotten this far, then the problem is likely ignition
related. Remember the noid test using all of the noid lights? All of them
were supposed to be equally bright. Since you have already tested all the
electrical side of the fuel injector circuit, the one remaining common item is
the pip sensor inside the distributor. A failing pip sensor, damaged shutter
wheel or bent distributor shaft could all cause the pulse delivered to the
injectors to be faulty. A bad pip sensor will cause all the injectors not to fire
and you will have no spark. Dumping the codes will show a code 14.


8) Spark plugs indicate one or more cylinders not firing: use the
multimeter to measure the resistance of the spark plug wires. The wires
should measure 2000 ohms per foot of length. A 2 foot wire would be 4000
ohms and a 3 foot wire would be 6000 ohms. Some Taylor and Accel wires
have metal cores and will measure much less: that’s OK.
Next examine the spark plug wires very carefully for burn spots, cracks and
damaged insulation. One good thing to try is to start the engine while the
car is a very dark area, open the hood and look for sparks or blue glow.
They indicate the electricity is leaking out of the spark plug wires.

Thanks to Tmoss & Stang&2birds at Mustang FAQ - Engine Information for some of the graphics

Thanks also to Ford Fuel Injection for some of the graphics.
 
would any of the codes i posted cause my car to not run? and as long as im getting spark and i know the timing is on can i safely assume my distributor and its internals are good.

All of the codes are related to emissions equipment. The only one that could cause problems is the 85 code. The 85 code alone is not a problem. However, if someone connected the vacuum source on the intake manifold to the carbon canister without the solenoid valve being present, the engine vacuum could suck fuel vapor into the intake manifold. That's why I posted the vacuum diagram. Make sure the vacuum line is not connected to the carbon canister or the fuel tank vent line that goes back to the gas tank. Leave the carbon canister or fuel tank vent line open and venting to the air.

Cap all unused vacuum connections, including the one coming from the front underside of the manifold that connected to the canister vent valve.