PI Intake Swap Alternator Bracket fit problem

Well, to answer the original post, I used them both, the PI under the NPI bracket. It's been fine now going on 5 years. I couldn't figure it out so that seemed like the best solution. If you go to page 2 under the link in my sig, enlarge the engine photo, you can see the result.
 
PG98GT said:
Well, to answer the original post, I used them both, the PI under the NPI bracket. It's been fine now going on 5 years. I couldn't figure it out so that seemed like the best solution. If you go to page 2 under the link in my sig, enlarge the engine photo, you can see the result.
So your saying you did the PI intake swap 5 years ago? Why the hell didn't you share this with us along time ago.......
 
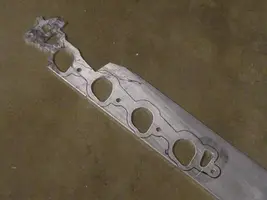
Half way done with the first one. It's going pretty easy, but I'm using the wrong bits. They're for wood. Got to go to the store to pic some more up, and will also get batteries to take pics and post...

1/4 inch aluminum. Hopefully, I can re-use the original bolts. Should be done with the first one tonite...
 
Heck yes I've been sharing info. Heads have been on since Sep 99, too bad I didn't know about removing the swirl dams to lower the compression because I'd sure like to supercharge it and not have the compression worry me. I post the parts list when appropriate and I see a post that needs the info or help, I don't just post for the heck of it, I don't have the time like I did before to really search the posts.
 
So far this is what I've got::
attachment.php

attachment.php


Tools used so far:
Drill with various bits
Dremel tool with spiral bits and a router attachment
Saber saw with metal blades.
 

Attachments

  • Mvc-012s.webp
    Mvc-012s.webp
    21.4 KB · Views: 358
  • Mvc-016s.webp
    Mvc-016s.webp
    17.1 KB · Views: 366
Took me 5 hours to complete the first one. We'll see with the second. I've been using a dremel, a drill and a sabre saw to cut the metal. I'm going to see if I've got a metal bit for my router tonight and hook up the table, so maybe it'll go a little faster.

I've already got the bolt holes cut and the pattern traced out on the next block of aluminum, so it should be done tonight.
 
do me a favor , post a pic of both sides with the actual corresponding gasket , I wanna see how close you got those things , looks good in pic , man nice work , might try to do this myself for a friend if i like how yours look with the gasket laying on them . post results of the install too when you get the car running again
 
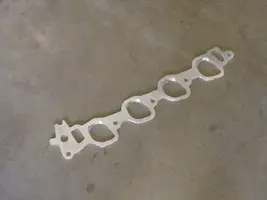
Finally done. Took the same amount of time to make the second one. Almost killed myself with the router :bang: .

Anyways, I don't think I'll make anymore as my dremel is about done (man, what I would give for a cnc machine. Just wanted to show everyone that it can be done, if you've got a little talent.

To answer your question-yes, I went all the way through and matched after to the PI gasket. The lines aren't very straight, and I will post install pics (with gaskets).
Last pic:
attachment.php
 

Attachments

  • Mvc-022s.webp
    Mvc-022s.webp
    15 KB · Views: 329
No Control said:
Finally done. Took the same amount of time to make the second one. Almost killed myself with the router :bang: .

Anyways, I don't think I'll make anymore as my dremel is about done (man, what I would give for a cnc machine. Just wanted to show everyone that it can be done, if you've got a little talent.

To answer your question-yes, I went all the way through and matched after to the PI gasket. The lines aren't very straight, and I will post install pics (with gaskets).
Last pic:
attachment.php
Kick-a$$ job man :nice:
 
yes but if you wanna not take chances with silicone , it cost more but in my opinion is worth it , check out livernois motorsports , whole kit with modified intake is 650 bucks , alot cheaper and easier than headswap , add PI cams and you should see some nice gains .
 
66SilverStar said:
so can the pi intake be bolted to the 98 model heads with a bunch of silicone and have a chance of sealing?

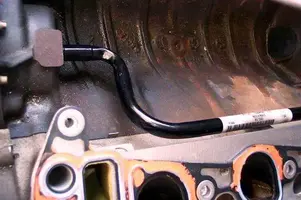
The answer is yes. Several others have done it, including myself. I had a hesitation that I thought was attributed to a vacuum leak but it turned out to be a faulty O2 sensor. The car is running great. I used a generous amount of Copper RTV as seen in this pic...
 

Attachments

  • RTV-03.webp
    RTV-03.webp
    31.1 KB · Views: 201
I take on this install Friday/Saturday.

From what i've read.. i have the Pi Intake on order (Summit 199.99)

NPI gaskets (2)
thermostat o-ring
water pump o-ring
updated coolant/heater tube
updated alternator bracket
updated thermostat housing bolts (2)
the updated water pump nipple that connects to the heater tube.


I believe that Randy sells this all together for $65 + Shipping..

Do you see anything left out?

Thanks :nice: