
So, a 15 amp fuse should cover it. It's large enough to handle all of your power demands and small enough that a short to ground will make light work of it.
You are using an out of date browser. It may not display this or other websites correctly.
You should upgrade or use an alternative browser.
You should upgrade or use an alternative browser.
Progress Thread Progress Thread- From6to8's 1994 Cobra Supercharger install
- Thread starter from6to8
- Start date
Okay but with a fuse tap there has to me too fuses put in. So I know the 15 that has to go back in there but what size does the other one need to be I guess from what I was reading and even what I shared here last night, I think it said like something like a very small maybe a 5amp should suffice for the other fuse for the gauges.So, a 15 amp fuse should cover it. It's large enough to handle all of your power demands and small enough that a short to ground will make light work of it.
It was either what I googled and shared here last night or something I googled prior to
gkomo
now i can hopefully expect to receive the shaft
for my gauges I added one of those ‘add a circuit’ deals, which I think was a 15 amp fuse I tapped into. I put the 15 amp fuse in the ‘first’ fuse slot and then a smaller (10 or 5 amp fuse) in the ‘second’ slot that goes to the gauge, whatever was suitable for the gauge… can’t recall off the top of my head.
Yeah pretty much what I was going to do from the little research and stuff last night. I'm going to call Gloria and see what fuse they recommendfor my gauges I added one of those ‘add a circuit’ deals, which I think was a 15 amp fuse I tapped into. I put the 15 amp fuse in the ‘first’ fuse slot and then a smaller (10 or 5 amp fuse) in the ‘second’ slot that goes to the gauge, whatever was suitable for the gauge… can’t recall off the top of my head.
Okay so yeah I was going to make a baffle and I was going to run a breather filter that I bought. Trying to make a baffle it's going to be too tricky I don't want it to take an eternity to fill oil and so I'd rather just buy one but I saw only one online for 86 to 93 which 86 to 95 should be the same valve covers and actually mine might be 86 to 93 I bought those back in 05. But yeah the measurements are off from the one that's online to buy and the aftermarket stuff the measurements also have to be right so I was thinking about this option right here.
I talked to another guy he said he has three supercharged cars and for years what he has been doing is running a breather cap the nipple and just keep the OEM PCV system and he has not had any issues but he do have baffles in his valve cover.
So instead of me putting a baffle in the oil field location now I will just keep that closed off and feel that same location but I will cap the nipple.
Summit sells one of these that I can put this is a breather I can put at the back of the passenger side valve cover that will be the breather the same thing that I was going to install in the oilfield location so it's going to be doing the same thing. What do you think
Summit Racing SUM-440331 Summit Racing™ Valve Cover Baffle Kits | Summit Racing https://share.google/j5kY3XAoZ82ok8u5m
@Noobz347
@gkomo
actually this one would likely work better for me
 thisoldfarmshop.com
Fox Body Mustang Oil Baffle ► This Old Farm Shop
Fox Body Mustang Oil Baffle Baffle makes it possible to use stock valve covers with stud mounted rocker arms.
thisoldfarmshop.com
actually this one would likely work better for me
Fox Body Mustang Oil Baffle ► This Old Farm Shop
Fox Body Mustang Oil Baffle Baffle makes it possible to use stock valve covers with stud mounted rocker arms.
I'd probably give that one a shot.
Never seen it before but I bet it would work on my rig too. I have a small oil separator in-line. It would probably go from [a tiny bit of oil] to [no oil at all] in the separator.
I will say this though:
It is possible that by restricting that orifice that you increase air velocity through it. Higher velocity means more oil in the mist.
It is possible that by restricting that orifice that you increase air velocity through it. Higher velocity means more oil in the mist.
Yeah it might work for you too it should. So what I'm going to do is just see how it works for me with that baffle, a breather, and stop PCV systemI'd probably give that one a shot.
Never seen it before but I bet it would work on my rig too. I have a small oil separator in-line. It would probably go from [a tiny bit of oil] to [no oil at all] in the separator.
I don't know why I am not getting notifications or email notifications I used to get the email notifications for replies I'm just now checking back here for the first time today and seeing your reply.I will say this though:
It is possible that by restricting that orifice that you increase air velocity through it. Higher velocity means more oil in the mist.
Take a look at the video click on that link and take a look at the video he shows how the he actually took a water hose and everything and ran water through it after he had installed it in the valve cover to show the water running fluidly and said the oil will not be restricted from going in and out you know where from going you know feeling your oil filling it out with oil. So does that make a difference in what you just said about restricting the orifice if the oil is flowing fine? As far as filling up but as far as it's sucking oil then I would think it should not?
If that video doesn't show it let me know I can attach one from YouTube that I found the other day
View: https://youtu.be/CITloQpKCnQ?si=ZGigZelrDVZZU5VH
View: https://youtu.be/CITloQpKCnQ?si=ZGigZelrDVZZU5VH
I don't know why I am not getting notifications or email notifications I used to get the email notifications for replies I'm just now checking back here for the first time today and seeing your reply.
Take a look at the video click on that link and take a look at the video he shows how the he actually took a water hose and everything and ran water through it after he had installed it in the valve cover to show the water running fluidly and said the oil will not be restricted from going in and out you know where from going you know feeling your oil filling it out with oil. So does that make a difference in what you just said about restricting the orifice if the oil is flowing fine? As far as filling up but as far as it's sucking oil then I would think it should not?
I am not certain. I can only speculate at this point. Totally worth trying out though.
So I'm thinking of 2 ideas to put my breather out of the way from hitting the Tb/discharge tube and both ideas are from a guy I saw on the corral. I'm awaiting his reply back as he replies not really fast lol. What do you think the one pic is, the black piece that's in the VC fill hole then the one way breather from CFM is attached to it.I am not certain. I can only speculate at this point. Totally worth trying out though.
In the other pic it's a Cfm breather but he has it ran over the discharge tube on the other car. I'm thinking of ideas of what to use to screw in the VC fill hole that can't be too high then 45 off of it to go towards the dizzy or if I have room, run it over the discharge like he has I'm running a 96-98 oem hood and though it has a scoop it's mostly in the middle of the hood.
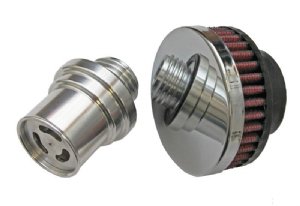
CFM 4.6/5.0/5.4/5.8L Baffled Billet Valve Cover Breather Kit for 1986-2001 Mustang GT & Cobra
“NOT FOR SALE/LEGAL IN CALIFORNIA/CARB STATES. ORDERS WILL BE CANCELLED AND REFUNDED“ FREE SHIPPING available via USPS First Class Mail to USA, APO, FPO, and PR. Please contact us for possible shipping discount using a different shipping method or to any other location.
Attachments
-
 TrickVert on the corral's Supercharger he had for sale and idea for oil fill cap mod to breat...webp219.7 KB · Views: 42
 -
 TrickVert's image of cfm one way breather with silicone hose putting breather over the discha...webp33.7 KB · Views: 49
 -
 TrickVert's image of cfm one way breather with silicone hose putting breather over the discha...webp25.2 KB · Views: 45
 -
 TrickVert's image of cfm one way breather with silicone hose putting breather over the discha...webp30.9 KB · Views: 47
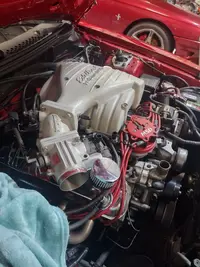
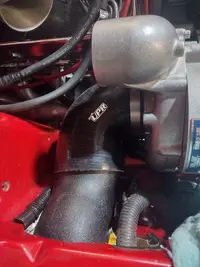
Well lately I ran into the issue of trying to figure out the baffle for the valve cover and the fitment of the breather on the vc because of running the elbow setup on the intake and it being so close to the discharge pipe. I ended up making a baffle and finding some fittings at work to try. I'm going to come off the male threaded to hose barb with a 1 1/4 90 silicone elbow followed by a short PVC to go in between the breather that's going to be screwed into a PVC threaded female to PVC female.
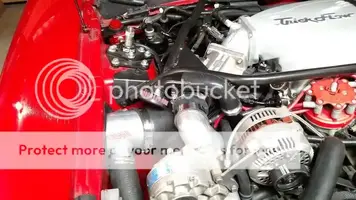
When I went to install the UPR boostmaster pipe I realized what people are saying when I did the research about the fitment. Because it was hard to get a pro m meter and filter which one thing I like about them is they come together as one piece, I went with the 90 mrm SCT Ba 2600. When you get that meter you have to buy a flange adapter that will allow it to accept a coupling on the other side that connects to the pipe. Of course there are different couplings you can buy and most of them will come probably about a minimum of I would say three or four inches so you would have to actually cut it/them if you are trying to fit the filter in to where it don't have to 90 downward.
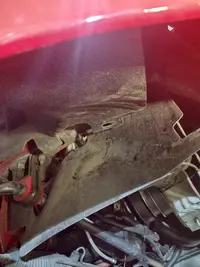
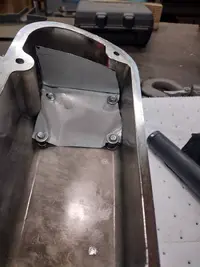
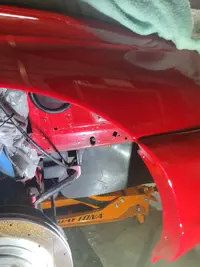
I originally was trying to maneuver it to where the filter was horizontal but it was too long and was hitting the frame. Then came the issue of the fender liner hitting the pipe so I had to be creative and cut the liner where it hit so that it can clear. I have an old liner that I was able to practice on and mock up, ended up making two different cuts and finally got it at the position to go ahead and make the cut on the liner to use. I definitely wanted to run a liner because the filter is sitting kind of low and want to keep it as decently clean as possible and definitely avoid water. This whole week was kind of challenging with having to come up with custom stuff and making stuff work but I'm getting closer LOL....
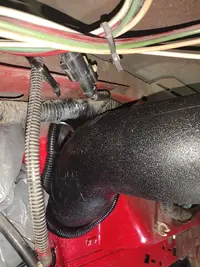
Btw, I attached some photos of the process but for instance the breather with the elbow and the PVC that's not what I'm going to end up using that was early in the process of just trying to see how I was going to run it. I got a few more things to do to the liner there are a few gaps that I am going to fill with some rubber matting that I'm going to attach but all in all the cut came out well and there's just a few things I want to clean up. The hole for the pipe I had to make some some adjustments on it as I originally cut it too high listening to this one guy who had an Anderson  , and I actually made a piece of sheet metal to fill it some but after I got the pipe in and got it situated and ran the loom around it doesn't look nearly as big of a gap and everything fills in decently with the loom.
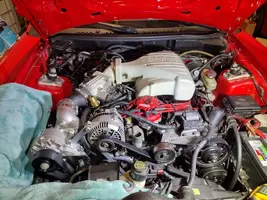
I got most of the headaches and the hard stuff out of the way and now to finalize hopefully next week and everything will be a whole lot cleaner than what you see in the bay and get everything back together it'll be good to go.
Also I realized the meter is backwards and I need to swap it tomorrow
When I went to install the UPR boostmaster pipe I realized what people are saying when I did the research about the fitment. Because it was hard to get a pro m meter and filter which one thing I like about them is they come together as one piece, I went with the 90 mrm SCT Ba 2600. When you get that meter you have to buy a flange adapter that will allow it to accept a coupling on the other side that connects to the pipe. Of course there are different couplings you can buy and most of them will come probably about a minimum of I would say three or four inches so you would have to actually cut it/them if you are trying to fit the filter in to where it don't have to 90 downward.
I originally was trying to maneuver it to where the filter was horizontal but it was too long and was hitting the frame. Then came the issue of the fender liner hitting the pipe so I had to be creative and cut the liner where it hit so that it can clear. I have an old liner that I was able to practice on and mock up, ended up making two different cuts and finally got it at the position to go ahead and make the cut on the liner to use. I definitely wanted to run a liner because the filter is sitting kind of low and want to keep it as decently clean as possible and definitely avoid water. This whole week was kind of challenging with having to come up with custom stuff and making stuff work but I'm getting closer LOL....
Btw, I attached some photos of the process but for instance the breather with the elbow and the PVC that's not what I'm going to end up using that was early in the process of just trying to see how I was going to run it. I got a few more things to do to the liner there are a few gaps that I am going to fill with some rubber matting that I'm going to attach but all in all the cut came out well and there's just a few things I want to clean up. The hole for the pipe I had to make some some adjustments on it as I originally cut it too high listening to this one guy who had an Anderson
, and I actually made a piece of sheet metal to fill it some but after I got the pipe in and got it situated and ran the loom around it doesn't look nearly as big of a gap and everything fills in decently with the loom.I got most of the headaches and the hard stuff out of the way and now to finalize hopefully next week and everything will be a whole lot cleaner than what you see in the bay and get everything back together it'll be good to go.
Also I realized the meter is backwards and I need to swap it tomorrow
Attachments
-
 IMG_20260123_201421528_HDR.webp590 KB · Views: 58
 -
 IMG_20260124_133622725.webp433 KB · Views: 55
 -
 IMG_20260113_094910703_HDR.webp290.9 KB · Views: 40
 -
 IMG_20260124_133635067_HDR.webp1.2 MB · Views: 59
 -
 IMG_20260109_171002394_HDR.webp372.7 KB · Views: 49
 -
 IMG_20260124_170707840_HDR.webp337 KB · Views: 39
 -
 IMG_20260124_174236354_HDR.webp405.1 KB · Views: 53
 -
 IMG_20260124_170553941_HDR.webp436.2 KB · Views: 65
 -
 IMG_20260124_170655126_HDR.webp520 KB · Views: 57
 -
 IMG_20260123_201512544_HDR.webp384.7 KB · Views: 47
 -
 IMG_20260112_181059237_HDR.webp338.7 KB · Views: 47
 -
 IMG_20260113_094903088_HDR.webp424.5 KB · Views: 57
 -
 IMG_20260119_154013139_HDR.webp312.7 KB · Views: 53
 -
 IMG_20260124_144953356_HDR.webp504.9 KB · Views: 56
 -
 IMG_20260113_135922329_HDR.webp308.1 KB · Views: 49
 -
 IMG_20260124_170546644_HDR.webp811.2 KB · Views: 51
 -
 IMG_20260121_183244214.webp218.5 KB · Views: 44
Last edited:
gkomo
now i can hopefully expect to receive the shaft
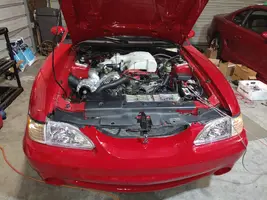
I feel like you’ve been talking about buying a supercharger and now one just suddenly appeared, or is this a different car? Vortech?
For this build thread it was always about a supercharger for it. When I started this thread i was getting my ducks in order and gathering information doing the research and I originally was going to take it to a guy with a shop about 3 hours away and let him install everything. My research led me to believe I could do it myself so yeah I finally got the car back after hitting a deer in October that set me back a few months and I didn't even start on the blower install until December after getting all the most of the parts in Black Friday.I feel like you’ve been talking about buying a supercharger and now one just suddenly appeared, or is this a different car? Vortech?
Vortec V3
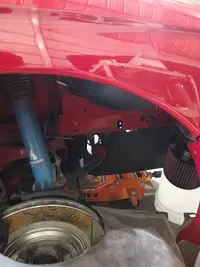
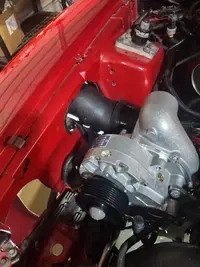
Realized the position of the pipe was going to hit the tire so I had to trim just a few small areas of the corner on each side of the holes and I was able to readjust and reposition it much much higher. That UPR boost master pipe definitely require some maneuvering LOL . Also I know I got to flip the meter
. Also I know I got to flip the meterAttachments
-
 IMG_20260125_180514056_HDR.webp261.7 KB · Views: 41
 -
 IMG_20260125_180503935_HDR.webp446.4 KB · Views: 50
 -
 IMG_20260125_180246467_HDR.webp414.8 KB · Views: 49
 -
 IMG_20260125_180237549.webp834.7 KB · Views: 44
 -
 IMG_20260125_175144982_HDR.webp302.7 KB · Views: 45
 -
 IMG_20260125_175141824.webp212.4 KB · Views: 46
Well since I got the boostmaster pipe installed and finished buttoning things up, I had a few small minor issues that I got worked out. Upon starting the car I had a little issue with the positive battery cable and the injectors. I took the alternator out the first time you little small single wire clip piece of it broke and I glued it back together. When I went to fire the car up for the first time the volts needle was jumping around and ended up tightening down the positive post more. Through all of that I was diagnosing the electrical system just checking everything over putting on wires and such too.
Also had a situation with the number five fuel injector and it didn't happen when I first fired the car up, but after about the third time of letting it run that one day idling for about 5 to 7 minutes each time, the third time I was sitting in the car and I heard a whoosh. I thought it was coolant but turned out the that number five injector had popped out of the rail some and I could see I could actually see piece of the o-ring. I was trying to figure out what happened ended up taking the rail loose on both sides lubing everything back up putting it back together. I did that two to three different times and it still leaked at number five and I even swapped the number five and number six injector and it still leaked at number five.
During a little research someone said they had an issue where the bolt was bottoming out and there was a little bit of Play between the tab and the bolt head and actually that's exactly what my issue was. Just that one tab had a little play in it so put a washer in between it and do not have any more issues with it. The car still though I felt something was off as the two times I attempted to drive it it would sputter and not want to even go over 2,000 rpms, no power. Research led me to believe that the startup tune was just not good enough to be able to actually drive the car because my intention was to drive it up there to get it dynoed and for tweaks. Well this Thursday I'm actually going to trailer the car an hour and 45 minutes to the tuner.
Since I didn't really attach any images along the way I'm just going to attach quite a few here right now from the last spot I left off to now.
I guess the only way to upload a video here is to do it on YouTube first and then attach the YouTube link
Attachments
-
 IMG_20260125_180237549.webp834.7 KB · Views: 61
 -
 IMG_20260125_180246467_HDR.webp414.8 KB · Views: 43
 -
 IMG_20260125_175138649.webp243 KB · Views: 42
 -
 IMG_20260204_175052773_HDR.webp449.8 KB · Views: 58
 -
 IMG_20260125_175736181_HDR.webp677 KB · Views: 61
 -
 IMG_20260125_175654157.webp839.8 KB · Views: 55
 -
 IMG_20260125_175720712.webp358.8 KB · Views: 45
 -
 IMG_20260205_170152423.webp742.5 KB · Views: 54
 -
 IMG_20260206_183418639_HDR.webp457.3 KB · Views: 53
 -
 IMG_20260125_175141824.webp212.4 KB · Views: 40
 -
 IMG_20260204_171309616_HDR.webp534.7 KB · Views: 48
 -
 IMG_20260128_173035575_HDR.webp469.5 KB · Views: 53
 -
 IMG_20260125_175144982_HDR.webp302.7 KB · Views: 46
 -
 IMG_20260206_183359871_HDR.webp502.6 KB · Views: 58
 -
 IMG_20260206_183349690.webp478 KB · Views: 51
 -
 IMG_20260206_183424181_HDR.webp539.4 KB · Views: 60
 -
 IMG_20260206_183431083_HDR.webp710.7 KB · Views: 59
Last edited:

gkomo
now i can hopefully expect to receive the shaft
You probably have stated it already but what are you using to tune it? Do you have a standalone ECU?
Weird about the start up tune. From the videos i've watched people can at least drive their cars gingerly to get some datalogging going, and tweak from there. Guess it doesn't matter for you if you are trailering it to a tuner anyways.
Good work!
Weird about the start up tune. From the videos i've watched people can at least drive their cars gingerly to get some datalogging going, and tweak from there. Guess it doesn't matter for you if you are trailering it to a tuner anyways.
Good work!
Stock ecu chip tune using an Sct. It was already tuned for the Na setup prior so he just made the changes based on me going from 24s to 60s and adding the blower. Also of course went from whatever fuel pump was in to a 255 and UPR boostmaster pipe.You probably have stated it already but what are you using to tune it? Do you have a standalone ECU?
Weird about the start up tune. From the videos i've watched people can at least drive their cars gingerly to get some datalogging going, and tweak from there. Guess it doesn't matter for you if you are trailering it to a tuner anyways.
Good work!
I made a post on Facebook and most everyone said that pretty much they even with their startup tune they had to end up taking it in to get tuned because it was undrivable pretty much just trying to get it above 2000 RPMs
I think years ago when I did some research though and I don't remember if it was a blower car but I remember people having a startup tune for even some big or stroker motors and the car drove decent in order to get some data Love again stuff done.
Similar threads
- Replies
- 24
- Views
- 875
- Replies
- 43
- Views
- 943
- Replies
- 19
- Views
- 723