Street Scene Main Grille

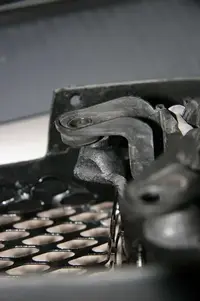
I just bought a Street Scene main grille with center fogs (black chrome) and am trying to swap over my fog lights. The mounting points on the grille for each fog don't even come close to lining up with the screw positions on the fog light mounting brackets. Has anyone installed one of these and encountered a similar situation? Looks like I'll be calling Street Scene on Monday. :shrug:
 
Pictures of my new Street Scene Grille:

From the back compared to my 3D Carbon Eleanor
IMG_0409.webp


The mounting lugs don't even come close to lining up:
IMG_0410.webp


Vertical alignment sucks too:
IMG_0411.webp


So I called Street Scene and explained what the issue was. Their rep first tried to tell me that I need to screw in each tab one at a time, drilling holes in the tabs, and they should be springy enough to work. I called BS - the alignment is way off.

Then he asks me where I bought it. He finally explains that yah they "noticed" that the "mold was off a bit on that one" and that they've rebuilt the mold and have one that actually fits.

I asked him if I can send this one back to them for replacement. He says I have to return it to my supplier, who has to return it to his supplier, and so on. He wouldn't budge. I can't believe that they would let some crap out of their site and then force a customer they've already inconvenienced into an even more convoluted return procedure. WTF?
 

Attachments

  • IMG_0409.webp
    IMG_0409.webp
    105.4 KB · Views: 114
  • IMG_0410.webp
    IMG_0410.webp
    44 KB · Views: 114
  • IMG_0411.webp
    IMG_0411.webp
    17 KB · Views: 109
Street Scenes Center fog light grill

I purchased mine a few weeks ago and I encountered the same problem. I worked through it and it came out fine. The only problem I did have was that the back of the driver's side fog light plug-in was a very tight fit. I did not realize this unitl I went to button up the radiator cover and the push pin clips weren't lining up. I would up cutting 2 of the of small plasitc clips off so that I could change the directiong of the wiring harness. Sorry if this sounds confusing. During the reinstall I accidently dislodged the black metal bezzel inside one of the fog lights...what a pain in the ass that was to correct. THe factory fog lights are so cheap looking! Anyway this is how mine turned out. I kinda like the look because it stands out from most of the others.
I also painted the metal braket for the hood black and moved my horns so they were not visble through the grill. I choose this grill because it matches the grill in my Saleen Heritage bumper cover.
For some reason my photos will not upload...keeps saying upload failed!

Host your pics on Photobucket and then paste the IMG link into a message here. I'd like to see how yours turned out. SS insisted that I return it through the distributor. What a PITA.
 
So after 3 weeks of waiting, my replacement Street Scene Grille arrived last night .....


This is how the foglights fit this time. The inside lugs fit nicely but the outside lugs are still way off - in all three dimensions. It's the same problem on both sides.

IMG_7010.webp


Closeup of the outside upper mounting point:

IMG_7012.webp


Closeup of the outside lower mounting point:

IMG_7013.webp


This grille is basically the same as the first one I got.

Looking for opinions on what to do. My options:


1) Uninstall the lower grille and send both back.

2) Leave the lower in (I wanted a grille to help protect my intercooler rad) and stay with my 3D Carbon Eleanor upper.

3) Leave the lower in and use this upper installing the fog lights using the crappy mounting points.

I've already contacted SS to see if they have any suggestions. I'm not impressed! :mad:
 

Attachments

  • IMG_7010.webp
    IMG_7010.webp
    76.7 KB · Views: 112
  • IMG_7012.webp
    IMG_7012.webp
    24.5 KB · Views: 122
  • IMG_7013.webp
    IMG_7013.webp
    19.8 KB · Views: 119
Their suggestion (from Mike Spagnola - Street Scene President):

"Those tabs are "soft" and should be able to be moved to align the light"

Translation:

Rather than putting any effort into designing a product that actually works, we prefer our customers use a BFH to get it to fit! :nonono:
 
That sucks! Even the second time around after they "rebuilt" their mold and it's still that far off:eek:
Which grill do you like better? If you like the SS grill, won't drilling holes in the fog housing be ok? I'd do it if I liked that grill better. To bad SHR doesn't make an upper grill...yet.
 
That sucks! Even the second time around after they "rebuilt" their mold and it's still that far off:eek:
Which grill do you like better? If you like the SS grill, won't drilling holes in the fog housing be ok? I'd do it if I liked that grill better. To bad SHR doesn't make an upper grill...yet.

I wanted a lower grill to help protect the intercooler rad; I wanted the upper and lower to match; and I really like center fogs. I also wanted something that is much easier to detail than the honeycomb grille. I'd spend as much time on that damned honeycomb as the rest of the car.

Do you know something about SHR that you're not sharing????
 
The only grills I know that SHR sell or are planning are the GT lower grill inserts and in development stages of a lower grill for the GT/CS.
If they made an upper grill for the Mustang, I know it would be extremely high quality! Out of the seven products I have that they make, all of them have fit great the first time:nice:

After your comment I went to their site and saw the lower grille inserts. I'll be ordering a set and sending this Street Scene crap back. Thanks for the heads up!

Anyone have any tips for speed detailing the honeycomb? All those nooks and crannies are a PITA.
 
After your comment I went to their site and saw the lower grille inserts. I'll be ordering a set and sending this Street Scene crap back. Thanks for the heads up!

Anyone have any tips for speed detailing the honeycomb? All those nooks and crannies are a PITA.

Compressed air after washing..


As for the street scene fit, I have yet to see one go in perfect with everything lined up. Have to drill new holes and bend and press things to fit every time..
 
After your comment I went to their site and saw the lower grille inserts. I'll be ordering a set and sending this Street Scene crap back. Thanks for the heads up!

Anyone have any tips for speed detailing the honeycomb? All those nooks and crannies are a PITA.

You're welcome:nice:
I've never really had any problems keeping the front grill honeycomb clean. Just wash with a soapy mitt and hose off. I would only run over the front real quick with a chamois and wipe the water off the sides and bottom of the grill and be done with it. The PITA part for me is the honeycomb tail panel! It is so shallow that the water just pools up and takes nearly 10 minutes to dry with the chamois. A few times I've used the leaf blower, but that's a pain to do often.
 
95% of the time I "wash" my car by dusting it twice with a Cali duster, then in sections I use a micro fibre cloth and Purple Slice detailer followed immediately with a clean microfibre cloth buff. The Cali duster obviously won't remove dust inside the honeycomb. I like to get in there with a cloth and clean it all out, then use Armour All to bring our the black. I'm thinking that maybe some of those small (1/2" wide) foam paint brushes that you can get in hardware store might work better. I like Emay's idea of using compressed air too. I've got to come up with a quicker solution that using a microfibre cloth wrapped around my fingers.

By the way, I try to avoid rain & mud and park my car for winter so it hardly ever sees significant "dirt" on the paint. For you lucky bastards out driving your stangs today, it's -10f here and we had a foot of snow overnight - about 100 more days before we can get our cars out.
 
OK - so I feel like a complete idiot. This afternoon I decided to take one final shot at the grille. The grille shell is made out of a tough but somewhat flexible plastic and of course is bowed to contour the front of the car. It turns out that the plastic must relax during cooling and the bow therefore increases creating an apparent misalignment of the fog light mounting points.

To mount the fogs, I attached the foglight inner posts which seemed to line up nicely then bowed the grille ends back out. That flex and a bit of additional persuasion of each post allowed me to line up the outboard tabs and screw the fogs into place. With fogs installed, the whole assembly fits the car like a glove. (Insert Homer Simpson "DOH" here)

I can say in retrospect that although their instructions are very poor (they could have pointed out the alignment "procedure" required), the grille assembly actually fits and looks great. Pictures to follow in due course.