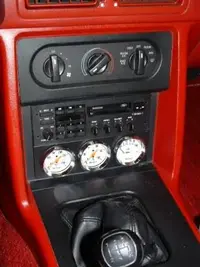
What do you think of this gauge mounting?

  • Thread starter Thread starter oz
  • Start date Start date

oz

Founding Member
Jun 29, 2000
1,079
10
58
Plymouth, MI
Greetings,
I finished up a metal panel to mount 3 - 2" gauges in my center stack, under my radio. I finished it with satin black textured paint and am pretty happy with it. It is slightly more glossy than the plastic but not as noticeable as the flash photo would indicate.

Any suggestions on what to do with the chrome on the gauges? It is a bit out of place in a fox mustang interior.

Thanks
 

Attachments

  • DSCF0181.webp
    DSCF0181.webp
    17.4 KB · Views: 292
You did a nice job.

I wanna hear what folks say about this too. I have one AM gauge with a chrome bezel and all the others are black (Phantoms). I need to convert the silver bezel but I have not seen a great way to do it. I'm not confident that I can draw and cut out a perfect circle to mask the lens/glass. I can see the gauge looking real crappy if that inner circle isnt perfect.

Did you consider mounting the gauges so the fronts of the bezels were pushed against the back of the facade you made? I'm not sure how that would have looked but it would have pretty much taken care of the shiny chrome bezels being so prominent.
 
I don't think the chrome looks that bad at all. You may have a bit of difficulty while you're driving seeing what the gauges are actually reading with them set up like that. You can always clock the gauges so the needles point straight up in the normal range. That way it only takes a quick glance to make sure everything is okay. That is from NASCAR gauge setup 101.
 
I don't think the chrome looks that bad at all. You may have a bit of difficulty while you're driving seeing what the gauges are actually reading with them set up like that. You can always clock the gauges so the needles point straight up in the normal range. That way it only takes a quick glance to make sure everything is okay. That is from NASCAR gauge setup 101.

That's how I do mine when it can be unobtrusively (some gauges look stupid when turned around).

Also, AM sells a dealie which angles the gauges towards the driver. Might be an option if they are hard to read.
 
what kind of metal stock did you make it out of an where did you get it? It looks nice! My car has the center console deleted an no heat/vents/controls so I'm putting the summit gauges in where the center vents go an need to trim it out.
 
lang,
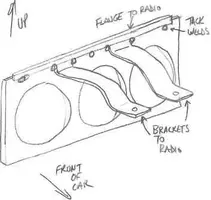
I got a 16 gauge metal plate at Home Depot and some metal cutting jigsaw blades and a 2" metal cutting hole saw... I first cut the holes with a 2" hole saw on a drill press and then cut the plate the same size as the storage bin that I took out. I cleaned up the edges with a bench grinder and diamond stone. Since the bin I took off had a flange that interfaces to the radio, I tack welded a flange to the back upper edge of my plate. I don't think this is really necessary but it makes it a little easier to 'tune' the fit to the radio since the upper edge is held flush to the radio.
To attach the plate to the radio I made a couple of straps (~5/8" wide), prebent them and attached them to the plate at the upper edge between the 1st and second hole and 2nd and third hole. If I did it again, I would probably want to attach them to the bottom of the plate since the top is held in place by the radio. You've got to be careful at the bottom though because there is an upturned flange on the instrument panel that just barely allows you to install the gauges. You can't go any further down than the bottom of the holes so the mounting straps will have to be attached between the holes.... If necessary, I was going to file down the flange on the IP but I didn't need to.
The straps shoul be pretty close to meeting up with the bracket that held the bin on the bottom of the radio. Adjust the bracket shape and drill holes and use the screws that attached the bin to attach the gauge plate. Tweak the fit as necessary. 16 gauge is stiff enough not to move during normal use but just soft enough to be moved to fit perfectly when needed.
To finish the plate, I flattened the visible surface on the diamond stone (since I had a few bumps from welding on the back side). I then used spot putty and wet sand primer to get the surface scratch free. I finished it with Rustoleum satin black textured paint (Home Depot). I probably didn't need to get the surface completely scratch free because the textured paint covers up a lot of imperfections.
Check out the sketch of my design attached.

Hopefully this helps.
 

Attachments

  • gauge pod1.webp
    gauge pod1.webp
    10.2 KB · Views: 148
Nice job on the install, however I probably wouldn't have put them so down low - but each to his own. I like having the gauges where they are easier to see - I have a 2 gauge A pillar pod and the gauge pod that mounts up on the dash with the large tach and 2 smaller gauges. Not very stealth however!
 
I don't plan to stare at them so I figure they will be fine at the bottom of the center stack. I certainly wouldn't put my tach or anything like that down there. Since my OEM gauges will still work, these additional gauges are more for confirmation of what I'm seeing in the cluster.
My Marauder has gauges in this location and they are pretty easy to see.