
You are using an out of date browser. It may not display this or other websites correctly.
You should upgrade or use an alternative browser.
You should upgrade or use an alternative browser.
NEWProject...DAY 3 (after 2 weeks)
- Thread starter 94GTLaserRC
- Start date

option 2
Im wondering if we only need to do the pass side. The driver's side had the battery, which means there was more room to begin with. Ill do some fitting today and see.
Yobi: will be working on the yard after 11am, so give me a call before that if you want the TB.
RC
Here's some pics from my engine bay project, http://www.mustangaddiction.com/pics.htm?bay2.html. You've got the easy part done now. Getting everything perfectly smooth with the bondo is a PITA. It took me three long weekends and half a can of bondo before I was happy with it.
Good luck!
I was studying your engine bay molding carefully to see how I can do mine. I just wanted to know how you would access the headlight bulbs if you need to, since you covered that area that is normally open on the stock setup.
RC
OPTION 2 WINS:
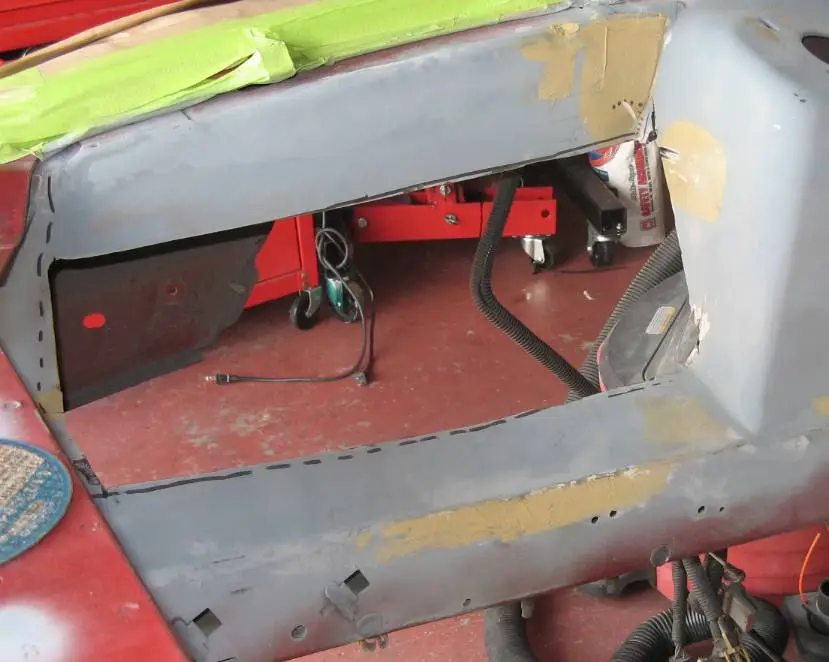
Cut Pass Side....I decided instead of cutting all of it out, to cut a "window" and then drop a diagonal, leaving the front open a bit.
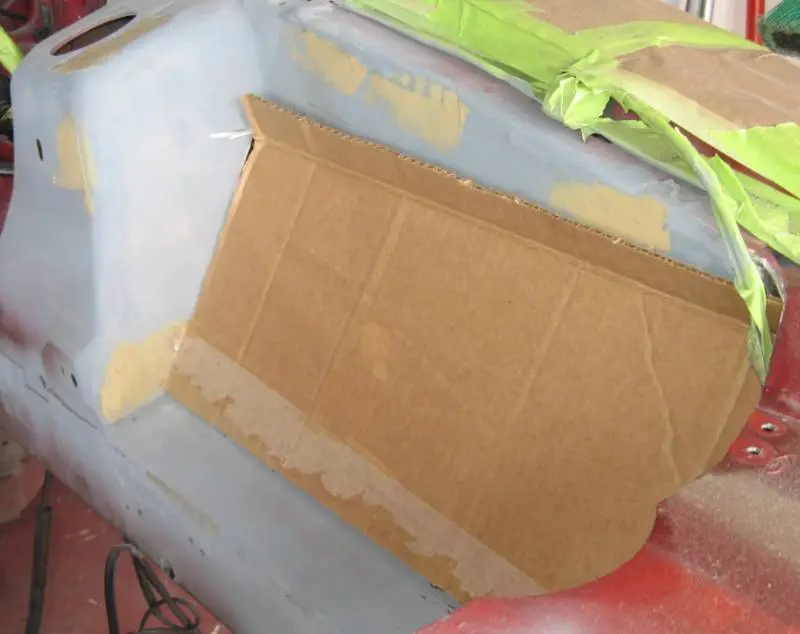
Here is a dry fit with the cardboard. I think when I get done with this stage I will be happy that we back-tracked
Thanks again for pointing that out Adam!
RC
Cut Pass Side....I decided instead of cutting all of it out, to cut a "window" and then drop a diagonal, leaving the front open a bit.
Here is a dry fit with the cardboard. I think when I get done with this stage I will be happy that we back-tracked
Thanks again for pointing that out Adam!
RC

Im wondering if we only need to do the pass side. The driver's side had the battery, which means there was more room to begin with. Ill do some fitting today and see.
Yobi: will be working on the yard after 11am, so give me a call before that if you want the TB.
RC
The section where the battery is won't be a problem, but IIRC there was a bulge next to the shock tower which probably was for tire clearance. To answer your pm, I just welded my plates over top of the factory sheet metal so tire clearance wasn't a problem on my car.
I COULD get to my headlight bulbs very easily by going between the radiator support and the back of the headlights. But I installed one of those UPR radiator covers, so now I have to remove it to change the bulbs.
The section where the battery is won't be a problem, but IIRC there was a bulge next to the shock tower which probably was for tire clearance. To answer your pm, I just welded my plates over top of the factory sheet metal so tire clearance wasn't a problem on my car.
I COULD get to my headlight bulbs very easily by going between the radiator support and the back of the headlights. But I installed one of those UPR radiator covers, so now I have to remove it to change the bulbs.
Thanks...If I knew the "straight down" cuts wouldnt work, I would have left the stock metal there also. Since we went straight down, our stock metal came out.
Now that we're back-tracking, how do you think it will work with the way the last photo shows?
1....the cutout as seen in photo one "should" leave enough clearance?
2....the cardboard cutout piece should be at the correct angle?
Thanks
RC

str8stang036
New Member
did you fit the tire again?
We shouldnt need to, judging by old sheet metal left behind and where cuts were made, but we can check before the next welding stage.. Going to get the metal today and some extra cutting wheels.
BTW...Jose...you didnt mention in your post what you think about the cuts?


RC
Thanks...If I knew the "straight down" cuts wouldnt work, I would have left the stock metal there also. Since we went straight down, our stock metal came out.
Now that we're back-tracking, how do you think it will work with the way the last photo shows?
1....the cutout as seen in photo one "should" leave enough clearance?
2....the cardboard cutout piece should be at the correct angle?
Thanks
RC
Looks good to me.
Maybe you could put your inner liner back in and see how close it is? If it fits, then you shouldn't have any problems with the tires fitting.
str8stang036
New Member
Looks good to me.
Maybe you could put your inner liner back in and see how close it is? If it fits, then you shouldn't have any problems with the tires fitting.
The original pieces are too "hacked" up to dry fit. The main clearance problem area before was were the back and side corers met in the fenderwill. the side piece came down about 3 inches past normal, and the bottom went OUT about 3 inches more than normal. That whole corners is eliminated now...Still need room for the power Pipe for the Vortech.
RC
Ok....here are the new pieces cut:
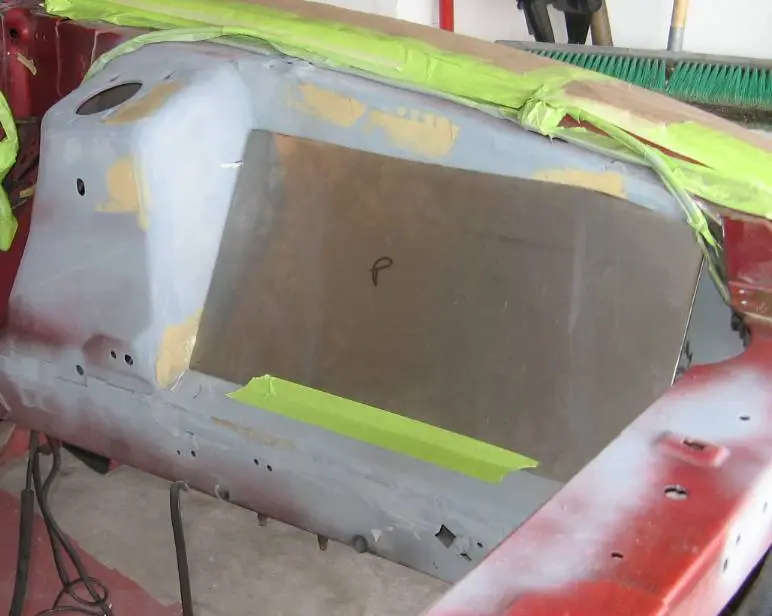
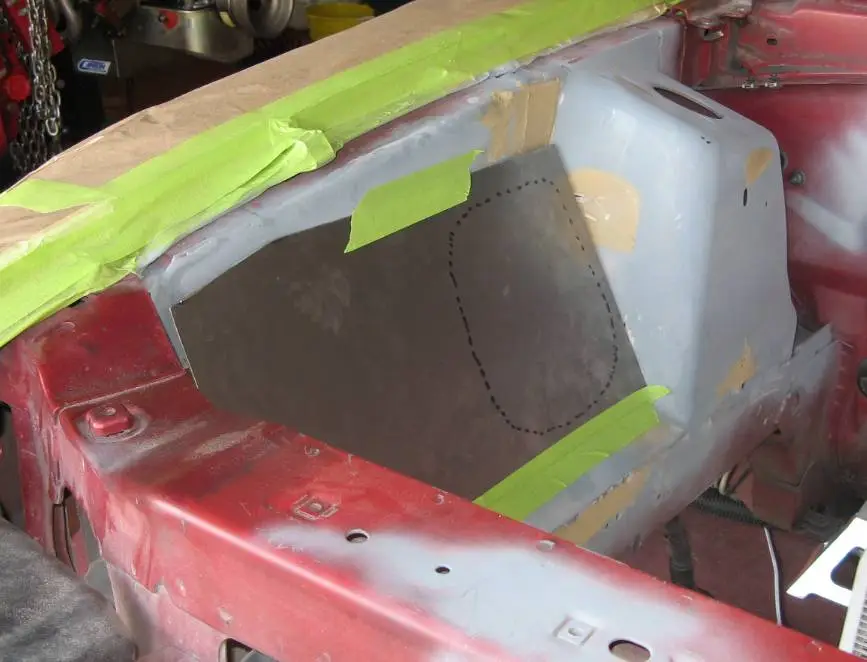
I think Option 2 was the right choice...May still even get this painted by next Saturday.
The other thing I did right THIS TIME was to prepare the metal surface on the outer portion...I used a metal conditioner, then wiped clean with Laquer thinner, let dry, then primed with etching primer...This should protect the metal from rusting.
Will get some more pics up Wed before and After priming.
RC
I think Option 2 was the right choice...May still even get this painted by next Saturday.
The other thing I did right THIS TIME was to prepare the metal surface on the outer portion...I used a metal conditioner, then wiped clean with Laquer thinner, let dry, then primed with etching primer...This should protect the metal from rusting.
Will get some more pics up Wed before and After priming.
RC

Yobi1Kanobi
Member
- Apr 9, 2003
- 559
- 0
- 16
That looks Good
Better than what you saw Sat, right?
Got STB $$...Thanks!! ENJOY!!
RC

Adam95GT
New Member
Better than what you saw Sat, right?
Got STB $$...Thanks!! ENJOY!!
RC
Bout to say man... i know i didnt have tire clearance... im cutting out mine and doing it on an angle instead of welding up all the holes... ill show ya how mine is comming along... Im just glad i was looking at this as i was doing mine... i loved the way you did yours at first... and while i was cutting it out with the air saw... i noticed that there was no way i could turn the wheel... i had chris hold the panel up and i cut the wheel sure enough it hit....

GTA_V6_Mustang
Active Member
Ok so now I see the pictures you where telling me about. You know everything your doing looks easier in pictures then in person, lol.
Bout to say man... i know i didnt have tire clearance... im cutting out mine and doing it on an angle instead of welding up all the holes... ill show ya how mine is comming along... Im just glad i was looking at this as i was doing mine... i loved the way you did yours at first... and while i was cutting it out with the air saw... i noticed that there was no way i could turn the wheel... i had chris hold the panel up and i cut the wheel sure enough it hit....
Glad YOU could help... Would have Sckd if we got it all done and we found it out afterwards!!
Derrick...Yep, it always looks easy in the pics

RC
str8stang036
New Member
Is the line you made on the pass side the line for the power pipe? If it is, it seems too big.
Yes....I think we should try to cut it first.
RC

Is the line you made on the pass side the line for the power pipe? If it is, it seems too big.
ill be doing that to mine too... you need some room for when the motor torques, but not that big... right now i have the whole fender cut out for that
 doesnt look pretty at all
Id like to get some rubber trim to go around the hole so it doesnt scratch up the pipe too
Similar threads
- Replies
- 1
- Views
- 67


- Replies
- 4
- Views
- 467
- Replies
- 3
- Views
- 260


- Replies
- 1
- Views
- 569