Fox exploere upper intake

kendawg73

Well-Known Member
Feb 5, 2014
474
102
64
So I was going through my parts trying to get things ready for when the weather warms up so I can start work on the car again...

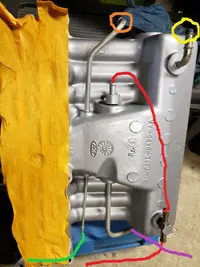
I'm looking at the bottom of the explorer upper intake, and it looks like some dumb ass crushed and pinched off, and cut the 2 vacuum connections instead of just capping them or hooking them together with a vac hose, there was suppose to be 3 there, the larger one in the center and 2 smaller ones on the sides.

And as you can see in the pic if you zoom in where I have the arrow pointing, it looks like its not even closed all the way... not sure on the other side.. but I assume they can't be air tight... so, that part doesn't screw out or anything does it? If not, can I maybe heat it up and melt some solder over the ends to seal it up? of even just put some JB weld on them or both? The 2nd pic is one I found on the interwebs showing what it was suppose to look like.

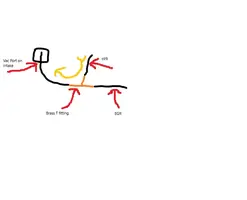
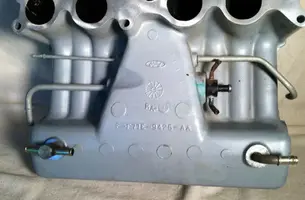
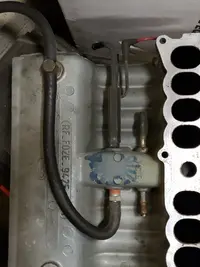
now the next 2 pic are my old intake and the explorer one... so looks like i'm going to be a few vac lines short on the explorer one, what should I hook up to where? Also, why does the PVC valve hook into that T and then the other side connect to another vac port? isn't it getting vacuum at the T already where the line from the PCV valve goes? Looks like the other end of that T the PVC goes to, will go to that part where the 2 ports were crushed and cut on the Explorer intake.
 

Attachments

  • 20190308_073555.webp
    20190308_073555.webp
    165 KB · Views: 259
  • 97explorer upper vac.webp
    97explorer upper vac.webp
    29.1 KB · Views: 310
  • 20190308_074132.webp
    20190308_074132.webp
    131.2 KB · Views: 249
  • 20190308_073541.webp
    20190308_073541.webp
    180.8 KB · Views: 254
Last edited:
The crushed ports are water ports for coolant. You don't need them.


When I prepped my explorer intake for install, I removed ALL of the explorer vac fittings. I tapped every hole for 1/4 or 1/8 NPT depending on how big of a vac line I needed and then installed a NPT to tube fitting. I tapped and drilled for the Mustang HO vacuum tree and installed that. End result was the install was 100% like stock.
 
  • Like
Reactions: Habu135
The crushed ports are water ports for coolant. You don't need them.


When I prepped my explorer intake for install, I removed ALL of the explorer vac fittings. I tapped every hole for 1/4 or 1/8 NPT depending on how big of a vac line I needed and then installed a NPT to tube fitting. I tapped and drilled for the Mustang HO vacuum tree and installed that. End result was the install was 100% like stock.

where do those water ports run to? did it just go in one and out the other? to just cool that little ring around the vac port there?

also, how did you remove the fittings? I think the only thing that is missing this that manifold tree that the stock mustang intake had, which had 3 connections.

Not really feeling drilling and tap the upper, hate to frak it up...
 
Last edited:
Yes, It just flows in and out of that jacket to cool/heat that port up.

The fittings do pull out. Pretty much just grab it with a good set of plier and pull. Only friction from the fit holds them in
 
Yes, It just flows in and out of that jacket to cool/heat that port up.

The fittings do pull out. Pretty much just grab it with a good set of plier and pull. Only friction from the fit holds them in

Hmm. I knew that coolant was cycled through the egr plate where the TB is, but I did not know coolant also gets cycled through the underside of the intake. Thats a new one on me.
 
Ok, well....I better check my hose routing again. I think I hooked my charcoal canister up to one of those lines. I haven't noticed a problem but who knows?
 
THe early f6 explorer intakes done have the coolant provision here. Just the f7 versions.

Here's a closeup of the fitting. The center port that you'd expect to see is vacuum, but the two curved ports are for coolant in/out

IMG_3312.webp


Found a pic of how I did my explorer intake. Ripped all the oe vac ports out, drilled and tapped my own

IMG_3313.webp
 
Another version of the explorer intake that has coolant in the manifold this time the coolant enters a cast in area of the upper. You can see the two hoses to the left running towards the TB.

The center port runs to the pcv on all applications

IMG_3314.webp
 
I’ve got a strange explorer intake that I’ll tackle at some point. What do you guys think about this one? Not trying to hijack thread:hide:. Would I just loop those coolant lines?
F6BAD49E-D45A-44B1-868C-E7DF4E2571BE.webp
 
Ok, can I do this?? (see the attach pic of my intake)….
1. Where I have the red line draw, this is where I hook the PVC valve (I'm still not sure why they have it hook like that, doesn't pull vacuum at that T fitting anyway?)
2. the purple goes to the plastic vacuum manifold on the firewall (by brake booster.)
3. the green I run to the FPR and EGR ( I would have to install a brass T-fitting for this to split the line since I'm a connection short).
4. what do I hook to the yellow? does the charcoal canister hook here?
5. and what do I do with this orange one? do I just cap it?

Now, I no longer have the air pump, so I wont be putting those tab solinoids that control the vacuum for that back on either, so no vacumm needed there.
Also, should I T (split) the green line for the FPR and EGR, or could I use the port on the vacuum manifold that was capped from the factory (I belive it's the one next to the source) and run that to the EGR?
BTW, I bought pretty much each size of black silicon vaccum hose to install (replace all the rubber lines).
 

Attachments

  • intake_vac.webp
    intake_vac.webp
    194 KB · Views: 261
EGR isn't direct vacuum. Needs to feed the regulator. My thought is that it doesn't need direct manifold vacuum so you could source it anywhere.

You want fuel pressure and charcoal canister on their own independent lines. Both could potentially pull fuel so you don't want that fuel to travel to other components pulling vac.

Orange would be charcoal canister.

Yellow is not needed. Cap it, or remove it and drill/tap and install plug.

Right, I meant run it to the EGR regulator, so I could hook it to the unused port on the vaccum mainifold on the firewall then. But ?, the EGR and FPR are hook on the stock intake to that 3 port tree that screws into the stock manifold anyway... So theoretically speaking, if I used a T to split that port... if I hook like this... (see pic) would that kind of almost be the same and prevent any fuel going to the EGR, since the port is pulling vaccum it would go to the intake anyway right? The flow is going to go like the yellow arrow, so if the FPR did go bad and leak feul it would get sucking into the intake.
 

Attachments

  • Untitled.webp
    Untitled.webp
    6.3 KB · Views: 277
In theory, that should work

Of course, if I remove the port that I have the purple line on, and drill and tap that to fit the stock mustang 3 port tree, I would be all set, and cap the others... hmmm but can I do it without screwing it up... makes me nervous drilling and tapping the alum.. I did for the ATC and EGR coolant port... of course I did screw up and ran the tap all the way in... (didn't know I shouldn't do that with NPT fittings) so not that screw in all the way... I put the liquid Teflon tape stuff on, and that tighten up.. so I shouldn't have any leaks...

So, do you know/remember for sure what size NPT tap I need to use for that stock tree? and what size drill bit to use for that?
 
I'll have to look back in my thread to see if I recall. But I drilled and tapped all the ports on mine, but did break one tap because I got greedy.

Use lube, go slow. And periodically clean and test fit.

I used 1/8 and 1/4 npt for the various barb fittings I installed. The vac tree MIGHT be 3/8 npt. Same as intake sensor but need to confirm