Build Thread 429MII's Build Thread

20200410_185706.jpg
20200410_185717.jpg
20200404_172811.jpg
20200410_185618.jpg


Making progress... slowly...many hours but lots of thinking book ended by a little work lol.. getting close now but still have to prep are under cowl grill before it is closed to me forever again.
I formed a drip rail on the upper lip of where the firewall makes the cowl, so now I won't need the big cowl seal across the top to clean it up a bit. Going to have to clearance the hood inner structure for that possibly, but I was going to have to modify the inner anyway for carb clearance so....
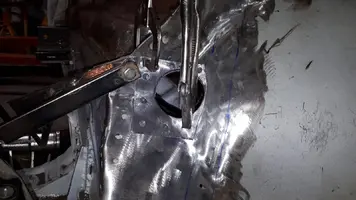
Put a small gusset out from the firewall to the inner fender on the pass side inner rear fender for some added strength. Since this side will have several holes for exhaust and it is a little more compromised than the drivers firewall because the driver's side has the reinforcement plates for brakes etc. It is naturally much more rigid on the drivers side from factory.
 
  • Like
Reactions: 2 users
  • Sponsors (?)


yup. Now I have to give a coat of paint the inside of the cowl because once she's closed up there is no getting back in there....and I have to figure out putting it back together and somehow seam sealing the joints when I can't get to them.....I will be so glad when this part is over.
 
  • Like
Reactions: 2 users
Sealed and attached the upper cowl yesterday with the epoxy panel adhesive.
This stuff has tiny glass beads in it that keep the prescribed thickness of adhesive required for the strongest bond. Apparently the bond is stronger than the parent metal (...in the case of sheet metal anyway...) Some of the other stuff out there does not have this feature, so you end up clamping the parts too tight and squishing out all the glue so there is no strength in the joint.
Seems to have worked to attach the upper panel and at the same time sealed the joint which was exactly why I had to use it instead of welding the seam. (there are still welds across the top drip rail channel and at the upper sides)
Now a bunch more grinding and welding today. Pics to follow.
I am so tired of being crumpled up inside the engine bay.
Can't wait to be finished this part of the build..............seems I've said this before..hmm.
 
  • Like
  • Hell Yeah!
Reactions: 1 users
I like this idea of the chrome bumper:
rear roll pan bumper + the camaro bumper
I didn't like the stock bumper look when I started to messing around with my mustang II. It had the idea of a tucked front bumper plus the divided chrome bumper of the escort RS 2600 or the capri RS:
ampnet_photo_20180731_152437-1-e1536516755756.jpg

bauW2ZA3yDu5jVDMJh7peLywoUA45UGKUarsB6I9e1Lko8LDww.jpg


The chrome bumpers are much more vintage then the 70ties plastic monsters... I will keep it stock for now (also because german TÜV).

I like the original tail lights... so I would keep them.

By the way the escort seems to have minilites with gray "rim star" (is this the right word?!) on them... seems to be a sign for my MII.
 
  • Like
Reactions: 1 user
The body line on the tail panel would be cut out. Hard to see from pics but tail panel would be flat and moves back about a inch and a half. hard to mock that up without cutting metal out. I can do all this stuff and I think tastefully so it won't look un natural so to speak, but I'm still torn with customizing.
One side of me says leave the body alone, other side says customize it but only if it really looks professional. Too many hack job mustang II customs out there, and I don't want to add to that group.
I already had a 66 mustang bumper mocked on the front and with sectioning and end shortening and what not it fits the body like it supposed to be there. So I do have a solution for the front as well, but once I take that leap there is no return.
 
  • Like
Reactions: 1 users
Started the process of finally welding in the trans tunnel and firewall started. firewall is tacked in, half of tunnel. Now it's weld, grind repeat for the foreseeable future lol...
Cut the hole for the rearmost header tube on the pass side as it was easier without the firewall in. Made a reinforcement for the area. pics to follow...
 
  • Like
Reactions: 2 users
WAY back when, I had a brilliant idea of installing a Boss 302 clone in my car, then it progressed to installing a 427 Windsor stroker with Cleveland heads. Building headers was THE part of it all that intimidated me enough to scrap the idea - I can't imagine trying to work on actual big block! But so far you're doing great, even if it IS frustrating!
 
Thanks for the support ..... I have been doing a lot of swearing unfortunately.
The back pipe,to answer the question, goes behind the old firewall. It will be separated from the flange so it will be a one cylinder pipe for that one that connects up at the collector after travelling through the wheel well. I think in the picture if you look you can see the hole across from the port.