91 Convertible Light bar

Blueinfan

Active Member
Mar 18, 2021
244
56
38
Temecula
Hi All,

Been working on a 91 Convertible for some time now. So, i decided to add a light bar to the car. I can tell you that the instructions on how to install the light bar are not very detailed. Caused me some headaches in the install. But still have questions and hope the Fox community can help me.

I'm uploading some pictures.

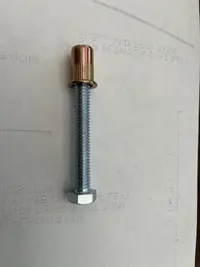
1. My first question is on picture 3, does the pole need to sit on that lip?


2. Instead of using the bolts they provided I used a different bolt because I did not have to retap it.
3. Their instructions says to use a 1 3/4 hole saw, yes its for the top but once you hit the metal piece it changes the game. I had to use a step bit for the seat belt bracket.
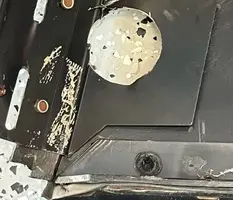
4. When I was sawing the plastic panel, the blade caught the metal plate and ripped the panel as you ca nsee on picture 9. No problem. I'll have to repair it. So i decided to take off the metal bracket where the seat belt slides through and cut the lip off as you see on picture 6. I'll just revit the piece back.

I have other questions regarding what it should look like once the top is up but have to take pictures for that.
 

Attachments

  • Picture 1.JPG
    Picture 1.JPG
    37.2 KB · Views: 20
  • Picture 2.JPG
    Picture 2.JPG
    47.8 KB · Views: 22
  • Picture 3.JPG
    Picture 3.JPG
    36 KB · Views: 23
  • Picture 4.JPG
    Picture 4.JPG
    48.1 KB · Views: 20
  • Picture 5.JPG
    Picture 5.JPG
    40.4 KB · Views: 20
  • Picture 6.JPG
    Picture 6.JPG
    67.4 KB · Views: 21
  • Picture 7.JPG
    Picture 7.JPG
    39.3 KB · Views: 18
  • Picture 8.JPG
    Picture 8.JPG
    52.3 KB · Views: 20
  • Picture 9.JPG
    Picture 9.JPG
    54.4 KB · Views: 22
  • Sponsors (?)


Those are lag bolts for wood. I seriously doubt that those will remain in place over time with normal street driving.

There is no parallel universe that exists where I would use wood lag-bolts to secure sheet metal.


Not what you asked but it jumped out at me like a naked cake girl at an office party.
 
  • Agree
  • Like
Reactions: 3 users
I can't answer whether or not the pipe needs to sit on that lip, but it certainly seems to be off. You'd think that there wouldn't be a gap like that. If all else fails I'd see about stacking some washers or something in there to mount it solidly. And I agree, you'd be better served with the rivnut tool that @Noobz347 linked and a proper bolt.
 
  • Like
  • Agree
Reactions: 1 users
I can't answer whether or not the pipe needs to sit on that lip, but it certainly seems to be off. You'd think that there wouldn't be a gap like that. If all else fails I'd see about stacking some washers or something in there to mount it solidly. And I agree, you'd be better served with the rivnut tool that @Noobz347 linked and a proper bolt.
Okay, I will use this tool - HARDELL Rivet Nuts.

Any idea where I can find a light bar that shows what the pipe looks like once its mounted behind the panel?
 
I can't answer whether or not the pipe needs to sit on that lip, but it certainly seems to be off. You'd think that there wouldn't be a gap like that. If all else fails I'd see about stacking some washers or something in there to mount it solidly. And I agree, you'd be better served with the rivnut tool that @Noobz347 linked and a proper bolt.
I haven't tightened the bolts because i was checking to see what it looked like.
 
Any idea where I can find a light bar that shows what the pipe looks like once its mounted behind the panel?

No idea.

My recommendation would be to loosely install the thing so that it looks right and acts right in relation to your top and the rest of the car.

Once you're happy with how it sitting, get the "Death Wheel" out (angle grinder) and cut it down so that it fits how you want it to fit.

Some Chinaman that's never seen a Mustang in person is who put that kit together for us. They're not what I would refer to as "exact".

If for some reason you ever do a roll bar or cage, you'll find similar modifications are generally required. Better to ship with too much material (maybe be too long) than not enough.
 
  • Like
Reactions: 1 user
My 89 had a styling bar. No light. It was installed in the 90s woth lag bolts like those. It was still tight in 2008 before i completely stripped and rebuilt the car.
IMG_20220120_132115_215.jpg
 
  • Like
Reactions: 1 user
No idea.

My recommendation would be to loosely install the thing so that it looks right and acts right in relation to your top and the rest of the car.

Once you're happy with how it sitting, get the "Death Wheel" out (angle grinder) and cut it down so that it fits how you want it to fit.

Some Chinaman that's never seen a Mustang in person is who put that kit together for us. They're not what I would refer to as "exact".

If for some reason you ever do a roll bar or cage, you'll find similar modifications are generally required. Better to ship with too much material (maybe be too long) than not enough.
For sure! Just frustrating to get some new parts for a 91 Mustang and then have to be modified because the part doesn't fit right.
 
My 89 had a styling bar. No light. It was installed in the 90s woth lag bolts like those. It was still tight in 2008 before i completely stripped and rebuilt the car.
IMG_20220120_132115_215.jpg
Ok, got the tools n the bolts. That bolt or whatever it’s called is 5/16x 18. How big does the hole have to be to crimp it?
 

Attachments

  • IMG_9690.jpeg
    IMG_9690.jpeg
    366.1 KB · Views: 11
You are supposed to remove the speaker grilles from the panels to access mounting bolts, leave the styling bar loose and install the panels, then move bar up or down so it sits tight on top surface of panel, then tighten bolts. The lip is irrelevant. I did not like the mounting for this bar when I put it in mine, in my opinion the thin metal of the door jamb is not an adequate mounting whether with self tapping screws or nutserts. Ended up welding a nut plate that I carefully slipped inside the door jamb to line up with the holes, the bolts tighten down and sandwich the jamb between the plate and post, very solid.
 
  • Like
Reactions: 1 user