
Tools needed:
1/4" and 3/8" drive ratchets with extensions
8mm socket, 1/4" drive
10mm socket, Deep Well and regular, 1/4" AND 3/8" drive
Phillips head screwdriver
This install is rather straight forward. It may seem a little intimidating if you've never done something like this before, but there is nothing complicated about it. Nut's and Bolts mostly. There were a few small snags which I will detail, but nothing major.
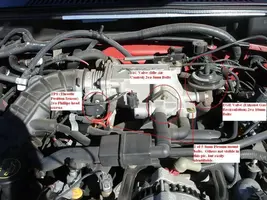
Here are the 3 main components you will be removing and reinstalling. They are the TPS (Throttle Position Sensor), IAC (Idle Air Control) Valve, and EGR (Exhaust Gas Recirculation) Valve. You will also be working with the throttle cable linkage (including cruise control) and a few vaccum lines.

First, Disconnect the Battery
In no particular order, I began removing the accesories attatched to the stock TB/Plenum. Here I remove the IAC valve using a 1/4" drive ratchet with either an 8mm or 10mm socket. I honestly do not recall which it was. To get to the lower bolt, you have to manuever the ratchet a little bit but its not difficult. There isnt much room for ratcheting action after you break the torque on the bolt. *Hint* its hard to get your fingers in there to manually back the bolt out of the IAC/Plenum. use your index finger to put a slight amount of pressure on the bottom of the socket. This will allow you to back the bolt out with the ratchet (using your other hand) even after you have broken its prevailing torque (it wont sit there and go which ever way you move the ratchet, due to there being no resistance in either direction). While working here you can also remove the rubber hose found just under and to the right of the IAC (under the ratchet in this pic). Remember this particular hose, because it may come into play later during your install.

The IAC removed. If possible, try to reuse the gasket. I did and am having no problems at all.

Next I removed the TPS using a phillips screwdriver. BE CAREFUL NOT TO STRIP THE HEADS OF THE SCREWS! They are in there with lock-tight from the factory, so take your time and dont get impatient. Use a lot of pressure on the screws and slowly break the torque. After removing the TPS I also (carefully) pulled off the rubber hose with the 2 Red wires leading into it. I believe these are the 2 you use to check the voltage at idle with a voltmeter. (correct me if I'm wrong). I did not do this because none of the local auto parts stores had a voltmeter. FYI, the voltage at Idle should be 0.98-1.00.

I next removed the EGR. This is where you will need the Deep Well 10mm socket for the rear bolt. Its actually a stud with a hex-nut on it for easier access. Nonetheless you still need a Deep Well. Again, try to re-use the gasket. Mine stuck to the EGR so I left it there.

After disconnecting the EGR, I moved on the the Throttle cable/linkage. To remove the Throttle cable, manually place the TB in WOT position. This will give you enough slack to pull the cable out of the throttle cam guide and pull the cable connecting barrell out of the throttle cam. Sounds a little complicated right? Its not. Just move the butterfly to WOT and work it out. You will see what needs to be done. Simply remove the cruise control lever by carefully (its plastic) pulling up on it. You must also remove the spring which can be twisted out of its place. Try to take a visual image of what everything should look like for when you reinstall it. Then simply remove the two 10mm bolts that hold the Throttle linkage braket onto the plenum and move it out of the way.

After the TPS, IAC, EGR, and Throttle Linkage, there are a few more small, but important, things you must remove/disconnect prior to removing the stock Plenum. These include the clamp holding the intake tube to the throttle body (and the intake tube itself) and the 5 8mm bolts holding the plenum to the lower intake manifold; I saved these bolts for last. There is also a rubber hose behind the plenum (vacuum line Im assuming) shown here. It connects to the small pipe that is visible under the throttle cable and cruise control lever. Simply pull it apart.

Now take your time, make sure EVERYTHING is disconnected/removed, and do a tool and hardware inventory! The last thing you want to happen is for anything to fall down into the intake manifold. Once you have done this, carefully remove the stock plenum/TB assembly. If you do not plan on installing the new plenum immediately, take a clean cloth and cover the manifold opening. This is what everything should look like once the stock plenum is removed.

To install the new plenum/TB, simply do everything you did to remove the stocker, but in reverse order. Make sure you dont forget the IAC and EGR gaskets, remember what hardware goes to which components. ALSO, when you torque the 5 Plenum mount bolts remember: the stock lower intake manifold is plastic! there is the possibility of cracking it if you over-torque the bolt too much.
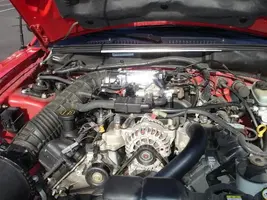
Here is the Accufab Plenum and TB bolted onto the manifold.

And everything else finally put back together I hate to say it (I do, really) but it needs to be said..........BLING BLING

NOW, here are the problems I encountered.
First, the easy one. Perhaps the most trivial, yet biggest PITA was getting the stock, rubber intake tube to fit over the 75mm TB. It just didnt want to fit. Once I'd get 75% of it on there, the bottom would slide off. I decided to disconnect the MAF and Air Filter housing, as well as the IAC (tube that runs under the IAC, not the actual IAC itself) and other unknown (to me) rubber hoses that are connected to the intake tube. This allowed me to move the tube into a much easher position and gave me a LOT more play to work with. I was able to get it over the TB opening with the intake tube vertical, and twist it back down to its normal position. I then reinstalled the clamp, MAF and air filter/housing. Problem solved. For future reference, try lubing or trimming the tube for a better fit. (advice compliments of JC. I'd give you a thumbs up but I've exceeded my image count) Chances are it is distorted and will not slide right on, especially with a bigger TB.
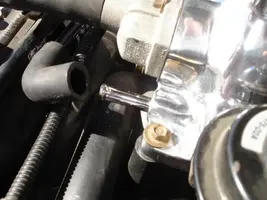
Now, this is something to consider before you go tearing your car apart. Remember that rubber hose just under the IAC, the one I told you to "Remember" ? Rumor has it the pipe it connects to on the plenum is a different size on certain year 4.6's. Just my luck, I had the LARGE pipe, while the pipe on the Accufab plenum was much smaller in diameter. Because I bought my plenum used, I did not get this magical adapter. Here, this is what I was confronted with:
Stock Plenum Tube

Accufab Plenum Tube


See the difference? The rubber elbow was just way too big to fit the smaller tube on the Accufab plenum. Now, if you are one of those "Do it by the book" type people who would have ordered the adapter, and not driven your car for days, just to do it "right", please stop reading. I dont have that luxury. This is my DD. What did I do? It just so happens the lot next to my apartment complex was recently leveled. A certain amount of debris was left behind. Including this:
View attachment 489371
You're damn right I used it. I measured, took it inside, cleaned it up real nice with hot soapy water and a pipe cleaner, and cut it to desired length. It fits perfectly over the smaller pipe on the Accufab Plenum, and the rubber hose from the air intake fits perfectly over the homemade adapter. Hey, it works")
Now, after everything is buttoned up, do another tool inventory and make sure every bolt, screw, clamp and rubber hose is secured properly. Finally, reconnect the battery. If you did everything properly, hopefully you're car will fire right up and your RPM's will idle like this.

I have no idleing problems at all. I made sure there were no air leaks before I closed the hood. Took it for a slow drive around the block, parked it, popped the hood and made sure all lines were still secure with no leaks. After everything checked out good, I took her for a real spin.
If there is anything incorrect about my write-up, please, feel free to correct me. If we can agree that an inaccuracy exists, I'll have no problem correcting it so that this write-up can be more useful to others. Also feel free to let me know the proper names of those tubes that connect to the plenum, especially the one I rigged to fit the Accufab Plenum.
I hope this can be of good use to some of you. It is a pretty straight forward install, but I thought it was something that generated enough questions a thorough write-up was in need. Total install time was about 1hr 15 minutes. That included a short break, wrestling with the intake tube/TB deal, and taking the time to rig that tube. If I were to do it all over again, I'd say 45 minutes tops. Product review to come later in the thread. My fingers are tired of typing, my eyes hurt and Im still dirty.
1/4" and 3/8" drive ratchets with extensions
8mm socket, 1/4" drive
10mm socket, Deep Well and regular, 1/4" AND 3/8" drive
Phillips head screwdriver
This install is rather straight forward. It may seem a little intimidating if you've never done something like this before, but there is nothing complicated about it. Nut's and Bolts mostly. There were a few small snags which I will detail, but nothing major.
Here are the 3 main components you will be removing and reinstalling. They are the TPS (Throttle Position Sensor), IAC (Idle Air Control) Valve, and EGR (Exhaust Gas Recirculation) Valve. You will also be working with the throttle cable linkage (including cruise control) and a few vaccum lines.
First, Disconnect the Battery
In no particular order, I began removing the accesories attatched to the stock TB/Plenum. Here I remove the IAC valve using a 1/4" drive ratchet with either an 8mm or 10mm socket. I honestly do not recall which it was. To get to the lower bolt, you have to manuever the ratchet a little bit but its not difficult. There isnt much room for ratcheting action after you break the torque on the bolt. *Hint* its hard to get your fingers in there to manually back the bolt out of the IAC/Plenum. use your index finger to put a slight amount of pressure on the bottom of the socket. This will allow you to back the bolt out with the ratchet (using your other hand) even after you have broken its prevailing torque (it wont sit there and go which ever way you move the ratchet, due to there being no resistance in either direction). While working here you can also remove the rubber hose found just under and to the right of the IAC (under the ratchet in this pic). Remember this particular hose, because it may come into play later during your install.
The IAC removed. If possible, try to reuse the gasket. I did and am having no problems at all.
Next I removed the TPS using a phillips screwdriver. BE CAREFUL NOT TO STRIP THE HEADS OF THE SCREWS! They are in there with lock-tight from the factory, so take your time and dont get impatient. Use a lot of pressure on the screws and slowly break the torque. After removing the TPS I also (carefully) pulled off the rubber hose with the 2 Red wires leading into it. I believe these are the 2 you use to check the voltage at idle with a voltmeter. (correct me if I'm wrong). I did not do this because none of the local auto parts stores had a voltmeter. FYI, the voltage at Idle should be 0.98-1.00.
I next removed the EGR. This is where you will need the Deep Well 10mm socket for the rear bolt. Its actually a stud with a hex-nut on it for easier access. Nonetheless you still need a Deep Well. Again, try to re-use the gasket. Mine stuck to the EGR so I left it there.
After disconnecting the EGR, I moved on the the Throttle cable/linkage. To remove the Throttle cable, manually place the TB in WOT position. This will give you enough slack to pull the cable out of the throttle cam guide and pull the cable connecting barrell out of the throttle cam. Sounds a little complicated right? Its not. Just move the butterfly to WOT and work it out. You will see what needs to be done. Simply remove the cruise control lever by carefully (its plastic) pulling up on it. You must also remove the spring which can be twisted out of its place. Try to take a visual image of what everything should look like for when you reinstall it. Then simply remove the two 10mm bolts that hold the Throttle linkage braket onto the plenum and move it out of the way.
After the TPS, IAC, EGR, and Throttle Linkage, there are a few more small, but important, things you must remove/disconnect prior to removing the stock Plenum. These include the clamp holding the intake tube to the throttle body (and the intake tube itself) and the 5 8mm bolts holding the plenum to the lower intake manifold; I saved these bolts for last. There is also a rubber hose behind the plenum (vacuum line Im assuming) shown here. It connects to the small pipe that is visible under the throttle cable and cruise control lever. Simply pull it apart.
Now take your time, make sure EVERYTHING is disconnected/removed, and do a tool and hardware inventory! The last thing you want to happen is for anything to fall down into the intake manifold. Once you have done this, carefully remove the stock plenum/TB assembly. If you do not plan on installing the new plenum immediately, take a clean cloth and cover the manifold opening. This is what everything should look like once the stock plenum is removed.
To install the new plenum/TB, simply do everything you did to remove the stocker, but in reverse order. Make sure you dont forget the IAC and EGR gaskets, remember what hardware goes to which components. ALSO, when you torque the 5 Plenum mount bolts remember: the stock lower intake manifold is plastic! there is the possibility of cracking it if you over-torque the bolt too much.
Here is the Accufab Plenum and TB bolted onto the manifold.
And everything else finally put back together
I hate to say it (I do, really) but it needs to be said..........BLING BLING NOW, here are the problems I encountered.
First, the easy one. Perhaps the most trivial, yet biggest PITA was getting the stock, rubber intake tube to fit over the 75mm TB. It just didnt want to fit. Once I'd get 75% of it on there, the bottom would slide off. I decided to disconnect the MAF and Air Filter housing, as well as the IAC (tube that runs under the IAC, not the actual IAC itself) and other unknown (to me) rubber hoses that are connected to the intake tube. This allowed me to move the tube into a much easher position and gave me a LOT more play to work with. I was able to get it over the TB opening with the intake tube vertical, and twist it back down to its normal position. I then reinstalled the clamp, MAF and air filter/housing. Problem solved. For future reference, try lubing or trimming the tube for a better fit. (advice compliments of JC. I'd give you a thumbs up but I've exceeded my image count) Chances are it is distorted and will not slide right on, especially with a bigger TB.
Now, this is something to consider before you go tearing your car apart. Remember that rubber hose just under the IAC, the one I told you to "Remember" ? Rumor has it the pipe it connects to on the plenum is a different size on certain year 4.6's. Just my luck, I had the LARGE pipe, while the pipe on the Accufab plenum was much smaller in diameter. Because I bought my plenum used, I did not get this magical adapter. Here, this is what I was confronted with:
Stock Plenum Tube
Accufab Plenum Tube
See the difference? The rubber elbow was just way too big to fit the smaller tube on the Accufab plenum. Now, if you are one of those "Do it by the book" type people who would have ordered the adapter, and not driven your car for days, just to do it "right", please stop reading. I dont have that luxury. This is my DD. What did I do? It just so happens the lot next to my apartment complex was recently leveled. A certain amount of debris was left behind. Including this:
View attachment 489371
You're damn right I used it. I measured, took it inside, cleaned it up real nice with hot soapy water and a pipe cleaner, and cut it to desired length. It fits perfectly over the smaller pipe on the Accufab Plenum, and the rubber hose from the air intake fits perfectly over the homemade adapter. Hey, it works
Now, after everything is buttoned up, do another tool inventory and make sure every bolt, screw, clamp and rubber hose is secured properly. Finally, reconnect the battery. If you did everything properly, hopefully you're car will fire right up and your RPM's will idle like this.
I have no idleing problems at all. I made sure there were no air leaks before I closed the hood. Took it for a slow drive around the block, parked it, popped the hood and made sure all lines were still secure with no leaks. After everything checked out good, I took her for a real spin.
If there is anything incorrect about my write-up, please, feel free to correct me. If we can agree that an inaccuracy exists, I'll have no problem correcting it so that this write-up can be more useful to others. Also feel free to let me know the proper names of those tubes that connect to the plenum, especially the one I rigged to fit the Accufab Plenum.
I hope this can be of good use to some of you. It is a pretty straight forward install, but I thought it was something that generated enough questions a thorough write-up was in need. Total install time was about 1hr 15 minutes. That included a short break, wrestling with the intake tube/TB deal, and taking the time to rig that tube. If I were to do it all over again, I'd say 45 minutes tops. Product review to come later in the thread. My fingers are tired of typing, my eyes hurt and Im still dirty.
Attachments
-
 AccufabWrite-up.webp82.1 KB · Views: 671
 -
 AccufabInstall005.webp23.5 KB · Views: 306
 -
 AccufabInstall006.webp25.8 KB · Views: 366
 -
 AccufabInstall007.webp23.4 KB · Views: 286
 -
 AccufabInstall008.webp22 KB · Views: 307
 -
 AccufabInstall009.webp38.3 KB · Views: 297
 -
 AccufabInstall013.webp22 KB · Views: 309
 -
 AccufabInstall014.webp41.1 KB · Views: 322
 -
 AccufabInstall019.webp41.4 KB · Views: 304
 -
 AccufabInstall021.webp46.9 KB · Views: 316
 -
 AccufabInstall010.webp31 KB · Views: 306
 -
 AccufabInstall019.webp41.4 KB · Views: 302
 -
 AccufabInstall020.webp23 KB · Views: 309
 -
 AccufabInstall.webp8.7 KB · Views: 302
 -
 AccufabInstall023.webp16.6 KB · Views: 299


