
Road racers need not apply, this is a job for a drag junkie. BMR Fabrication can help you take 26.5lbs off the front end not only lightening your car, but helping with weight transfer during launch. Everyone I talked to said they didn't notice a difference with driving on the road, but you'd definitely notice a difference if you were in the twisties. BMR's directions are pretty simple and straight forward, but a few could use pictures. I don't have a lift, so they're pretty close-up. Installation should take 1-1/2 hours on jack stands, or less on a lift.
Tools and Supplies Needed:
1. Lift vehicle and support safely with stands under the frame rails (I don't think you need pictures of this)
2. Using the 18MM deep well socket, remove the sway bar end links from the strut on each side. I used my impact wrench. You may need to take the nut off at an angle, as the stud spun with the nut if I tried to remove it head on. An easier way would be to use a ratcheting wrench on the 18MM nut and hold the bolt with a crescent wrench or something similar.

3. Using the 15MM deep well socket, remove the sway bar cross member mounts and lower the sway bar/endlink assembly by pulling straight out on the sway bar until it clears the bolts, then pull down and out.


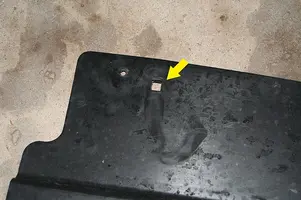
4. Locate the plastic bumper cover support and remove the 7 screws using the 7/32" socket.

View attachment 334035
4-1. Use a flathead screwdriver or similar object to break the tabs in the 2 square holes that clip into the radiator support, then remove the cover.

4-2. Cover removed:

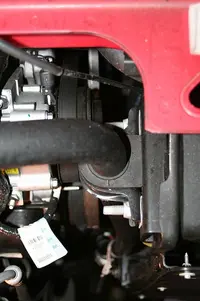
5. BMR says to use a 10MM socket, but my car had an 11MM socket, so Ford may have changed this. Use whichever fits (obviously). Loosen the nut on top of the radiator support that holds the clip for the AC line. The nut is on the left side, next to the brake line clip.

6. Pop the brake lines out of the two clips attached to the OEM radiator support. One is on the drivers' side of the horizontal section. The other is on the passengers' side, attached to the vertical section.


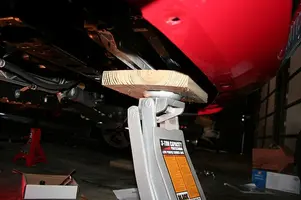
7. Place a jack under the radiator to prevent it from moving when the cross member is removed. I put a piece of wood on top of the jack to keep from damaging the radiator.

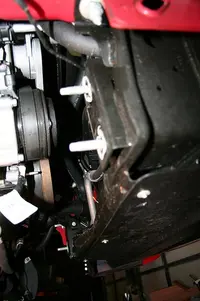
8. Remove the 4 bolts holding the OEM radiator support on using the 18MM deep socket with an extension. There are two on each side. Lower the cross member. There may be a line zip tied to the cross member, so have your cutters ready to cut the zip tie.

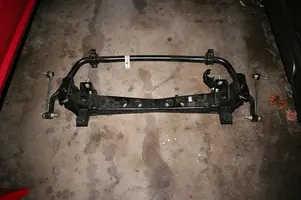
8-1. OEM front sway bar and radiator support removed:


8-2. OEM vs BMR:

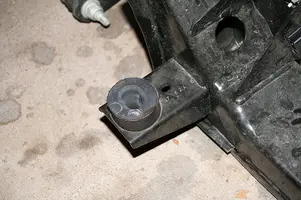
9. Remove the two rubber isolators from the OEM radiator support and transfer them to the BMR cross member.


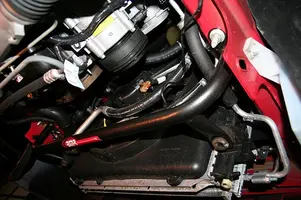
10. Install the BMR cross member using the 18MM deep well socket and extension, and torque to 110 ft/lbs.

11. Remove jack stand from under radiator.
12. Reinstall factory bumper cover using the 4 7/32" screws you removed earlier along with 3 zip ties (1 through the center hole where the screw was, and two through the square holes where the clips were).

13. Lower vehicle and clean up.
Tools and Supplies Needed:
- 18MM deep well socket
- 15MM deep well socket
- 6" or 12" extension
- 10MM socket
- 11MM socket
- Floor jack and small piece of scrap wood
- Wire cutters or sharp scissors
- 3 zip ties
1. Lift vehicle and support safely with stands under the frame rails (I don't think you need pictures of this)
2. Using the 18MM deep well socket, remove the sway bar end links from the strut on each side. I used my impact wrench. You may need to take the nut off at an angle, as the stud spun with the nut if I tried to remove it head on. An easier way would be to use a ratcheting wrench on the 18MM nut and hold the bolt with a crescent wrench or something similar.
3. Using the 15MM deep well socket, remove the sway bar cross member mounts and lower the sway bar/endlink assembly by pulling straight out on the sway bar until it clears the bolts, then pull down and out.
4. Locate the plastic bumper cover support and remove the 7 screws using the 7/32" socket.
View attachment 334035
4-1. Use a flathead screwdriver or similar object to break the tabs in the 2 square holes that clip into the radiator support, then remove the cover.
4-2. Cover removed:
5. BMR says to use a 10MM socket, but my car had an 11MM socket, so Ford may have changed this. Use whichever fits (obviously). Loosen the nut on top of the radiator support that holds the clip for the AC line. The nut is on the left side, next to the brake line clip.
6. Pop the brake lines out of the two clips attached to the OEM radiator support. One is on the drivers' side of the horizontal section. The other is on the passengers' side, attached to the vertical section.
7. Place a jack under the radiator to prevent it from moving when the cross member is removed. I put a piece of wood on top of the jack to keep from damaging the radiator.
8. Remove the 4 bolts holding the OEM radiator support on using the 18MM deep socket with an extension. There are two on each side. Lower the cross member. There may be a line zip tied to the cross member, so have your cutters ready to cut the zip tie.
8-1. OEM front sway bar and radiator support removed:
8-2. OEM vs BMR:
9. Remove the two rubber isolators from the OEM radiator support and transfer them to the BMR cross member.
10. Install the BMR cross member using the 18MM deep well socket and extension, and torque to 110 ft/lbs.
11. Remove jack stand from under radiator.
12. Reinstall factory bumper cover using the 4 7/32" screws you removed earlier along with 3 zip ties (1 through the center hole where the screw was, and two through the square holes where the clips were).
13. Lower vehicle and clean up.
Attachments
-
 2223435671_ccfc5171d5.webp74.4 KB · Views: 207
 -
 2223440075_a97fbd3982.webp56.6 KB · Views: 156
 -
 2224237300_c7b7f38f8f.webp56.8 KB · Views: 161
 -
 2223443251_890d99139b.webp71.5 KB · Views: 180
 -
 2223437059_ac579ec86d.webp61 KB · Views: 165
 -
 2224240270_41b968f68f.webp83.2 KB · Views: 154
 -
 2223451523_852f4e98b4.webp53.9 KB · Views: 175
 -
 2224243784_0273110a1b.webp42.3 KB · Views: 164
 -
 2224245932_c227b734df.webp43.7 KB · Views: 174
 -
 2224248540_ea65f0f872.webp54 KB · Views: 155
 -
 2223459785_661cc92534.webp54.4 KB · Views: 145
 -
 2223462699_c2ffe4fa09.webp65.1 KB · Views: 158
 -
 2224256866_ddbd8b0bdd.webp75 KB · Views: 155
 -
 2223468641_2c31061bd4.webp70.2 KB · Views: 180
 -
 2224269382_7c97b936b5.webp77.9 KB · Views: 155
 -
 2224262814_311b35020d.webp80.9 KB · Views: 155
 -
 2223481273_72a5351205.webp38.2 KB · Views: 148
 -
 2223484315_0f96c371ba.webp75.2 KB · Views: 156
 -
 2224277472_197a0103ac.webp70.1 KB · Views: 157

 anyone else that does a nice write up like this has the opportunity to make it to stangnet.com as well.
 ")