
Anyone done this and how hard is it? Which are ones to look at and which do I stay away from? I have a 69 Mach One 351 4v and am going to electronic ignition (MSD 6AL and Pertronix points replacer) if it makes much of a difference. I was thinking about changing out the guages so they would at least be accurate (tach for one) I havent looked into doing something like this before so i dont know if its something i should tackle. I have rebuilt motors, done rear ends etc, cant imagine this being extremely diffucult
You are using an out of date browser. It may not display this or other websites correctly.
You should upgrade or use an alternative browser.
You should upgrade or use an alternative browser.
Changing out guages
- Thread starter 69Mach351
- Start date

69Rcode_Mach1
Active Member
I don't know about the whole rewiring part for new guages, but getting them out is fairly simple. Just undo the 3 screws on the top off the dash and thne the ones on the edges and above the radio. Take off the dash pad. Then simply unscrew the guage cluster and remove the wiring clip and speedo cable and it sould come right out. Do you have a tach in the car right now? Or are you wanting to rewire it for a factory tach, if so I can help you with that.
1969mach1351
Member
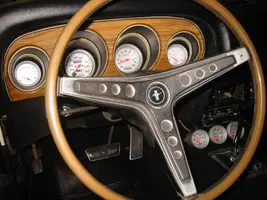
This is what i want. I have a factory tach, just want to replace them all with new, more visible, and more accurate guages. Any tips?1969mach1351 said:Here's what I did.
bnickel
Founding Member
i'd like to buy the factory setup from you if you go with aftermarket guages, or maybe work some kind of trade?
bnickel
Founding Member
that would be great thanks69Mach351 said:will let you know when i know what im doing. Will probably be a month or so before i do this due to money. Will keep that in mind

Pakrat
Founding Member
One of our more extreme mod members named Corpse did an excellent job of modifying the stock gauge pod to accept the new JBA?? gauges since he did not want to pay the huge price they chrarge for their custom pod. It was a year or two ago but as I recall he had to fab some new inner holders out of PVC pipe to line them up and then glass them in and fabricate some fastners to hold them in place. I tried to search for it but came up empty. I see him pop up on AOL IM so I'll try to ask him about it.
bnickel
Founding Member
1969mach1351
Member
It was fairly easy to put those gauges in, they are a perfect fit. I used all the factory pieces, just had to cut out the back to accommodate for the deeper gauges. I used the brackets that come with the gauges to hold them in place. Made my own wiring. I bought a junky gauge cluster for $10 and used that to cut up and just used my original wood grain face. I'd go with an electric speedo though.
how hard was everything to wire?1969mach1351 said:It was fairly easy to put those gauges in, they are a perfect fit. I used all the factory pieces, just had to cut out the back to accommodate for the deeper gauges. I used the brackets that come with the gauges to hold them in place. Made my own wiring. I bought a junky gauge cluster for $10 and used that to cut up and just used my original wood grain face. I'd go with an electric speedo though.
1969mach1351
Member
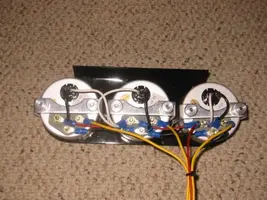
Well since you can hook all the gauges together you basically only need to run one keyed power source, one good ground, and one wire that comes on with your lights. And of course one wire going out to each sender unit.
Heres a pic of my three wired up.
Heres a pic of my three wired up.
Attachments

corpse
Founding Member
Pakrat said:One of our more extreme mod members named Corpse did an excellent job of modifying the stock gauge pod to accept the new JBA?? gauges since he did not want to pay the huge price they chrarge for their custom pod. It was a year or two ago but as I recall he had to fab some new inner holders out of PVC pipe to line them up and then glass them in and fabricate some fastners to hold them in place. I tried to search for it but came up empty. I see him pop up on AOL IM so I'll try to ask him about it.
They were AutoMeter gauges, using their monster 5" gauges for the speedo and tach. Since this thread is mostly about wiring, I don't have much to contribute.. But like, I wired mine, and the car didn't catch on fire, and I think it all still works, and I did mine the way everyone here is talking about..
bnickel
Founding Member
corpse said:They were AutoMeter gauges, using their monster 5" gauges for the speedo and tach. Since this thread is mostly about wiring, I don't have much to contribute.. But like, I wired mine, and the car didn't catch on fire, and I think it all still works, and I did mine the way everyone here is talking about..
hey corpsey, what's up? where ya been man? how's the car coming?
69Rcode_Mach1
Active Member
Dude can't you get the tach recalibrated so it is accurate? I don't know about you but I think the factory guages are bad ass. I am more particular to teh standard tachs that came in the Boss 302's that is what's going in my car.
markstang1969
New Member
- Apr 6, 2005
- 21
- 0
- 0
1969mach1351 said:Here's what I did.
I really like that look. Last night I priented out pics of the white guages and showed my wife. She likes them too.... So...<crosses fingers>
corpse
Founding Member
bnickel said:hey corpsey, what's up? where ya been man? how's the car coming?
eh, it's coming along very slowly.. the gas tank is at the shop, preparing to get a notch welded to allow the quick change to fit.
For whoever is interested - I found some of my pics of the gauges, so here they are...
pvc end cap used as the mounting cup for directional lights

Here's the outter gauges mounted up.. Here you can see the cavity where the directional lights will go into..

Side gauges complete, ready to be mounted. Yes, it looks crazy, but the purpose of this elaborate setup will be realized in the pics below.

Preparing the monster gauges.. the white plastic is 5" PVC tubing, very carefully cut and hand ground to fit the gauge..

This next pic shows it all laid out on the cluster.. You'll notice the fiberglassed tabs for the mounting points, and the strips between the 2 big tunnels to help stabilize everything.

Getting close to being done...

I don't have a picture of the final setup - but the tab that appears to be unused on the big tunnels is used for a third support for the big gauge, as just 2 mounting points make those big honkers more likely to tilt..
Here's a couple pictures of the gauges lit up...

The high beam indicator is a blue led in the top of the speedo tunnel, as seen here - cool lighting effect against the red.

Here is the best turn signal picture I have... Now you see why I wanted the gauge to "float" above its housing point - as it creates a halo affect around the gauge..

Pakrat
Founding Member
Now that's what I'm talking about.  Good talking to you yesterday Corpse, thanks for popping in with your 2 cents, now go climb a rock or something.
Good talking to you yesterday Corpse, thanks for popping in with your 2 cents, now go climb a rock or something.
69Rcode_Mach1
Active Member
Looks good man. I am personally not a fan of the aftermarket guages style. The lighting affect you got out of that looks beautiful though. I wish they reproduced the original guages so I could try customizing something like that.

84convertablegt
New Member
those look sweet, much better recessed like that. one question, am i halucinating or did i see drywall in one of those pictures???? 
Similar threads

- Replies
- 1
- Views
- 582
- Replies
- 12
- Views
- 715

- Replies
- 30
- Views
- 1K
