Check engine ligth is on, cant pull codes, running terribly rich

BK_CAULEY

it's built for speed not longevity, woman
Dec 26, 2006
0
10
49
Thomasville, ga
.backgorund on car. Has gt40 p's, typhoon intake, and f cam. Recently the computer lost internal ground and i replaced it with a a9l. ran ok for a week or so then started runnig very rich and check engine light came on. Ive tried to jump the codes bu the check engine light stays on and doesnt flash at all. Doesnt even give me the two flash's for clear (11). ive even tried the test light from tan to + battery post with no success. the test light just stays lit up.

I replaced the ECT sensor a while back, but with out pulling the codes im stumped. Can someone help me get in the right direction with getting this sittuation worked out.
 
  • Sponsors (?)


Year of car?
There are two different tech notes for computer can't dump codes problems, and they are model year specific. The odds are that you have a bad signal ground for the sensors. Finding it requires knowing which model year car you have so you know what color wires to chase...
 
Computer will not go into diagnostic mode on 91-93 model 5.0 Mustangs

How it is supposed to work:
The grey/red wire (pin 46) is signal ground for the computer. It provides a dedicated
ground for the EGR, Baro, ACT, ECT, & TPS sensors as well as the ground to put the
computer into self test mode. If this ground is bad, none of the sensors mentioned will work
properly. That will severely affect the car's performance. You will have hard starting, low power
and drivability problems.
Since it is a dedicated ground, it passes through the computer on its
way to the computer main power ground that terminates at the battery pigtail ground. It should
read less than 1.5 ohms when measured from anyplace on the engine harness with the battery
pigtail ground as the other reference point for the ohmmeter probe.

What sometimes happens is that the test connector grey/red wire gets jumpered to power
which either burns up the wiring or burns the trace off the pc board inside the computer.
That trace connects pins 46 to pins 40 & 60. Only an experienced electronics technician can open
the computer up & repair the trace if it burns up and creates an open circuit.

The STI (Self Test Input ) is jumpered to ground to put the computer into test mode. Jumpering
it to power can produce unknown results, including damage to the computer. The ohm test
simply verifies that there are no breaks in the wiring between the test connector and the computer input.

How to test the wiring :
With the power off, measure the resistance between the computer test ground
(grey/red wire) on the self test connector and battery ground. You should see less than
1.5 ohms.

attachment.php


If that check fails, remove the passenger side kick panel and disconnect the computer
connector. There is a 10 MM bolt that holds it in place. Measure the resistance between
the grey/red wire and pin 46 on the computer wiring connector : it should be less than
1.5 ohms. More that 1.5 ohms is a wiring problem. If it reads 1.5 ohms or less, then the
computer is suspect. On the computer, measure the resistance between pin 46 and pins
40 & 60: it should be less than 1.5 ohms. More that that and the computer’s internal
ground has failed, and the computer needs to be replaced.

If the first ground check was good, there are other wires to check. Measure the
resistance between the STI computer self test connector (red/white wire) and pin 48 on
the computer main connector: it should be less than 1.5 ohms. More that 1.5 ohms is a
wiring problem

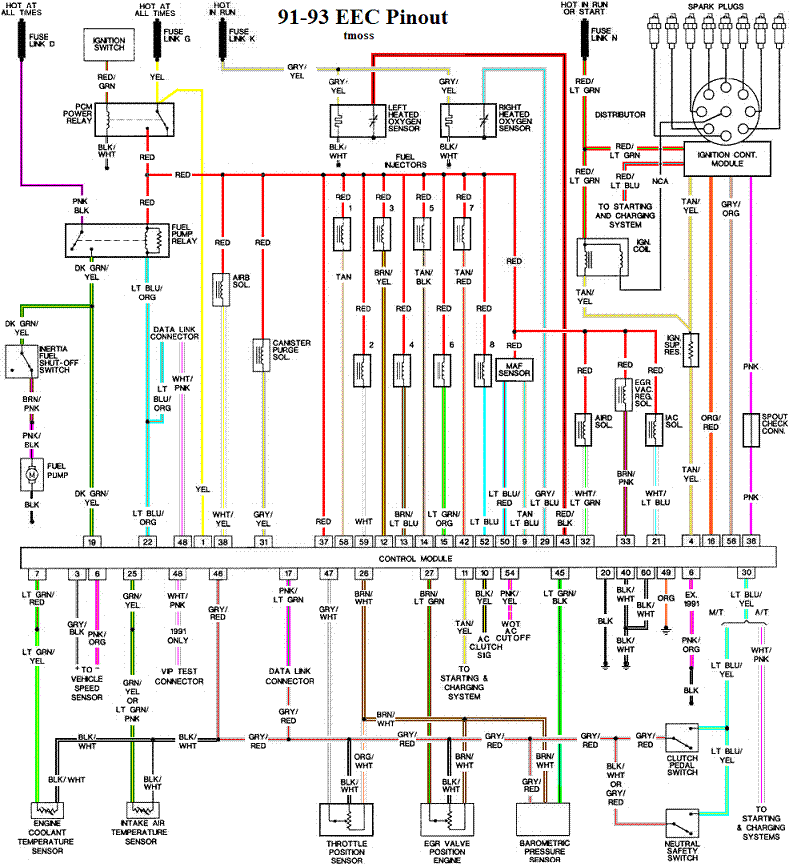
The following is a view from the computer side of the computer connector.
eec04.gif


Diagram courtesy of Tmoss & Stang&2birds

Check out the diagram and notice all the places the grey/red wire goes. Almost every
sensor on the engine except the MAF is connected to it.
91-93_5.0_EEC_Wiring_Diagram.gif


See the following website for some help from Tmoss (diagram designer) & Stang&2Birds
(website host) for help on 86-95 5.0 Mustang wiring Mustang FAQ - Engine Information Everyone should bookmark this site.


harness02.gif


If you feel like opening up the computer to attempt to repair the fried wire, see Computer issue? - Mustang Forums at StangNet and joel5.0's comments for more help on fixing the computer innards.
 
ok. i used the ECM repair thread and now i have TPS voltage back, my check engine light is off but my throttle response is dead if i floor it from a idle it kinda boggs and pops through the intake, and once it clears 2k it revs fine. also my idle air control valve is now holding my idle around 12--1400 rpms and will not drop unless i unplug the IAC. Ive checked my tps setting (1.4 at idle btw) and made sure my timing was good, even checked fuel pressure which was good. Im only getting one code now 67. but that is for my nutral safety switch i believe. so it shoudnt affect anything.
 
Progress is good. The pop and bog is an indication of a lean mixture, which is either the TPS with a bad spot in it or a vacuum leak.

Let's try chasing any TPS problems first.

Some of this will be redundant, but since I am not there to watch over your shoulder, here's the whole TPS test & adjustment process...

TPS setting and troubleshooting

Revised 04-Oct-2010 to reorder test sequence and eliminate duplicate steps.

Setting the TPS:
You'll need a good Digital Voltmeter (DVM) to do the job. Set the TPS voltage at .5- 1.1 range. Because of the variables involved with the tolerances of both computer and DVM, I would shoot for somewhere between .6 and 1.0 volts. Unless you have a Fluke or other high grade DVM, the second digit past the decimal point on cheap DVM’s is probably fantasy.

Since the computer zeros out the TPS voltage every time it powers up, playing with the settings isn't an effective aid to performance or drivability. The main purpose of checking the TPS is to make sure it isn't way out of range and causing problems.

Wire colors & functions:
Orange/white = 5 volt VREF from the computer
Dark Green/lt green = TPS output to computer
Black/white = Signal ground from computer

The Orange/White wire is the VREF 5 volts from the computer. You use the Dark Green/Lt green wire (TPS signal) and the Black/White wire (TPS ground) to set the TPS. Use a pair of safety pins to probe the TPS connector from the rear of the connector. You may find it a little difficult to make a good connection, but keep trying. Put the safety pins in the Dark Green/Lt green wire and Black/White wire. Make sure the ignition switch is in the Run position but the engine isn't running.

When you installed the sensor make sure you place it on the peg right and then tighten it down properly. Loosen the back screw a tiny bit so the sensor can pivot and loosen the front screw enough so you can move it just a little in very small increments. I wouldn’t try to adjust it using marks.

A.) Always adjust the TPS and Idle with the engine at operating temp. Dive it around for a bit if you can and get it nice and warm.

B.) When you probe the leads of the TPS, do not use an engine ground, put the ground probe into the lead of the TPS. You should be connecting both meter probes to the TPS and not one to the TPS and the other to ground.

C.) Always reset the computer whenever you adjust the TPS or clean/change any sensors. I just pull the battery lead for 10 minutes.

D.) The key is to check the TPS voltage whenever the idle screw is changed.

TPS testing:
Most of the time a failed TPS will set code 23 or 63, but not always. Use either an analog meter or a DVM with an analog bar graph and connect the leads as instructed above. Turn the ignition switch to the Run position, but do not start the engine. Note the voltage with the throttle closed. Slowly open the throttle and watch the voltage increase smoothly, slowly close the throttle and watch the voltage decrease smoothly. If the voltage jumps around and isn’t smooth, the TPS has some worn places in the resistor element. When the throttle is closed, make sure that the voltage is the same as what it was when you started. If it varies more than 10%, the TPS is suspect of being worn in the idle range of its travel. It should go from base voltage at idle to somewhere near 4.6-4.8 volts at WOT [/b]

TPS Troubleshooting:

The TPS sensor is a variable resistor like the volume control on most cheap radios. We have all heard them make scratchy noises as you turn them up or down. The carbon element can wear and cause a drop out spot in the output voltage. This confuses the computer because it expects to see a steady TPS voltage increase as the Throttle opens up.

TPS troubleshooting steps:
Some basic checks you can make to be sure that the sensor is getting power & ground:
Note that all resistance tests must be done with power off. Measuring resistance with a circuit powered on will give false readings and possibly damage the meter.
Check the resistance between the black/white wire on the MAP/BARO sensor and then the black/white wire on the EGR and the same wire on the TPS. It should be less than 1 ohm. Next check the resistance between the black/white wire and the negative battery cable. It should be less than 1.5 ohm.

The following power on check requires you to turn the ignition switch to the Run position.
Use a DVM to check for 5 volts on the orange/white wire. If it is missing, look for +5 volts at the orange/white wire on the TPS or EGR sensors. Use the black/white wire for the ground for the DVM.
 
Checked tps voltage and no matter where you turn it, it never drops beloew 1.19 (read with a snap on RMS 40000 count meter) and when i slowley open the throttle, the sweep is irratic and jumps .05-.15 volts until it pegs at or around 1.65-70 @ WOT. So i am having the parts house deliver a new TPS as im typing this.