This is probably the second time I have posted this for the same user, but here goes...
The ACT (Air Charge Temp) sensor will probably need to be moved. The GT 40 lower manifold isn't drilled & tapped for it to go into the intake like the stock manifold was. There is a boss cast into the GT 40, but a machine shop will have to drill & tap the new manifold. The best spot for the ACT is the air box if you don't do the drill and tap thing. You get to cut and splice the 2 ACT wires in order to make them long enough to reach the air box. Solder the wire extensions on the existing wires & use heat shrink tubing to cover the splices. Offset the place where you cut the wires so that you don't have a big bulge when you put heat shrink over the 2 wires to cover & protect them. The air box gets a hole (5/8" or so) for the ACT drilled about 1 1/4" down & 1/1/4" in on the front top side near the upper radiator hose. A brass fitting nut from Home Depot or Ace Hardware secures the ACT into the air box.
If you are very clever, you will find that the ACT connector comes apart so that you can remove the pins. A very small screwdriver releases the lock in the front of the center insert, while another small screwdriver inserted in the back pushes it out. Once the center insert is out of the connector shell, the pins come out easily. New pins are available from AutoZone in a $5 electrical pin kit for Fords. Crimping the pins on the extender wires saves you from having to splice them twice: once to put the connector on and once to extend the wires.
6 ft black 18 gauge wire
6 ft green 18 gauge wire
6 ft 1/4" heat shrink tubing
1 ft 3/16" heat shrink tubing
Measure the 2 extender wires & cut them to length, crimp one set of pins on them. Then mate up the extender pins with the wiring harness & slide the 3/16" heat shrink tubing over them & shrink the tubing. Then slide the 1/4" heat shrink tubing over the pair of wires and shrink the tubing. When you are done you'll have about 1" of wire left without heat shrink tubing on it to strip & crimp the new pins on. Stick the new pins in the old connector shell, assemble it and you are done. It looks as good as factory. Some wire loom can be used to enhance the "Factory Look".
Use the TPS and IAB from your old throttle body. All the EGR passages were there and fit OK. Use you old fuel rails and regulator. You will probably need a new EGR spacer adapter and gaskets. Without the EGR spacer, there is no place to mount the throttle linkage support bracket.
I used the stock water lines on the Explorer manifold and they connected up to the EGR without any problems. I made a “U” out of ½” copper pipe and sweat soldered it together. Then I used it and some hose with clamps to bypass the leaky heater I have. You don't need heat very often here in Central Florida...
Also see
http://www.veryuseful.com/mustang/tech/engine/ConvertingExplorer65mmTB.pdf for modifications to adapt the 65 MM Explorer TB to a Mustang
for modifications to adapt the 65 MM Explorer TB to a Mustang
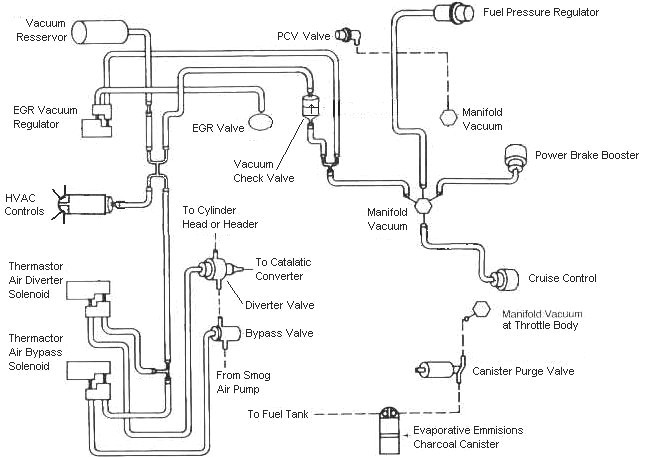
Vacuum line connections:
One large vacuum line from the upper front goes to the carbon canister
One large vacuum line from the rear goes to the vacuum tree.
One small line in the front feeds the Smog pump solenoid control valves on the rear of the passenger side wheel well..
One small line in the rear goes to the fuel pressure regulator.
One small line in the rear goes to the EGR suction regulator.
One large line in the rear goes to the PVC valve.
My favorite trick that saves time and effort is the stay in place gasket. Be sure that you scrape (don't use a wire brush) all the old gasket material off, then clean all the surfaces with acetone or MEK.
When the surfaces are clean, use weather strip adhesive on the head to manifold surface, and on the side of the gasket that mates to the head. Follow the instructions on the tube or can and when it gets tacky, press the gasket down on the head.
Clean the area where the rubber rails mount to the block in front and in the rear with more acetone or MEK and do the same trick with the weather strip adhesive that you did to the heads.
Coat the rubber seals and the gasket area around the water passages with lots of Blue Silicone gasket sealer and put it together. Wala! no leaks, and no gaskets that shifted out of place.
If you reuse the injectors from your old setup, a repair kit is available from most auto parts stores if needed. Coat the injector body "O" rings with oil before you use them and everything will slide back together. Take the other advice you got here and run with it.
Fuel injector seal kits with 2 O rings and a pintle cap (Borg-Warner P/N 274081) are available at Pep Boys auto parts. Cost is about $2.74 per kit. The following are listed at the Borg-Warner site (
http://www.borg-warner.com ) as being resellers of Borg-Warner parts:
http://www.partsplus.com/ or
http://www.autovalue.com/ or
http://www.pepboys.com/ or
http://www.federatedautoparts.com/
Most of the links above have store locators for find a store in your area.
Use motor oil on the O rings when you re-assemble them & everything will slide into place. The gasoline will wash away any excess oil that gets in the wrong places and it will burn up in the combustion chamber.

 so then i went through the explorer and the owners manual said 97. so my question is are the 96-97 intakes the same.