"Project Lunch Break"
So here is the official thread that I will be using to update the progress on my project. Maybe should I call it Project Reincarnation? lol I have been ordering parts and peices here and there and need a total of about 1700 bucks to finish getting all the parts I need to mechanically finish the car. Im guessin about another 1500 on top of that for the body and paint materials needed to get the car painted. My main focus is to get the car running and such. Here is a list of the parts I have so far:
*on the parts I need to get
Anybody's suggestions on what I should maybe consider getting are appreciated.
Engine
Rebuilt engine with stock forged pistons, swapped out the old hypers cause Im gonna spray.
GT40 heads
E 303 Cam
Explorer Intake
1.7 RR's
Convertible motor mounts
UPR Aluminum A/C Delete
Aluminum Idler Pulley
"5.0L" Aluminum Oil Cap
UPR Polished Underdrive pullies
*MSD 6AL-2 Ignition Box
*Tach Adapter Harness
*MSD Coil
Ford Motorsport Plug Wire Holders
Drivetrain
Tremec 5 speed (2.95 first gear ratio)
Steeda Tri Ax Shifter
Rebuild kit
New Input Shaft
New Cluster gear
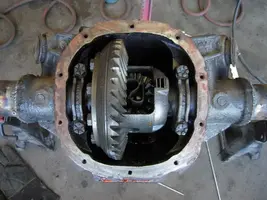
Full 8.8 rear with 3.73's
Full rebuild kit
Carbon Fiber clutch disc set for trac-loc
Trick Flow Girdle
*Adjustable Clutch Cable
*Poly Bushings for housing
*Spec Stage 1 Clutch set
*Pilot bearing
*Driveshaft Safety Loop
Suspension/Brakes
New QA1 K member
New used control arms with Poly Bushings
Refurbished stock spindles
Refurbished Rotor Dust Sheilds
Lakewood 90/10's in the front 50/50's in the back
UPR Bump Steer kit
Ford Motorsport C springs
BBK Gripp C/C plates
Newer Quad Shocks
*Turn Rotors from 89
*Bearing Seals
*EBC Green Stuff brake pads
*Sway Bar End Links
*Poly Sway bar bushings
New Inner tierods
Energy Suspension Spring Isolators
Offset Rack Bushings
Interior
Full Black Interior from 90 GT
Two Black Flofit seats
Billet Window Switch kit
Billet Shifter Bezel
Grant leather steering wheel
*Grant Steering Wheel Apapter
Billet Turn Signal Cover
*Battery Trunk Mount kit
*Complete Interior Screw kit
*Door Lock actuator kit
Exterior
Cobra Front Bumper
Cervinis Cobra R hood
91+ style fenders
GT ground effects
Cobra Rear Bumper
Saleen Wing
Rust free hatch with shaved trunk lock
Perfect 93 model quarter windows
2 17x8 Stern Replicas with Motorsport rivets
2 17x9 Stern Replicas with Motorsport rivets
Here is my overall image of how I want the car to come out, still debating on the dip down with the orange. Not sure if that's going to be included when it comes down to painting the car.

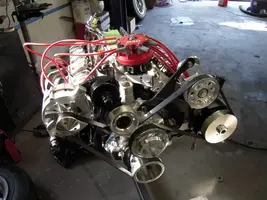
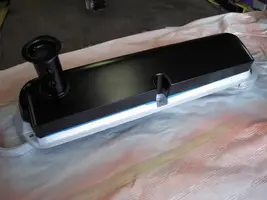
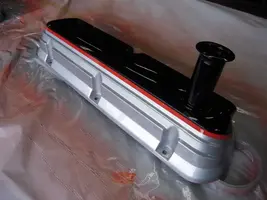
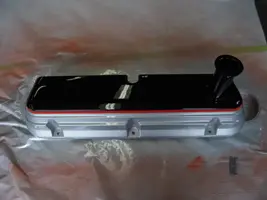
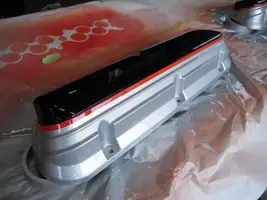
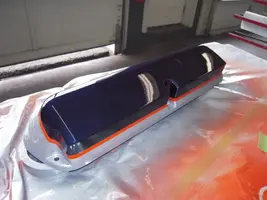
Here are some pics of the car when I got it and how the engine bay has progressed. I will be working on cleaning and painting some of the engine brackets this weekend so I will try to get some pictures of that stuff up on here. I hope you all enjoy. Sorry for the mediocre pics, all I had was my camera phone at the time.


So here is the official thread that I will be using to update the progress on my project. Maybe should I call it Project Reincarnation? lol I have been ordering parts and peices here and there and need a total of about 1700 bucks to finish getting all the parts I need to mechanically finish the car. Im guessin about another 1500 on top of that for the body and paint materials needed to get the car painted. My main focus is to get the car running and such. Here is a list of the parts I have so far:
*on the parts I need to get
Anybody's suggestions on what I should maybe consider getting are appreciated.
Engine
Rebuilt engine with stock forged pistons, swapped out the old hypers cause Im gonna spray.
GT40 heads
E 303 Cam
Explorer Intake
1.7 RR's
Convertible motor mounts
UPR Aluminum A/C Delete
Aluminum Idler Pulley
"5.0L" Aluminum Oil Cap
UPR Polished Underdrive pullies
*MSD 6AL-2 Ignition Box
*Tach Adapter Harness
*MSD Coil
Ford Motorsport Plug Wire Holders
Drivetrain
Tremec 5 speed (2.95 first gear ratio)
Steeda Tri Ax Shifter
Rebuild kit
New Input Shaft
New Cluster gear
Full 8.8 rear with 3.73's
Full rebuild kit
Carbon Fiber clutch disc set for trac-loc
Trick Flow Girdle
*Adjustable Clutch Cable
*Poly Bushings for housing
*Spec Stage 1 Clutch set
*Pilot bearing
*Driveshaft Safety Loop
Suspension/Brakes
New QA1 K member
New used control arms with Poly Bushings
Refurbished stock spindles
Refurbished Rotor Dust Sheilds
Lakewood 90/10's in the front 50/50's in the back
UPR Bump Steer kit
Ford Motorsport C springs
BBK Gripp C/C plates
Newer Quad Shocks
*Turn Rotors from 89
*Bearing Seals
*EBC Green Stuff brake pads
*Sway Bar End Links
*Poly Sway bar bushings
New Inner tierods
Energy Suspension Spring Isolators
Offset Rack Bushings
Interior
Full Black Interior from 90 GT
Two Black Flofit seats
Billet Window Switch kit
Billet Shifter Bezel
Grant leather steering wheel
*Grant Steering Wheel Apapter
Billet Turn Signal Cover
*Battery Trunk Mount kit
*Complete Interior Screw kit
*Door Lock actuator kit
Exterior
Cobra Front Bumper
Cervinis Cobra R hood
91+ style fenders
GT ground effects
Cobra Rear Bumper
Saleen Wing
Rust free hatch with shaved trunk lock
Perfect 93 model quarter windows
2 17x8 Stern Replicas with Motorsport rivets
2 17x9 Stern Replicas with Motorsport rivets
Here is my overall image of how I want the car to come out, still debating on the dip down with the orange. Not sure if that's going to be included when it comes down to painting the car.
Here are some pics of the car when I got it and how the engine bay has progressed. I will be working on cleaning and painting some of the engine brackets this weekend so I will try to get some pictures of that stuff up on here. I hope you all enjoy. Sorry for the mediocre pics, all I had was my camera phone at the time.

 .
.