Progress Thread Today in the shed........

Don7Up

Member
Sep 14, 2025
15
21
13
IA
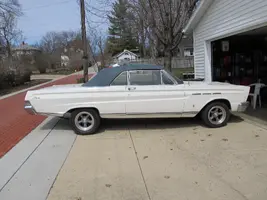
Back to work on my brothers car. Put the new Pioneer deck in. Discovered working on these malaise era plastic interiors not my favorite. I'd much rather spend time wrenching on my 65 Comet, which is just a Mustang in much fancier clothes.

Found out why the dash rattles. All 3 of the bolts to hold in the dash piece under the steering column, and the 2 lower bolts for the inst. cluster were all missing. I hope the local Ford dealer has dash hardware on hand. Then I had to get YouTube certified on console removal lol! A little fiddly but it's all back together now, and I don't have to deal with the stock radio that would only play a cassette in reverse.

Got a question. While working on that dash, I noticed the far left dash piece that surrounds the A/C vent is cracked. I doubt Ford still sells it, so if anyone knows a vendor much appreciated.

IMG_1656.webp

IMG_1657.webp
 
I believe LMR sells interior hardware kits that may have all the missing bolts/screws you need. However, you may be required to purchase more (in the kit) than what you need exactly. I would also look at LMR for the cracked vent bezel piece, if its not connected to the entire dash.
 
Thank you sirs for the heads up. Should have remembered LMR. That's where I got the radio install parts and under hood decals. Speaking of those decals, if anyone knows where a good pic of a stock under hood can be seen so I can get the placement right I'd appreciate it.

LMR shows the cracked dash piece as the inst. cluster bezel. At least it's available, but for $$, I'm going to try super glue first.

Went to the Ford store looking for screws and a dipstick o-ring this morning. Once again reminded why I avoid that place. They wanted $7 for o-ring, $11 EACH for lower dash screws, and couldn't even find the lower inst. cluster screws. One of the many things I did when working was manage a NAPA store. Incompetence on that side of the parts counter drives me nuts. Here's a pic of what I'd rather be working on.
 

Attachments

  • IMG_0492.webp
    IMG_0492.webp
    319.1 KB · Views: 22
Yep, your right. Part of the dash. Guess that super glue better work!

No no no... These are super easy to fix.

Get behind the crack and rough it up with sand paper ( @General karthief No, this is something else ).
Get a good two-part epoxy (JB Weld makes a good one) and some cheese cloth.

Pinch the crack closed however you find a good way to do it. Use Q-Tips to apply a layer inside. Use Q-Tips to roll the cheesecloth into the epoxy and use Q-tips once again to apply a second thin coat over the cheesecloth and partially cured epoxy.

A very light sanding on the front side will make the crack disappear. You usually don't even need a filler. If you do, use one for plastics and apply it just before you paint/dye the entire dash.
 
Those screws for the lower dash go into the frame behind it. In my daily, one of them broke loose on the frame side and spun endlessly. Had to cut it out. Replaced it with one of those ziptie anchors. It's not the most elegant solution, but I didn't have a better idea that doesn't involve removing the dash.
 
  • Like
Reactions: RaggedGT
Another "mostly" decent day in the shed. Started on the dash. Got the inst. bezel screws in, then saw why the lower dash panel had no screws. The 2 outer ones had busted screws in the threads, like someone tried 1/4" ones in the metric threads. Doh! Hopefully the center one will nail it down. Seeing this makes me jones no longer about the cracks around the a/c vent. Just another thing to fix when the dash comes out to change the heater core.

Then put it back up on the Quick Jack lift to look at the dipstick tube. Jeez, can't even see the hold down bolt. Is there an easier way to get there than dropping the Y pipe?

Decided I better take a better look at this slippery slope. Good news is I now know why it drives good. All new suspension. OESpectrum shocks/struts, springs, steering rack, and sway bar links. Damn, that sway bar is ginormous! Rear axle arms are powder coated red, with the tops being adjustable, so guessing not stock there.

Then the bad news. This thing took one for the team hard in the front end. Radiator support buckled and didn't get pulled back quite enough. Body shims behind the hood latch to get it working. Ends of the plastic fan blades reefed. Hood gaps mostly acceptable, but it sits a little proud at the right rear corner. The repair cheapness shows with the hose clamp on the left headlight bucket, and the right headlight recess at the top. I can only guess my bro bought this off an add and didn't really look at it. This disappointment, and the heater core, is probably why I saw it last on the road 3 years ago when it went to Des Moines to get the new top put on. Oh well. He liked it enough to to keep working on it so I will too.

Then, I moved on to the mountain bike. I put riser bars on because I'm retired and need to get the exercise I'm missing from the daily grind. The cables were all too short, and needed replaced anyway. Garage tunes today provided by B.O.C and Loverboy.
 

Attachments

  • IMG_1659.webp
    IMG_1659.webp
    347.7 KB · Views: 23
  • IMG_1660.webp
    IMG_1660.webp
    271.8 KB · Views: 22
  • Like
Reactions: 85GT4V
Today, while pondering the Mustang dipstick o-ring problem, decided to get the Comet out instead. When I got home, the throttle linkage was sticking so it wouldn't go back to idle. This thing was a weird Harold linkage with 5 pivot points. Not one of Fords better engineering moments lol! Sprayed them with dri-lube and let Dr. Miles have a look. My local 35 mi. motorcycle lap. It was loosened up when I got home. Ran good, but in the it's always something dept. the right header collector gasket was ticking a little. The H pipe has to go anyway so I'll get to that next. Road tunes deftly delivered by my Kill Hannah cassette.

Then on to the fun stuff. Been playing with my bikes mostly for the last 20 yrs. which is why the cars sit and get gummed up throttle linkage. Pulled a couple XS650's out of a falling down shed in the past. One of them was a 75 Chopper. +5 Frank's forks, king/queen with sissy bar, ape hangers, drag pipes, the whole 9 yards. Started, but motor was weak so parted it out. The paint was really cool, but probably lacquer and starting to chip off. Wanting to nail that loose paint down, I sprayed one of the side covers with Rustoleum 2X gloss clear last week to see if the paint would comingle. Side cover won't fit my 81's frame so no loss, but it worked fine. Did the tank today. Garage tunes were the Beatles.
 

Attachments

  • IMG_1661.webp
    IMG_1661.webp
    338 KB · Views: 12
  • IMG_1662.webp
    IMG_1662.webp
    293.9 KB · Views: 16
Another decent day in the shed. Put the Comet up and took the too much slack out of the stretching e-brake cable. Then tightened the nut that holds the ps. reservoir on the back. Been dripping for awhile. Crystal ball says probably a new sealing washer and a little high tack in it's future lol!

Then looked at another leak. The Yammie R5C left a little puddle of 2stroke oil on the floor last winter. Pulled the cover and all the hoses/fittings were dry, but that white thumbwheel on the back end was the same color as the Wallyworld's Finest oil in the tank. Let it warm up, wiped everything off. I'm betting on the rear pump seal.

Then put the XS650 together. Petcocks and gas cap seal got here yesterday. Haven't had this tank on for 6 or 7yrs. and missed it. Goes great with the rat bike vibe. Always feel a little punk riding this so tunes today provided by the Clash.
 

Attachments

  • IMG_1664.webp
    IMG_1664.webp
    264.1 KB · Views: 18
  • IMG_1663.webp
    IMG_1663.webp
    299.4 KB · Views: 20
Interesting day in the shed today. Sisters b'day next month and she's been bitching about the headlights on her Prius. My go-cart Fiesta's were bad enough to use as a learning tool. Watched a few utube vids and got a couple 3M kits. About a 2 beer job lol! Don't know how long that final clear coat wipe will last, but the kit has everything you need but the cordless drill, a few rags, and a squirt bottle. Instructions good. Barring unknown longevity, 2 thumbs up. Inspirational learning tunes provided by cd 1 of the Stones forty licks.

Then I took the XS out for the fuel tank swap test run. Everything to do with the tank was peachy. No petcock drips, and it it didn't organ donor reject the Honda gas cap seal. Sometimes you have to raid the other guys parts bin when the cost less then half lol! The it's always somethings were the tach and chudder. At 3/4 throttle it was gasping. Going to raise the metering rods a notch, and if that isn't enough go 1 bigger on the main jets. The clock needles have been bouncing a little since it spent 4 days under water in the '08 flood. Today the tach was bad. I'll pull the cable and grease it tomorrow.

Ran the R5 around town on errands last week, and it's for sure the rear pump seal. Not bad though so it's on the winter list.

In trying to stay on topic for a Mustang forum, I also ran errands in the Comet. Surprisingly, reefing up the rear p/s pump reservoir nut stopped the drip. For now. I'm not holding my breath on that. Hope you people are having as much fun in your shed as I am.
 

Attachments

  • IMG_1665.webp
    IMG_1665.webp
    315.7 KB · Views: 16
  • IMG_1666.webp
    IMG_1666.webp
    399.8 KB · Views: 14