Status
Not open for further replies.
image.webp
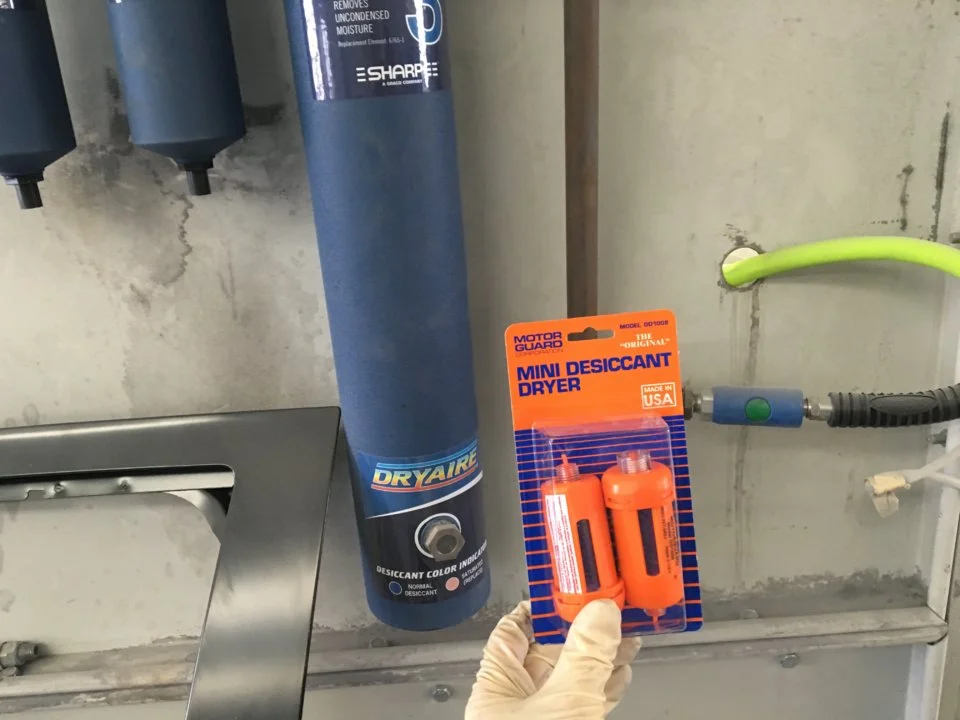
Here's a neat little item.
I'm going to be spraying a little primer on doby this weekend and needed a small inline moisture remover.
These are the latest thing. They use desiccant beads like my big filter on my booth.
When the beads are saturated, they turn pink.

Fyi... If you put six of them inline trying to stop excess water, it'll drop your gun pressure too far to use... Lol.
 
  • Like
Reactions: Davedacarpainter
Well I called Matrix this morning,..just to be sure that I'd have to remove all of that stinkin 2k primer.
(Sorry Dave,...I was hoping you were just being overly anal)
You're not.

He said it all has to come back off. What I thought was water in the paint wasn't. It was solvents "boiling" trying, to escape forming bubbles that eventually pop. He said that I'd see first hand what'll happen if I tried to topcoat it by using reducer to wipe it off. He said that the fact that I'll be able to almost easily wipe it off with reducer is proof enough. A properly activated 2k is way more resistant to getting "wiped" off

So,...down to the garage. I actually ran over the whole hood last night with 120,...I'm going to finish that removal with 220, and wipe the rest off with reducer.
First, I'm gonna work on the door bar, and door panel some more.
 
Well I called Matrix this morning,..just to be sure that I'd have to remove all of that stinkin 2k primer.
(Sorry Dave,...I was hoping you were just being overly anal)
You're not.

He said it all has to come back off. What I thought was water in the paint wasn't. It was solvents "boiling" trying, to escape forming bubbles that eventually pop. He said that I'd see first hand what'll happen if I tried to topcoat it by using reducer to wipe it off. He said that the fact that I'll be able to almost easily wipe it off with reducer is proof enough. A properly activated 2k is way more resistant to getting "wiped" off

So,...down to the garage. I actually ran over the whole hood last night with 120,...I'm going to finish that removal with 220, and wipe the rest off with reducer.
First, I'm gonna work on the door bar, and door panel some more.
Sucks that you have to do it,
I'm not so sure about his whole solvent explanation to you though. Solvent pop doesn't look like that. Plus it happened right away, right?
I would bet it was water in the line myself, or possibly some contaminant in the air around you like if you had used a spray lubricant somewhere close to where you shot it in the recent past. Water is what I think though.
 
Dang, Ive missed a lot in these last couple days. Sucks to read of your primer issue. Your door bars look good, and at least they dont sit next to eachother on the hood for the subtle differences to be noticable... (get it?) As far as my hood... Its about time to get the car out of hibernation and I ditched the cowl hood in favor of a factory hood with a factory scoop (couldnt find a plain factory hood that didnt need paint). Well I never liked the hood scoop, and decided to lose it and go for heat extractor V2. Best part though, is that if I dont finish it or bail on the idea all together, the stupid giant factory scoop will cover it all up like it didnt happen.
 
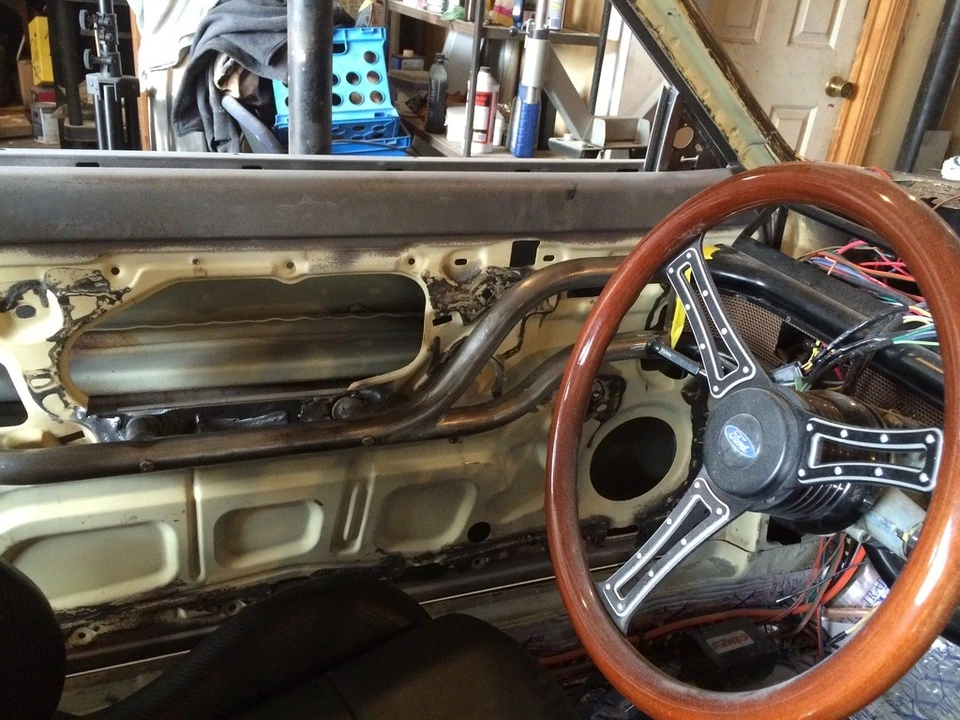
The door bar marches on. I modified the door today to allow me to bolt up the bars, and check them for fitment.
FCFDA142-4D7E-4619-8C7B-FD905FA3F11C_zps93roj2lt.webp

Clearly, the wheel blocks your perspective here. But I gotta say, it's working out exactly as I want it to. Just sitting on the bare door skin, I have it spaced off 1/4" to simulate the door panel thickness with added upholstery. I'll probably back that spacing down about an 1/8th to be a perfect simulated standoff.

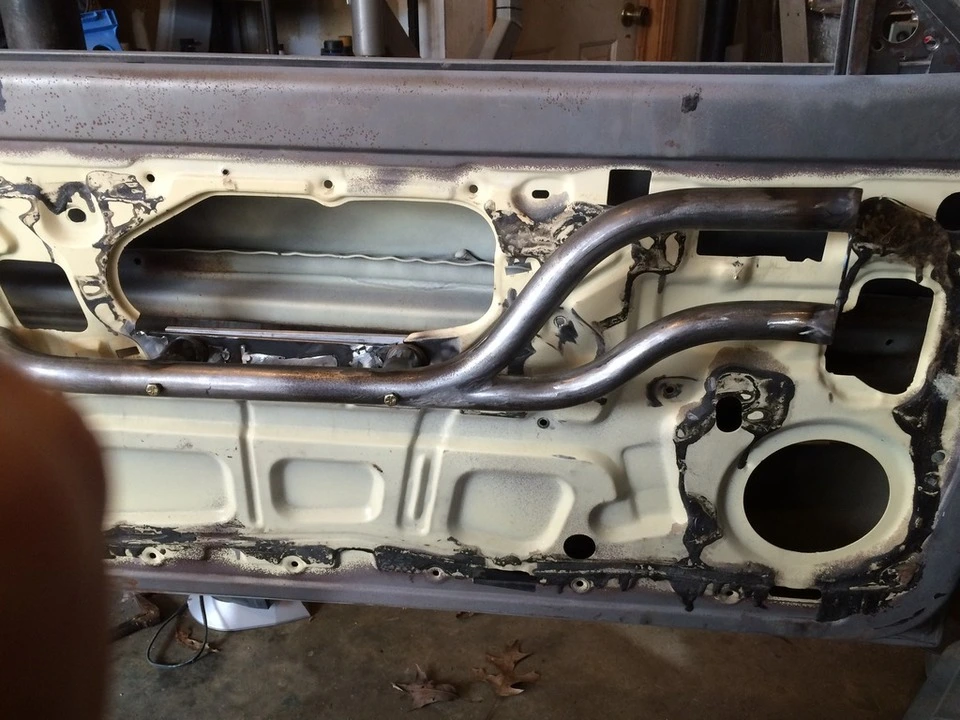
The door panel itself will be pretty extensive. A bottom that will stand off about 1.5", and follow the contour of the bar will serve to hide the window motor mechanism, Give the 6.5" component woofer some depth, and allow me to build a map pocket. Above the bar, there will be more mesh recessed into the upholstery, ( same leather that is on the dash) painted to match the copper mesh everywhere else, with the new cyclone letters I had made mounted right in the middle of that mesh directly above the doors arm rest handle.
B8F38889-58E8-4F88-BCB1-B881CE7DCBD6_zpskjbom4ds.webp


* those bolts are only temporary, I plan to recess the heads of an allen bolt into the handle as a final solution.

Right now, the entire mess is moveable. Originally, I planned to be able to float that thing around so that I could dial the fitment in precisely. So that is how I made it today, A 1-1/5" piece of .125 bar welded to the door skin, with two 7/8" holes drilled into it, backed by another piece of aluminum bar that is threaded to act as a nut plate.

I got to thinking about it, and thought why does it need to be moveable? No other door panel can have it's components "adjusted" after it's installed on the door. That said, I'm thinking that I'm gonna get the door perfectly aligned, and I'm gonna make the bars' mount points permanent.

One less thing I'll have to dick with.
 
The door bar marches on. I modified the door today to allow me to bolt up the bars, and check them for fitment.

FCFDA142-4D7E-4619-8C7B-FD905FA3F11C_zps93roj2lt.webp

Clearly, the wheel blocks your perspective here. But I gotta say, it's working out exactly as I want it to. Just sitting on the bare door skin, I have it spaced off 1/4" to simulate the door panel thickness with added upholstery. I'll probably back that spacing down about an 1/8th to be a perfect simulated standoff.

The door panel itself will be pretty extensive. A bottom that will stand off about 1.5", and follow the contour of the bar will serve to hide the window motor mechanism, Give the 6.5" component woofer some depth, and allow me to build a map pocket. Above the bar, there will be more mesh recessed into the upholstery, ( same leather that is on the dash) painted to match the copper mesh everywhere else, with the new cyclone letters I had made mounted right in the middle of that mesh directly above the doors arm rest handle.

B8F38889-58E8-4F88-BCB1-B881CE7DCBD6_zpskjbom4ds.webp


* those bolts are only temporary, I plan to recess the heads of an allen bolt into the handle as a final solution.

Right now, the entire mess is moveable. Originally, I planned to be able to float that thing around so that I could dial the fitment in precisely. So that is how I made it today, A 1-1/5" piece of .125 bar welded to the door skin, with two 7/8" holes drilled into it, backed by another piece of aluminum bar that is threaded to act as a nut plate.

I got to thinking about it, and thought why does it need to be moveable? No other door panel can have it's components "adjusted" after it's installed on the door. That said, I'm thinking that I'm gonna get the door perfectly aligned, and I'm gonna make the bars' mount points permanent.

One less thing I'll have to dick with.
Don't forget about tweeters in the doors.

Just sayin.
 
Dang, Ive missed a lot in these last couple days. Sucks to read of your primer issue. Your door bars look good, and at least they dont sit next to eachother on the hood for the subtle differences to be noticable... (get it?) As far as my hood... Its about time to get the car out of hibernation and I ditched the cowl hood in favor of a factory hood with a factory scoop (couldnt find a plain factory hood that didnt need paint). Well I never liked the hood scoop, and decided to lose it and go for heat extractor V2. Best part though, is that if I dont finish it or bail on the idea all together, the stupid giant factory scoop will cover it all up like it didnt happen.
Believe me when I say that I wish there was a cover that I could just bail on the entire project, and hide everything beneath it.

The door bars are definitely far enough apart to not be "scrutanizable"? Couple that to the fact that one is obscured by the steering wheel, and I'm all kinds of good.
 
The door bar marches on. I modified the door today to allow me to bolt up the bars, and check them for fitment.

FCFDA142-4D7E-4619-8C7B-FD905FA3F11C_zps93roj2lt.webp

Clearly, the wheel blocks your perspective here. But I gotta say, it's working out exactly as I want it to. Just sitting on the bare door skin, I have it spaced off 1/4" to simulate the door panel thickness with added upholstery. I'll probably back that spacing down about an 1/8th to be a perfect simulated standoff.

The door panel itself will be pretty extensive. A bottom that will stand off about 1.5", and follow the contour of the bar will serve to hide the window motor mechanism, Give the 6.5" component woofer some depth, and allow me to build a map pocket. Above the bar, there will be more mesh recessed into the upholstery, ( same leather that is on the dash) painted to match the copper mesh everywhere else, with the new cyclone letters I had made mounted right in the middle of that mesh directly above the doors arm rest handle.

B8F38889-58E8-4F88-BCB1-B881CE7DCBD6_zpskjbom4ds.webp


* those bolts are only temporary, I plan to recess the heads of an allen bolt into the handle as a final solution.

Right now, the entire mess is moveable. Originally, I planned to be able to float that thing around so that I could dial the fitment in precisely. So that is how I made it today, A 1-1/5" piece of .125 bar welded to the door skin, with two 7/8" holes drilled into it, backed by another piece of aluminum bar that is threaded to act as a nut plate.

I got to thinking about it, and thought why does it need to be moveable? No other door panel can have it's components "adjusted" after it's installed on the door. That said, I'm thinking that I'm gonna get the door perfectly aligned, and I'm gonna make the bars' mount points permanent.

One less thing I'll have to dick with.
Nice work there mister.
 
Don't forget about tweeters in the doors.

Just sayin.
I was planning on putting the tweeters in their little half eyeball pods, and mounting them on the part of the dash bar that transition into the door bar.

That'll probably change a bagillion times over, but for now they're gonna be sitting there,...all "take me to your leader" and sht.
 
  • Like
Reactions: Davedacarpainter
So, Mike not trying to be a smarty pants, honest.. When you said door bars I Imagined safety feature as in modern car door bar collision protection. Are these snazzy bars going to offer that in your grand scheme after installation, or are we strictly shooting for aesthetics?
 
So, Mike not trying to be a smarty pants, honest.. When you said door bars I Imagined safety feature as in modern car door bar collision protection. Are these snazzy bars going to offer that in your grand scheme after installation, or are we strictly shooting for aesthetics?
Lets think on that. Mike, and safety... nah, doesnt fit well together. I feel like they are aesthetic pieces that will become spears in the event of being t-boned. But maybe you brining that up will get him to integrate them into a saftey feature.
 
  • Like
Reactions: Davedacarpainter
So, Mike not trying to be a smarty pants, honest.. When you said door bars I Imagined safety feature as in modern car door bar collision protection. Are these snazzy bars going to offer that in your grand scheme after installation, or are we strictly shooting for aesthetics?
Lets think on that. Mike, and safety... nah, doesnt fit well together. I feel like they are aesthetic pieces that will become spears in the event of being t-boned. But maybe you brining that up will get him to integrate them into a saftey feature.

Iowa boy is right. The bars are purely cosmetic. No way in the world could these things be relied upon as protection- For one thing, the door bars are sectioned and butt welded in 7 places. The other is that they are only .085 wall (in some cases.0625 wall) 1.250 tubing. No way could they be counted on to lend any degree of safety.

I will say this: the trail fitment today with the door panel in place gives you a sensation of being in a tight cockpit. It is what I wanted when I planned the build. I laid out the pattern for he door panel today,....it's gonna be cool.
 
Ok,... today wasn't really supposed to be a progress day. Mater of fact, I wasn't even supposed to be there today.

But things took a turn in a different direction.

It all started when I back #2's 86 out of the drive this morning to go to the grocery store. I get to the end of the drive, step on the brake,....and I got nothin.....It keeps right on rolling,..foot on the floor. I pump the brakes like mad, and finally get it to stop. I pull it back in, wake up the dead head, and ask him how long the car has been w/o brakes. He says....."for a little while".

For a little while.:doh:

I go upstairs, call AZ to see if they have a MC, and go there in my Ranger, as well as the other store I intended to go to in my son's 86.

Two hours later,..he has brakes again.

The wife comes out,..asks me if I want to go to HD with her (I don't) and tell her as much. She leaves to go get flowers. That leaves me in a place I didn't think I was gonna be in.

The green zone.

"The white zone is for loading, and unloading passengers,....the green zone is for dickin off"

So I'm there,...what else was I to do? You want me to get a ticket?:shrug:

So,.....more door.....panel.

Since the door bars sweep up right where the stock Fox door handle was, clearly the stock door handle wasn't gonna work. I never intended for it to. The plan was always to relocate it to the rear of the upper door. I was gonna use a kit from the street rod industry that uses a billet knob and trim plate, and a cable/bellcrank dealy to tie it into the factory latch.

The kit cost about 50 bucks, and the knob and trim plate was another 50. 100 bucks.

100 dollars to be able to open my door from the inside.

I wasn't feelin' it.

So I decided to let the Monster decide.

He thinks for a minute.....

The Monster says,......."Just a thought here.......but how often do you think you'll ever actually lock the door from the inside?"

Uhh,.....never?

"Ok then, why not re-purpose the door lock knob, and make it the interior door release?"

So it shall be done...

It's no rocket science actually. A typical drag race car door opening modification,...I've actually done it before for that very purpose.

In this case,...it saves me from spending the money, and having to try to build a better mousetrap to try and actuate a rod operated latch with a cable.

So here it is,..."exhibit "A".

BBCC8C7F-7696-4E5E-B98C-B85425CC1A35_zps0daaxt33.webp


Your everyday 36 year old Fairmont door latch. The "l" shaped lever is the door release.

So you pull a Gunny Highway,.....You Improvise,......you Adapt,...and you'll Overcome.

7A69156F-9F5D-4537-8BBA-E4DCE5B0A82F_zpsx1mktqr0.webp


Cut off, and re-clocked,....again glad that I bought my TIG back.

After that,...you bolt the latch in the door, and "twist" the door lock rod 90 degrees, and you got yourself bonafide pushbutton that opens your door.

887E1552-733D-4FCD-ACC1-8912DEDB1801_zpsx3xtggvr.webp


Where my seats are located, the door lock knob is even with my shoulder. The chance that I'll acidentally put my arm on the knob, and open the door is minimal because of that. Ideally, it would've been better to make the release action a pull, rather than a push, but that would've required a bellcrank gizmo. I wanted to keep it simple.

The panel is laid out. Tomorrow (If I'm not taking my drug test for the new job) I'll go get the materials to build one.

3B217C5D-43CF-4160-BC24-2B3CB39B0040_zpsnvethjtr.webp


And......beer.
A70AE5A0-4419-45CB-A7CD-7843D72B5F2D_zpsygz7gxky.webp
 
Status
Not open for further replies.