Progress Thread [Parts] Foxbody 5.0: 3D printer / STL models

snovak

Active Member
Oct 9, 2020
260
143
53
Croatia
Hello!

INTRO: I am from Croatia, Europe. Proud owner of '88 5.0 vert.
As we don't have much stores here (if any) with US car parts, and shipping from USA for small parts costs a fortune sometimes, if they want to ship I was forced to improvise.
Therefore, I made few reproduction parts with 3D printer. I am sure there is more of us, so this topic would be my contribution to Foxbody society :)
We can't reproduce alternator, of course, but some parts of the car can be done with PLA, ABS etc and finished to (at least) look as original.

Soooo, please, if anybody else has projects attach here.
Moderators, feel free to move this topic to other part of forum if You find in inappropriate here.

Attached is the first one:
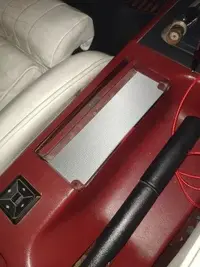
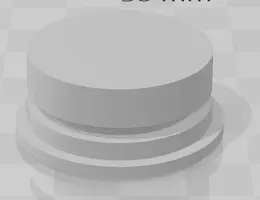
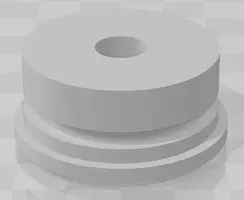
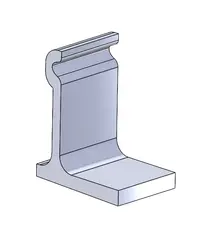
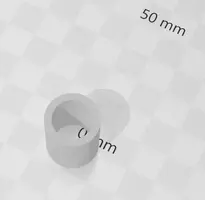
DOOR STRIKER BUSHING
Flashprint file, Solid Edge model, STL
Printer: Flashforge Guide II 2
Material: PLA
- part fits on striker, but has just a little bit bigger OD than needed (You cant open door properly), so I ground it a bit on site. Never corrected model afterward...
 

Attachments

  • Door_Striker_bushing.zip
    Door_Striker_bushing.zip
    652.3 KB · Views: 239
  • door_striker.webp
    door_striker.webp
    3.7 KB · Views: 298
Last edited:
LICENSE PLATE HOLDER
In Europe we have wider 'normal' license plates, too wide to fit between rear lights. In Croatia we have a 280x200mm (~11x8") license plate choice for special vehicles (which I used). This one is, sadly, a bit too tall to fit also.
Therefore, I made angled license plate holder, or adaptor if You like.
Flashprint file, Solid Edge model, STL
Printer: Flashforge Guide II 2
Material: ABS
-adjust per Your license plate dimensions/country limitations. AND check if it is legal before permanent use!!!
 

Attachments

  • Like
Reactions: Noobz347
FUEL LINE DISCONNECT TOOLS
* 1/2, 3/8 and 5/8 tools for one-time use
Flashprint file for all + 5/8 separately (which I broke once), STL files
Printer: Flashforge Guide II 2
Material: PLA
- I did not try, maybe ABS would be more rigid. 5/8 PLA broke on one old stuck line, but it was more my fault due to excessive force used.
 
NOT A PART:
KEYCHAIN Mustang horse
* I found this online and made it smaller to fit on keys
Flashprint, STL files (careful, big model)
Printer: Flashforge Guide II 2
Material: ABS
- Black ABS, and I broken into SWMBO nail polish stuff and paaaaints!!!! Found nice white for horse, and red for groove between bezel and horse. Transparent as finish. If You have newest model of SWMBO, You may have a wider choice of colors :) :):rolleyes:
 

Attachments

  • Like
Reactions: Noobz347
FUEL FILTER SECURE CLIPS
* The clips that fit into fuel filter connectors to secure them. When old enough, may collapse when changing filter, and if You don't receive them with new fuel filter.....
Flashprint for 2 pcs, STL file
Printer: Flashforge Guide II 2
Material: PLA
- ABS would be better choice, but I had PLA on machine at the time
 

Attachments

  • Like
Reactions: Noobz347
I wouldn’t use PLA on those parts. Use something more durable as PLA will start to break down over time. You really don’t want a fuel line clip to degrade and fail and cost you your car.

Good point! Therefore:
WARNING:
* I would recommend ABS at least for all parts.
**Also, everybody should note (at least) that all parts are made with 100% infill.
***It should be clear to everybody that all thoose reproductions are not OEM automotive industry rigidly tested parts and that they SHOULD BE MONITORED.
 
Another reproduction. On my vert rear quarter driver window failed. Luckily it was not motor but broken gear instead. Just tare apart motor shaft and test motor. If it is working, problem is in gears. My gear was actually cracked, and window was not moving up or down for 0.1", You could hear only clicks.
WINDOW GEAR AND PINS
* The 45-tooth gear and three "bushings" that go between motor shaft and window mechanism as a protection, rather to crash this parts than window guides/motor....
Flashprint, STL file, Solid Edge files
Printer: Flashforge Guide II 2
Material: ABS
- For gear I used 100% infill
- For three pins i used 15% infill
Warning: this should not be permanent replacement part, only as a temporary solution until You receive OEM part!
I should not be responsible for any damage.

For durability I will report back. Original parts are ordered, but I will keep thoose in until they fail.
 

Attachments

  • foxbody_window_gear.zip
    foxbody_window_gear.zip
    3.7 MB · Views: 182
  • foxbody_windows_gear.webp
    foxbody_windows_gear.webp
    15.2 KB · Views: 330
  • foxbody_windows_gear_pin.webp
    foxbody_windows_gear_pin.webp
    4 KB · Views: 294
  • Like
Reactions: arnie93lx
FYI I started to work on ashtray plate prototype. Quit smoking several years ago so ashtray is not needed... but I vape :-)

I want to keep this vert as stock as possible, but still have some modern touch.
One should remove stock ashtray and lighter, and simply stick in 3D printed cover plate. Close the ashtray lid and nothing is visible.
Furthermore and if I respect all below, reversing to OEM should take few seconds. Lift and unplug plate, reinstall lighter and ashtray and it is all back to stock like nothing was there.

When finish, I will upload also a solid plate (uncut holes). Preview picture of first prototype for dimensioning attached (aluminum PLA used).
Usable surface in above ashtray hole by design is 87x40mm (~4"x1.5") and some shallow space above 12V OEM lighter...
Personally, I don't want to cut/dremel center console, but if someone wishes to do so, I think you could squeeze cup holder in there, at least for thinner bottles (I see that lots of you want that here),
Additionally, options open and you can use this plate for mounting: illumination, displays, gauges, switches, inputs/outputs, NOS, anything...

Nevertheless, my plan is to make this "mod" reversible as possible:
- buy cheapo car charger (does not matter use/type), strip it down and pull out 12V wires. This plug will stick into OEM lighter place as a power source for complete plate, kindly avoiding any splicing into OEM wires :-)
- in modelled plate above this I will install small chassis mount main on-off switch (1-pole) for total manual 100% cut-off
- wires from above switch will go to 2 pcs of 12V chassis mount double usb plugs (RV, boat type). Both of them are ordered with on/off switch and also with green light to blend with AOD indicator bulb, and one of them with green digital voltage display
There is a possiblility that I will need to make a groove for plugs if the ashtray lid wont close (due to a lip at the right side of lid).
Everything is ready and in place... only waiting for dual usb plugs to arrive from China... master Yoda would say "patience you must have, worth it will be..." :-)
 

Attachments

  • 1614326474472.webp
    1614326474472.webp
    19.8 KB · Views: 300
Guys You have three simple new desings and useful parts for engine teardown or rebuild:

1. Dizzy cap - I think yall are sick of those old shirts or towels sticking out like too big sock on foot hahahaha
2. PCV cap - same thing as 1 on back side for crankcase ventilation
3. Same as dizzy cap but with hole which should be reamed to Your home made priming tool diameter...stick this to keep priming tool and drill in place.

All three parts have grooves for o-rings, useful for Your new sneakers if You turn engine on stand hahaha.

Simple parts, but make life easier.
STL files only.
 

Attachments

  • PCV-cap.webp
    PCV-cap.webp
    6 KB · Views: 207
  • dizzy-priming_tool.webp
    dizzy-priming_tool.webp
    5.6 KB · Views: 186
  • dizzy-pcv.zip
    dizzy-pcv.zip
    1.6 MB · Views: 128
Old thread... but tagging along because this is one of the first results for 3D printing for foxbody on google. Here's my contribution:
1996 COBRA WHEEL CENTER CAP RETAINING RING TABS

This is a pretty niche wheel, but the retaining tabs on the rear of the center caps that hold the metal ring often snap off due to brake heat, age, etc. I modelled and tested these easily printable tabs. Clean up, flatten, and scuff the mounting face of the center cap and use a strong contact adhesive like super glue or epoxy. (Make sure you try and stick it down where the retaining ring is meant to sit, use good discretion) Been on my car a few months and no issues yet! I am uncertain if this would work on other center caps such as the "pony wheels" but you are welcome to try, if I remember right they are similar. These center caps are pricy so if you can fix them, heck yeah.

This is also my first time posting a zip file, etc, so if something doesn't work please let me know.
STL, STEP and SolidWorks files included. I recommend printing it on its side, like an "L" shape.
 

Attachments

  • CobraCenterCapRear.webp
    CobraCenterCapRear.webp
    54.3 KB · Views: 54
  • CobraRim1.webp
    CobraRim1.webp
    26.1 KB · Views: 53
  • CenterCapTab.zip
    CenterCapTab.zip
    115.9 KB · Views: 32
  • RetainingTab.webp
    RetainingTab.webp
    10.8 KB · Views: 51
Last edited: