Progress Thread Komo's 1990 GT - Parts Gathering Purgatory & Home Remodel

It was @FastDriver and I had the impression that it had been through some 'stuff' before that point? :shrug:
Yeah, it was me. Nope, it never went through any 'stuff'. I see now where you asked me how old it was, but I answered about the OEM booster I had on the shelf, not the LMR one.

I bought it brand new from LMR in May of '23, installed that Summer, and because I did a bad job on the E-Brake cable install, it took me forever (~2 years) to diagnose. It dragged the whole time. At first, I thought it was maybe the adjustment rod so after several attempts I spun it all the way in, then maybe my E-brake, and after being sure it was coming from the front, I thought maybe it was something wrong with the stock prop-valve that I'd gutted so I swapped it for the delete kit, then maybe a bad brake line and traced them, then maybe one of the calipers. I even thought maybe it had something to do with the line-lock signal being noisy. Finally, after talking about how a vacuum-assisted brake booster works with a friend, I got to thinkin', removed the vacuum signal and viola! No more drag. Drove it like that for around a month, and on my next 'F-it project', I decided to pull an old OEM (I believe) Cobra Booster off the shelf and installed it. My problems were solved. I documented how much the adjustment rod stuck out of the booster compared to the OEM. As I said in this post, link, the reviews are fine, and I've never heard anyone else say they were a problem. So, I just chalked it up to my usual luck. Basically, there was a vacuum leak happening that caused it to apply more an more brake pressure the longer I drove the car, but even then it was inconsistent -- a pretty aggravating problem, honestly. At least I've been all around the brake system on Black Jack, now. In the end, having functional Cobra Brakes & E-brake is still well worth the hassle. It really is a HUGE leap up from stock fox brakes.
 
Last edited:
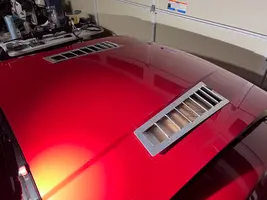
Alright last photo of the vents for now. I cleaned up/deburred the edges, bent the support structure in where needed, vents fit properly now. Guess it’s come down to paint and how to attach them. Of course paint the hood first as well.

I’ll do some sanity check measurements again just to be 100% sure they are even side to side.

IMG_9364.webp
 
Anyone know what ID power steering hose i need to run a new hose from the PS cooler up to the pump? I realized i threw my old one away because it was so crusty/dirty i didn't want it laying around dirtying up my workspaces. Forgot to measure it.

Should be just the hose and held on with clamps if i recall. 3/8 or 1/2"?
 
MM sent my urethane rack bushings so i popped the rear ones in the new rack. Said 7-10 days for the rest of my orders after my last communications said "a few days" like 2 weeks ago. Now i'm just waiting on the steering shaft to come. Need to use an impact to get the upper shaft bolt out... couldn't get it off with wrenches due to the tight space and no leverage. Bottom shaft bolt is loose already.

So whats left for the steering system project is:

- loosen upper shaft bolt
- remove old rack/shaft (keep steering wheel on center)
- remove and count turns for old outer tie rods
- replicate turns on new outer tie rods on new rack

- install new rack and shaft (paint new shaft as well)
- connect high pressure hose and low pressure return line hose to pump
- fill and burp PS fluid

and i just realized i've owned the car for 1 year now!
 
Last edited:
  • Like
Reactions: 85GT4V
Got the old tie rods off, counted 22 turns for each side so I replicated that with the new ones on the new rack.

Both old inner tie rods were completely shot, just flopping around. Put the old tie rods back on loosely just in case I need to adjust the wheels when centering the steering wheel.

Soaked the upper shaft bolt more with penetrating oil. Like the 4th time I’ve soaked it over the past couple weeks so hopefully a quick zap with an impact knocks it loose (and slides off).
 
Well, STILL waiting on my MM order. I am going to reach out on Friday if i don't get shipping info as that is the 10th day in the last 7-10 days update i received on the 9/26/25.

Last couple nights i got the holes drilled in the hood for the nuts/bolts to hold the louvers down. @nicholase suggested a good 3M type tape, but after considering that option, the louvers are flat, the hood slopes down, and i was thinking with the heat baking on these when the car is running, i didn't feel confident the tape would hold the louvers on the slope under high heat. So, i'm just going to bolt them down. The benefit of this is i can install these on the car prior to getting the hood painted (whenever that will be) and just remove/reinstall when that time comes.

I also painted them satin black, will clear them tonight. They look really good black.

I also tied my steering wheel down with rope in the straight forward position, started removing my rack (just removed rack bolts and inched it forward). Forgot i only slightly loosened the lower shaft bolt, but didn't completely remove it, so i think thats preventing me from removing the rack completely.

THEN, i can install the new rack and lines while i wait for the MM steering shaft to come in. Since their shaft is retractable it should be easy to install with the rack installed (at least i hope).

I got kid #2 coming this month (could be anytime really) and i really thought i'd have this job long done by now but MM is really screwing my schedule with their parts.
 
  • Like
Reactions: 90sickfox
"bolt them down"

With what? Galvanic corrosion is real. O_o

Are the vents made from aluminum?
Yes but they come with holes predrilled around the border, and one of the options when you buy them is to buy nuts/bolts from RaceLouvers themselves. I didn't buy the nuts/bolts, but bought some at Ace Hardware that fit. So the bolt goes through the louver and hood and you tighten the nut down on the underside of the hood to keep the louvers in place and also help them conform to the slope of the hood.

At least thats how my brain works and i plan on doing it. Won't the paint on the louvers prevent the corrosion from occuring?

Edit: they DID come with aluminum rivets, but i wasn't planning on using those:

1759868335298.webp
 
Last couple nights i got the holes drilled in the hood for the nuts/bolts to hold the louvers down. @nicholase suggested a good 3M type tape, but after considering that option, the louvers are flat, the hood slopes down, and i was thinking with the heat baking on these when the car is running, i didn't feel confident the tape would hold the louvers on the slope under high heat.
I didn't realize the louvers were pretty drilled for attachment. I was thinking a smooth monochromatic paint would look cool without any exposed fasteners. Look more factory than a "bolts on" but I'm sure it will look sweet however you do it.

....i really thought i'd have this job long done by now....

41921fba-a356-49a7-9206-c35edc9485e2.gif


It will never be done! That's how these things are lol.

In all seriousness that sucks about the parts. The world just don't work right like it used to.
 
  • Like
Reactions: gkomo
I didn't realize the louvers were pretty drilled for attachment. I was thinking a smooth monochromatic paint would look cool without any exposed fasteners. Look more factory than a "bolts on" but I'm sure it will look sweet however you do it.


41921fba-a356-49a7-9206-c35edc9485e2.gif


It will never be done! That's how these things are lol.

In all seriousness that sucks about the parts. The world just don't work right like it used to.
I will paint the bolt heads the same black so hopefully the 'blend in' as best as can be.

Ya the parts situation sucks, but at least MM is responding to me (albeit with bad info). I'd be way more pissed if they just ghosted me like with what you're dealing with.

I just need the car drivable by the end of the year. We plan on starting our second story addition in January so i'll need the car out of the garage for that. My concern was just having time to work on it with a newborn before the remodel starts. Just trying to get it drivable in the next few weeks.
 
  • Like
Reactions: nicholase
I'll just leave this here:

I like that idea. I was actually browsing McMasterCarr for stuff similar. Some of the bolts need to be like 1.5" long (or longer?) to get through the louver/hood/support structure. I bought a bunch of 2" bolts that fit and accompanying nylock nuts, was planning on installing them all with the 2" bolt then cutting the excess of the bolt off where applicable.
 
Got the old rack out, what a pain. It did not want to come out easily.

Started trying to put the new rack in and just couldn’t get it. The top metal hoses (the ones that come on the rack already) are hitting the motor mount perches so I can’t just stuff it up and on the pegs. I’ll have to watch some videos.

IMG_9391.webp

So this is where I left off for now.
 
How does the positioning of those lines on your new rack compare to your old rack? Is it possible to carefully "massage" the lines on the new rack to resemble the old ones?
They look the same.

I watched LMRs how to video and I think I know what I need to do. First they put the passenger side rear bushing on the sleeve first (I already installed it on my new rack, so first mistake), then they remove the sleeve completely from the drivers side to make room, put the rack up into place then put the sleeve back on through the rack/bushing hole.

I’ll try that method next.
 
Spray cleared the louvers and it made them way too shiny. I'm wanting the sheen to match the flatness of the cowl so i'm just going to respray the flat black over the clear and run it.