Progress Thread Komo's 1990 GT - Parts Gathering Purgatory & Home Remodel

All great suggestions!

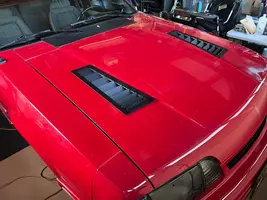
Opinions on adding some sort of gasket between the hood and louvers? At my work we have many different types of gaskets we use in various widths, thicknesses, materials. I could potentially 'borrow' some if its a good idea.
 
All great suggestions!

Opinions on adding some sort of gasket between the hood and louvers? At my work we have many different types of gaskets we use in various widths, thicknesses, materials. I could potentially 'borrow' some if its a good idea.

I would suggest that the gasket you use is the same 3M (Red) tape that was suggested to you previously.

It holds like a beast. It is the 'sticky stuff' used by OEMs to affix emblems and badges.

It can be "released" by gentle heating with a heat gun (so as not to damage paint).

Alternatively, the same adhesive is available in tube (like RTV) if you prefer to mask it off and apply your own bead vs. a roll of adhesive tape. If you choose this method, you need to mask it all off so that it is "sharp" when you're finished.
 
Stolen from the interwebz:

3M ProductType / BaseLiner ColorCommon ThicknessTypical Use / OEM ApplicationsTemp ResistanceNotes
4229PAcrylic Foam Tape (Automotive)Red polyethylene film0.76 mm (0.030")Exterior automotive trim, body side moldings, door edge guards, spoilersUp to 200 °F (93 °C) continuousThe gold standard for OEM trim; used by GM, Ford, Toyota, etc. Slight gray foam appearance.
06384 / 06386 / 06397Automotive Acrylic PlusRed liner0.8 – 1.1 mmHeavy exterior badges, fender flares, rocker moldingsUp to 250 °F (121 °C) short term06384 is the direct replacement for 4229P in many kits; better adhesion to modern clear-coat paints.
5952VHB General-Purpose (Black Foam)Red liner1.1 mm (0.045")Universal bonding—metal to plastic, spoilers, emblems250 °F short termUltra-strong, somewhat flexible; favorite for spoilers or high-load trim.
4941 / 4950 SeriesVHB Industrial Gray FoamRed liner1.1 mmEmblem, badge, and sheet-metal bonding300 °F short termBonds dissimilar materials, including aluminum and composites.
4910 / 4910FClear VHB (Acrylic)Red liner1.0 mmInvisible attachment for glass or clear lenses300 °FGreat for interior clear lenses, light covers. Looks slick behind acrylic panels.
5955 / 5962VHB Thick Black FoamRed liner1.6–2.3 mmHeavy panels, spoilers, exterior door moldings250 °FExtra-thick for irregular surfaces or slight gaps.
3610 / 3615 Automotive PerformanceHigh-Temp Acrylic FoamRed liner0.8–1.6 mmExterior moldings in hot climates (AZ, TX)300 °FDesigned for high radiant heat zones; some OEM roof rail installs.
PT1100 / PT1500Acrylic Plus, Next-Gen OEMRed liner with black logo print0.8–1.5 mm2020-on OEM body trim, radar sensors300 °FHigh peel strength; compatible with paint systems including ceramic clear coats.


Quick Ref:

  • Emblems & Badges: 4229P or 06384 — 0.030" thickness matches factory standoff.
  • Spoilers / Winglets: 5952 or 5955 for flexibility and gap-filling.
  • Weatherstrips & Flares: 06397 (gray) — better stress absorption.
  • Glass / Clear Trim: 4910 — disappears completely.
  • Hot-Zone Body Panels: 3610 / 3615 — holds up near exhaust or engine bay.
 
  • Useful
Reactions: nicholase
Ooo appreciate the research. I will look into this.

The gaskets we have are made for the Navy and are either dense foam or a spongy rubber material. So they are very good at withstanding the elements, including heat, but may not be best suited for automotive, not sure. They are sticky on one side so i could peel and stick like the 3M stuff above.

I'd have to check the thicknesses though, the 3M ones above are all really thin compared to what i'm thinking we have.
 
I think this one is likely best for your application:

4941 / 4950 SeriesVHB Industrial Gray FoamRed liner1.1 mmEmblem, badge, and sheet-metal bonding300 °F short termBonds dissimilar materials, including aluminum and composites.

 
Just testing the look loosely fitting them in;

IMG_9393.webp

Of course I scuffed and sprayed the flat black on top and the can ran out mid painting and spurted some thicker globs on the drivers side one so I’ll sand them down just a bit and respray with a fresh can I have.
 
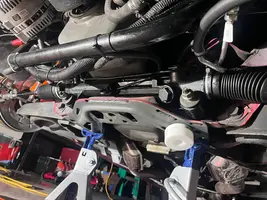
Got the rack in loosely with the new bushings. Followed LMRs how to and it went fairly smoothly. Had some trouble lining up the rack bolt and sleeve on the drivers side after removing and reinstalling the sleeve. Nothing a pry bar couldn’t handle though.

IMG_9394.webp

Eyeballing my outer tie rods they look like they’ll be close to spot on with the spindle.

Tomorrow should be tightening down the rack, loosely putting the tie rod ends in the spindles and possibly hooking up the lines to the pump.
 
Last edited:
Got the rack torqued down, high pressure line installed (think my routing isn’t 100% right but too late now), low pressure line installed, and outer tie rods loosely in the spindles. Everything I wanted to get done.

Just need to buy some PS hose to connect low pressure side to pump, and get the damn shaft delivered. Oh and remove old shaft still.
 
Dumb question but did you replace the teflon seal as well as the o-ring on the power steering lines?
Yes. The lines I bought came with the teflon seals preinstalled. All I had to do was add the supplied o-ring to the rack side of both lines. Pump side of the high pressure line I did not put an o-ring because I didn’t see anywhere it could go.
 
The fitting on the pump side connection doen't pull back like on the rack side connections. It just screws into the pump. I did pull back the two fittings on the rack side and add the oring, i just didn't see anywhere an oring could go on the pump side. Pump side and rack sides DO have the teflon washer though.

So how i have it right now is:

- Rack low pressure connection: teflon washer and o-ring
- Rack high pressure connection: teflon washer and o-ring
- Pump high pressure connection: teflon washer

I actually watched that video before tackling this whole project. But after watching it again, when he's connecting the high pressure hose from pump to rack i see him putting the o-ring on the rack connection, but i don't see him putting an o-ring on the pump connection. Would be nice just to have confirmation though.

Oh and when i removed the old pump high pressure line, all i saw was a torn up teflon washer, unless the o-ring was inside the old pump connection?
 
Last edited:
Ok he says “with your hose it should come with two o-rings”… mine only came with one and when researching this project I read some hoses need or don’t need o-rings. I think I’m going to take a gamble and install it the way it came unless someone knows for 100% that end of the hose needs an o-ring no matter what.

Again the hose I pulled off did not have an o-ring on it unless it got stuck inside the pump female side and I just didn’t catch it. I don’t have the pump anymore so I can’t check.
 
That’s only on the rack side. The pump side doesn’t have that type of connector. BUT now I’m questioning if it still needs an o-ring. I guess if I run it as is and I spray PS fluid everywhere I’ll know my answer.