Progress Thread 12th Owner: My '93 Notchback Restoration & Performance Build

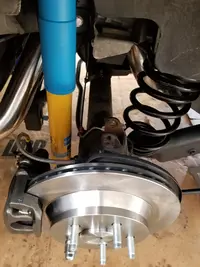
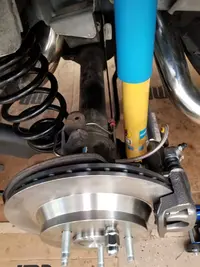
Other than filling the differential fluid with oil and bleeding the rear brakes, the rear is done. I broke a bango bolt tightening to "14 ft lbs" and called Maximum Motorsports with 15 minutes left in the business day. They're mailing me a new set for the front to be delivered on Friday. They rock and have great products. Got an alignment appointment for 4pm on Saturday. The finish line is in sight.
 

Attachments

  • 20190731_171844.webp
    20190731_171844.webp
    136.1 KB · Views: 178
  • 20190731_171833.webp
    20190731_171833.webp
    127.3 KB · Views: 159
I love it . You get the master , booster and prop valve done too ? And you gutted stock one front and back and used the blank front plug ?
 
Set aside some time and patience . That booster is not a fun time ! Lol
Sounds like I need to take advantage of tonight and Thursday night as much as I can in order to meet my timing. I'll probably fill the diff tonight and maybe start on the master cylinder Thursday night. I didn't purchase a new booster. I thought heavily about it and even drove a buddy's notch who did the same swap and his car felt really strong.
 
Sounds like I need to take advantage of tonight and Thursday night as much as I can in order to meet my timing. I'll probably fill the diff tonight and maybe start on the master cylinder Thursday night.
Atleast pull your master and booster maybe get the prop valve gutted and done and the adjustable installed then you can just focus on the booster to hopefully make your dead line . Soak those plugs with Pb blast on the prop valve
 
Ok. You guys are really encouraging me to finish this project by this weekend and I appreciate it. I went ahead tonight and filled the diff with 2 quarts Royal Purple and friction modifier, installed the proportioning valve and adjusted the e brake cable under the car. That should put me ahead to install the master cylinder tomorrow night. The front rotors, calipers and soft lines will be an easy job once Rock Auto delivers the correct rotors and all that leaves is the bleeding.
 
Ok. You guys are really encouraging me to finish this project by this weekend and I appreciate it. I went ahead tonight and filled the diff with 2 quarts Royal Purple and friction modifier, installed the proportioning valve and adjusted the e brake cable under the car. That should put me ahead to install the master cylinder tomorrow night. The front rotors, calipers and soft lines will be an easy job once Rock Auto delivers the correct rotors and all that leaves is the bleeding.
Awesome i love the determination!!
 
Bleeding can be a little PITA for an all new system. Took me a few tires to get all the air out and required bench bleeding the master a couple times as well.

Finally, setting the prop valve takes a little time as well. I set mine to FULL reduced pressure initially for my test drives, and then added more pressure slowly over time to a point where I felt comfortable with it during some hard braking testing. With the 13" front brakes, you have more than enough power to drive with full reduced power to the back brakes, especially the 11.65" brakes.

On a daily driver type fox that might see rain or snow, I recommend leaving it more towards the reduced pressure setting. On a weekend toy with fat sticky tires, you might want to be a bit more aggressive.
 
Bleeding can be a little PITA for an all new system. Took me a few tires to get all the air out and required bench bleeding the master a couple times as well.

Finally, setting the prop valve takes a little time as well. I set mine to FULL reduced pressure initially for my test drives, and then added more pressure slowly over time to a point where I felt comfortable with it during some hard braking testing. With the 13" front brakes, you have more than enough power to drive with full reduced power to the back brakes, especially the 11.65" brakes.

On a daily driver type fox that might see rain or snow, I recommend leaving it more towards the reduced pressure setting. On a weekend toy with fat sticky tires, you might want to be a bit more aggressive.
Good insight on the proportioning valve. Thanks. Is the bench bleeding necessary? Or does it just make the overall process easier?
 
If you are swapping the MC, you need to do it. The MC mounts at an angle and you'll never get all the air out of it unless you can jack the rear end of the car up VERY high to the point the MC is level
 
You don't even need a vice. I held mine in one hand, used a screwdriver to push the piston and braces the far end against a wall.

For all the work you've done, bleeding is easy. Don't get intimidated by it.

If I remember tonight I'll snap a pic of my bleeding setup. I might be able to find the fitting sizes too. Just need to pick up some 12" pieces from local parts store

Edit: M12 and M10 ISO bubble flare