Alright well, I know I offered to do some "how to" videos on some of this stuff but frankly I was taking forever with it and it felt very weird talking to myself in front of a camera in my garage alone so i've settled on a little build thread. I'm currently waiting on some parts so I figured this would be a good time to get this ball rolling even though I haven't exactly done a lot on the car yet. I'm having some trouble uploading images so please bare with me.
I mentioned in my greeting that I had some experience with bikes but not too much with cars. Here are some of my forever ongoing projects.

Here is my 1980 shovel chopper. Lots of custom parts made by myself, pretty standard vintage chopper, not period correct.

Now THIS is my pride and joy. 1958 Panhead bottom end shovel top end engine. I made or modified almost everything on this bike including lacing and truing wheels, the frame is a 70's shovel front half I have grafted to a hardtail off a early pan frame that was wrecked, machined my own axles, built the springer from a few stock knucklehead castings I found, machined a new stem to accept modern bearings, etc so forth you get the idea. NOW ONTO THE CAR

This is the 1966 mustang coupe A code I picked up. I chose to do a mustang because my dad had one when he was a young guy and it was stolen within three days of purchasing it. I plan to get the car ready to pass safety by may latest so that my dad and I can cruise it around stockish this year, next winter I'll do the majority of my performance upgrades. From afar the car looks great from a distance but as we all know that means precisely f**k all when you're trying to get something on the road that'll pass inspection.

The interior is the elusive "aqua" colour. Finding a dash pad in this colour was impossible, so I ordered some vinyl and some spray adhesive from 3M and i'll either try to re wrap it myself or pay a local guy who has done a ton of them to fix me up right. We are not going for "perfect" on this car because I intend to drive the heck out of it, but I do love the retro feel of this interior so the only thing I intend to change is the carpet; which I have purchased.
I mentioned in my greeting that I had some experience with bikes but not too much with cars. Here are some of my forever ongoing projects.
Here is my 1980 shovel chopper. Lots of custom parts made by myself, pretty standard vintage chopper, not period correct.
Now THIS is my pride and joy. 1958 Panhead bottom end shovel top end engine. I made or modified almost everything on this bike including lacing and truing wheels, the frame is a 70's shovel front half I have grafted to a hardtail off a early pan frame that was wrecked, machined my own axles, built the springer from a few stock knucklehead castings I found, machined a new stem to accept modern bearings, etc so forth you get the idea. NOW ONTO THE CAR
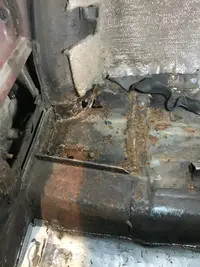
This is the 1966 mustang coupe A code I picked up. I chose to do a mustang because my dad had one when he was a young guy and it was stolen within three days of purchasing it. I plan to get the car ready to pass safety by may latest so that my dad and I can cruise it around stockish this year, next winter I'll do the majority of my performance upgrades. From afar the car looks great from a distance but as we all know that means precisely f**k all when you're trying to get something on the road that'll pass inspection.
The interior is the elusive "aqua" colour. Finding a dash pad in this colour was impossible, so I ordered some vinyl and some spray adhesive from 3M and i'll either try to re wrap it myself or pay a local guy who has done a ton of them to fix me up right. We are not going for "perfect" on this car because I intend to drive the heck out of it, but I do love the retro feel of this interior so the only thing I intend to change is the carpet; which I have purchased.