
Just read through this thread. Looks like a nice project you've got! It's going to be nice when you are done with it. I like the idea of a Cleveland. Be sure to look around at all the parts that you will need. They didn't make that many Cleveland's compared to 289s and 302s. Performance parts tend to be on the high side, so if budget is a factor the Cleveland might eat you up. I just really like the sound of those motors. I guess thats why I've always wanted to put one in something!
You are using an out of date browser. It may not display this or other websites correctly.
You should upgrade or use an alternative browser.
You should upgrade or use an alternative browser.
1966 Coupe Slow Build
- Thread starter AlmostCoffee
- Start date

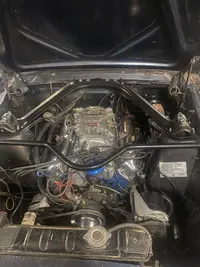
Thanks yeah, I think I may test fit the cleveland with my brake booster to ensure fitment before building it but i priced out a 347 build roughly as opposed to the cleveland build and the Cleveland would only be a little more expensive provided the crank and rods are in useable shape. If I can go that route I probably will, just for something different. However I may get laid off "due to COVID" this week so that's pushing timelines back right now. We'll see.Just read through this thread. Looks like a nice project you've got! It's going to be nice when you are done with it. I like the idea of a Cleveland. Be sure to look around at all the parts that you will need. They didn't make that many Cleveland's compared to 289s and 302s. Performance parts tend to be on the high side, so if budget is a factor the Cleveland might eat you up. I just really like the sound of those motors. I guess thats why I've always wanted to put one in something!
So I haven't updated in a while, but here's what I have been up to.

I installed my carpet. Basically I left it in the sun on a hot day for a while to get it malleable and get the creases out. This actually took me a while, but it turned out nice. I will need to re wrap the seats or get some form of upgraded seats, as these ones start to hurt my back after an hour or so.

I tried to polish the clear using a buffing wheel, but burnt through almost instantly. I hand polished the car instead. It turned out pretty well, only problem is you can see the imperfections everywhere now!
I cant seem to upload the photos but I ended up gapping and changing the plugs, alternator, regulator, installing an igniter ignition and rebuilt the 2100 carb for now.

And finally let my dad take the car out a few times. I found some issues with the drivers floor pan that I will need to fix before it can be safetied, but I was allowed 15 days of temporary insurance on it so we've been running it a bit. The only issue is for whatever reason until the engine is hot it has a tendency to stall out right as you start getting going. I don't have a timing light yet and will need to do some carb adjustments, but i'm sure I will figure it out eventually. The car is SLOW and kind of scary to drive right now... any slight bump in the road while making a corner throws you all over the place. I've looked up bump steer kits online but they all seem to be for manual cars, not power steering. I'm hoping the alignment is just bad, which led me to start doing the front end work.

I torched my old coils out (thinking of building my own coil spring compressor to install these. But I found something weird on top of the coils. These are cast aluminum spacers that don't seem to properly fit the spring? I'm assuming this is not normal and someone shoved these up there to address sagging coils instead of just changing the coils. That would be par for the course with this car... Regardless; unless someone tells me otherwise I wont reinstall these.

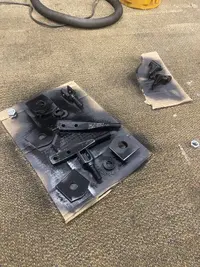
While I had everything out, I decided to fix the sandblaster at work and give them a blast. They're not perfect, but i think I will be just shooting them with epoxy primer and maybe some kind of paint. If anyone has suggestions on what to use besides powdercoat I would be glad to get some advice! I have read extremely mixed reviews about POR15 over blasted parts and for the price of it i'm not sure I want to risk it all flaking off in a year.I will be getting new lower control arms as I dont really like the idea of changing from rivets to bolts just to save 40 bucks or whatever.

I also made these following the instructions on dazecars. The strut rods were tricky to machine.. I am assuming due to flex. I had to take the final .015" with a file and emery cloth in order to have a workable finish.. But they turned out great. The only thing I did different is the spacers....

Day used pipe to create his spacers, but mentioned they don't fit quite right so I went ahead and made these. First I threw a 5/8 drill through them.

I then bored the first .220" out to .958" to fit on the lip of the clevis. I'm using 3/16 plate so i took into account as well when determining how much to bore.

I parted them at .370" but I did most of this based off memory as i'm at work and don't have the car in front of me to re measure.
Apart from that I did the arning shelby drop and threw the 351 out (took the heads off and it looked like it sat under water for several years. Oh well, I knew it was a gamble. My power steering is leaking really bad, so I think once the control arms are back on the car I will order the power steering rebuild kit chockostang offers and clean all that up. Right now I just need to order my suspension parts (going all new moog and AC delco) and get everything painted.

I ended up finding a couple 600 cfm carbs for dirt cheap. The holley came with a stock 302 4V manifold. I'm not sure if I will use it. I'm considering doing a cheap quick "run till fail" build up on the 289 until I can afford to do something nice to it... Thinking about home porting the heads, going to a 4bbl carb, intake manifold and 268h cam and running her till something goes. I also am torn between rebuilding an 8.8 from a scrapper or getting a 9" built from quick performance for the rear end. Anyway, that's all for now. Looks like there's been a lot of threads since I last checked the forum anyway so while i'm saving up more money i have lots of reading to do
I installed my carpet. Basically I left it in the sun on a hot day for a while to get it malleable and get the creases out. This actually took me a while, but it turned out nice. I will need to re wrap the seats or get some form of upgraded seats, as these ones start to hurt my back after an hour or so.
I tried to polish the clear using a buffing wheel, but burnt through almost instantly. I hand polished the car instead. It turned out pretty well, only problem is you can see the imperfections everywhere now!
I cant seem to upload the photos but I ended up gapping and changing the plugs, alternator, regulator, installing an igniter ignition and rebuilt the 2100 carb for now.
And finally let my dad take the car out a few times. I found some issues with the drivers floor pan that I will need to fix before it can be safetied, but I was allowed 15 days of temporary insurance on it so we've been running it a bit. The only issue is for whatever reason until the engine is hot it has a tendency to stall out right as you start getting going. I don't have a timing light yet and will need to do some carb adjustments, but i'm sure I will figure it out eventually. The car is SLOW and kind of scary to drive right now... any slight bump in the road while making a corner throws you all over the place. I've looked up bump steer kits online but they all seem to be for manual cars, not power steering. I'm hoping the alignment is just bad, which led me to start doing the front end work.
I torched my old coils out (thinking of building my own coil spring compressor to install these. But I found something weird on top of the coils. These are cast aluminum spacers that don't seem to properly fit the spring? I'm assuming this is not normal and someone shoved these up there to address sagging coils instead of just changing the coils. That would be par for the course with this car... Regardless; unless someone tells me otherwise I wont reinstall these.
While I had everything out, I decided to fix the sandblaster at work and give them a blast. They're not perfect, but i think I will be just shooting them with epoxy primer and maybe some kind of paint. If anyone has suggestions on what to use besides powdercoat I would be glad to get some advice! I have read extremely mixed reviews about POR15 over blasted parts and for the price of it i'm not sure I want to risk it all flaking off in a year.I will be getting new lower control arms as I dont really like the idea of changing from rivets to bolts just to save 40 bucks or whatever.
I also made these following the instructions on dazecars. The strut rods were tricky to machine.. I am assuming due to flex. I had to take the final .015" with a file and emery cloth in order to have a workable finish.. But they turned out great. The only thing I did different is the spacers....
Day used pipe to create his spacers, but mentioned they don't fit quite right so I went ahead and made these. First I threw a 5/8 drill through them.
I then bored the first .220" out to .958" to fit on the lip of the clevis. I'm using 3/16 plate so i took into account as well when determining how much to bore.
I parted them at .370" but I did most of this based off memory as i'm at work and don't have the car in front of me to re measure.
Apart from that I did the arning shelby drop and threw the 351 out (took the heads off and it looked like it sat under water for several years. Oh well, I knew it was a gamble. My power steering is leaking really bad, so I think once the control arms are back on the car I will order the power steering rebuild kit chockostang offers and clean all that up. Right now I just need to order my suspension parts (going all new moog and AC delco) and get everything painted.
I ended up finding a couple 600 cfm carbs for dirt cheap. The holley came with a stock 302 4V manifold. I'm not sure if I will use it. I'm considering doing a cheap quick "run till fail" build up on the 289 until I can afford to do something nice to it... Thinking about home porting the heads, going to a 4bbl carb, intake manifold and 268h cam and running her till something goes. I also am torn between rebuilding an 8.8 from a scrapper or getting a 9" built from quick performance for the rear end. Anyway, that's all for now. Looks like there's been a lot of threads since I last checked the forum anyway so while i'm saving up more money i have lots of reading to do
Attachments

Question for the guys running high (400+) hp/ torque numbers.... What rear wheels are you using? I'm trying to figure out if it's even worth going to a 4-500hp/tq 347 or 351w since the rear of the car only has 225's on it and that's sounding like a disaster waiting to happen. Can you hook up fine with stock wheel wells? Or should I consider doing a little mini tub?
I also have a dumb alignment question... I'm considering getting this kit https://www.speedwaymotors.com/Speedway-Economy-Front-End-Alignment-Kit,372862.html
What i'm confused about is setting the toe. If you're using these plates to set the toe, say 1/8" in; wouldn't the width of the plate affect that measurement, assuming they're wider than the wheel itself? Example: If i were to measure the difference of distance at say 30 inches width, wouldn't that show a larger discrepancy than measuring at 26 inches?
What i'm confused about is setting the toe. If you're using these plates to set the toe, say 1/8" in; wouldn't the width of the plate affect that measurement, assuming they're wider than the wheel itself? Example: If i were to measure the difference of distance at say 30 inches width, wouldn't that show a larger discrepancy than measuring at 26 inches?
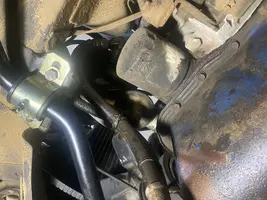
I have been working quite a bit on the car lately but it’s been fighting me at every corner. After figuring out the tie rods and drag link were from a mystery vehicle I now have all new steering and suspension parts. I rebuilt the control valve and replaced the hydraulic ram as mine looked like it had been crushed in a vice a little bit, along with tie rods, control arms, shocks,roller perches, ball joints, coil springs, all joints are moog or AC Delco except the lower control arms are cheapies I found locally. I’m just finishing up my adjustable strut rods but I’m a bit puzzled... the car seems to have about .5 degree positive camber on one side and 1.5 degree Positive on the other with no shims in place. I’m hoping this is a caster issue as the strut rods aren’t on, or that the carpet in my garage isn’t letting the tires settle out. My crossmember is stock and bolted up without an issue and I have a Monte Carlo bar on the top that only took a couple light taps to get in so I can’t imagine the shock towers are sagged.. so we’ll see. I just finished putting the new leafs in the rear and attached is how it’s sitting for now, I may want to play around with ride height a little more someday but I’m tired of messing around with this already so it’s staying as is for now!
Attachments
-
 9BE86256-99D0-424D-B68C-B0CAB89E9141.webp572.6 KB · Views: 193
 -
 8D3795C5-4F40-4B57-B1A8-6E100BF3C3ED.webp415.9 KB · Views: 186
 -
 E44254FD-16F2-4868-8264-0A507CA2EF4B.webp423.1 KB · Views: 191
 -
 F557F566-374C-4D14-BAA2-BA279DC6197B.webp462.5 KB · Views: 191
 -
 FCFA9978-4393-415B-9299-16FEE16E3FF5.webp256.7 KB · Views: 226
I finished up my strut rod mounts today and gave everything a coat of paint. I used shim washers to take up the excess space in the Clevis and used a longer bolt with a shoulder long enough that the heim joint isn’t sitting on threads then cut the bolts down. I’m happy how they turned out, however I’m having a clearance issue between the sway bar and the strut rods. As these are thick diameter strut rods and I had a thread pile up for some reason on one of them (naturally on the left hand thread side) I think I will try to find something a bit more narrow to use and see if that gets me there. If not I’m thinking either longer sway bar end links or tweaking the bar itself should get me there.
Attachments
-
 6DACAA93-CBDA-420E-ACDC-1A1CCC62301B.webp242.7 KB · Views: 209
 -
 8FC6D5A4-C862-4687-8DC9-6AFDE19FCDF4.webp811.1 KB · Views: 185
 -
 E90E39AC-6B5C-4AE4-919C-50842C3F7368.webp201.8 KB · Views: 208
 -
 9FAC1856-3009-4285-9912-D3EBF3653279.webp448.8 KB · Views: 190
 -
 D09E55F9-B3E2-46EE-A8E7-076316203FE7.webp383.5 KB · Views: 197
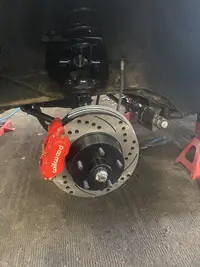
Well, I made myself some longer strut rod ends which fixed my clearance issue on the front (got a set of 7” bolts as opposed to the 6” originals and cut longer spacers). Next I got to work installing the new brake booster with a 1” master cylinder and prop valve from wilwood (it turns out they fit just fine) the only thing I had to do was sacrifice a wrench to get the booster mounts tightened. I’ve bled the system twice and cant seem to get a solid pedal but I’m sure that’s just a matter of patience. I also installed a 10psi residual valve on the rear brake line as they are staying drums until I upgrade the rear end.
Attachments


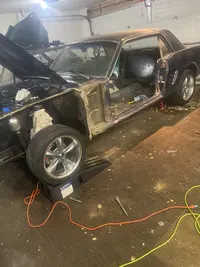
A reminder to check any “repairs” that previous owners have done. I had noted there was a large overlap on the drivers floor pan the P/O had installed. I figured he had used the original seat mount holes to line it up and it would just be a matter of grinding it down and making it look nice. Well, I ended up pulling 4 small self tappers off the seat riser and cutting the seam sealer to take a look at the welds... then the seat riser fell out. It turns out nothing on the drivers side of the car has a single weld on it and was mangled by an absolute hack. I’ve ordered new metal, I think I will do the rocker first (it’s not shot but it will be in a couple years) then the floor support, toe board then floor pan and seat riser in that order. It’s unfortunate as I thought I was pretty well finished but here we are.
Attachments

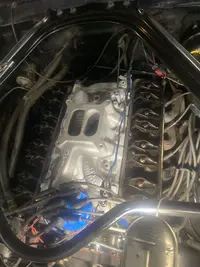
Since I am waiting on metal I went ahead and installed the performer RPM intake and the performer 1406 carb. I figure this is a bit too much carb for the engine but others run it so surely it can work. I chose the 1406 as I plan to use it on a 347 when that day comes. I also got a one piece export brace which installed without hassle surprisingly. The cars back to square 1 at the moment. I have some measuring to do as the passenger wheel seems to be sitting ablut 3/8” inboard. I ran a string from the rear of the car and the drivers side is perfect so I’m thinking something isn’t sitting right. Lots of work but I am really enjoying working on cars for once... the cost however is pretty brutal hah
Attachments
wicked93gs
15 Year Member
You wouldn't believe how much hack-job repairs from the previous owner I found on my coupe...it was a never ending rabbit hole for a long time. Looking good though.
Right now it seems it’ll never end, every time I think I’m done I go digging a little further and find more junk repairs. Thank you thoughYou wouldn't believe how much hack-job repairs from the previous owner I found on my coupe...it was a never ending rabbit hole for a long time. Looking good though.
After three days of fighting my old rocker to get it out, I had been panicking that my car went out of square or something weird due to a brutal gap on the rear quarter panel. The new rocker is from a certain pony part website I have had nothing but bad experiences with up till now and I finally on a whim measured the width of the replacement rocker. Turns out my problem is a not so cheap rocker that was made 3/8” wider than the original. Has anyone ran into this before? I’m considering narrowing the rocker I guess as I don’t see any other option, basically cutting along the “valley” and squeezing the top back together and welding it back up. Any ideas? Should I just try another brand of rocker and try to sell this one? I’m definitely not willing to put it in as is and would appreciate some guidance if possible
Attachments


So here’s my fix... dunno if it’s technically the right fix but it worked!

I cut about 3/8” Ou from the top and tacked then welded it back together. Seems to fit great now, what a relief


I cut about 3/8” Ou from the top and tacked then welded it back together. Seems to fit great now, what a relief
I had the exact same issue with a Dynacorn replacement rocker on my '66. I was only replacing a section, but I also had issues since it was stamped too wide. I fixed it the same way as you.
It’s been a while… I had to move to northern Canada for work, so haven’t been working on the car. It’s safetied and my dad is driving it around although the alignment could be better and either the intake or the distributor is leaking some oil. Oh well. Not much I can do from up here. In the mean time however I found an 8.8 rear out of a Ford Explorer and shortened it.

This thing was way too crusty, I should’ve waited for another but oh well. I started by stripping the diff to the housing and ground off the mounts.

Tried my best to clean and bead blast some of the grit off but it’s too big for the cabinet at work. It’ll probably just get hit with POR15 anyway, nothing fancy.

I used lay out dye to first scribe a straight line down the axle tube to make clocking the end back where it needs to be easy. I then measured the shorter side axle and subtracted that length from the longer axle. Set my calipers to the remainder (the length that you need to remove from the long side) and scribed my two start points for my cuts. I then used a pipe cutter to cut the axle tube. It worked pretty well, it would work perfectly if the diff wasn’t in as rough shape as it is.

This thing was way too crusty, I should’ve waited for another but oh well. I started by stripping the diff to the housing and ground off the mounts.
Tried my best to clean and bead blast some of the grit off but it’s too big for the cabinet at work. It’ll probably just get hit with POR15 anyway, nothing fancy.
I used lay out dye to first scribe a straight line down the axle tube to make clocking the end back where it needs to be easy. I then measured the shorter side axle and subtracted that length from the longer axle. Set my calipers to the remainder (the length that you need to remove from the long side) and scribed my two start points for my cuts. I then used a pipe cutter to cut the axle tube. It worked pretty well, it would work perfectly if the diff wasn’t in as rough shape as it is.
I guess the rest of my pics got deleted, but here’s the housing welded back up. I beveled the edges then tacked in four spots, then stitched about an inch at a time checking for alignment. I believe it came out good enough, possibly ever so slightly out but small enough I can’t tell for certain without more accurate ways of measuring.
New bearings, seals, axle, rebuilt trac lok, dust shields. I have new brakes back home for whenever it goes in.
This is my tooth engagement after a lot of messing around. Any diff experts here? A guy at work is convinced it’s too much engagement but I would like another opinion… looks pretty okay to me.
I should mention I used 2 pieces of c channel to align the axle tube with the cutoff section for welding. I had intended to use the original long axle and make a jig using it until I threw it in the lathe and realized it was wildly bent hah! If you’re doing this and have access to a lathe however it wouldn’t be a bad idea to make a couple pucks that sit where the bearings and seal sit and slide the axle in for added support against deflection.
I would compare your contact pattern with the examples on pages 25 and 26 of the Ford Performance ring gear installation instructions. As long as your backlash is good along with the contact pattern, send it.
Similar threads
- Replies
- 9
- Views
- 326
- Replies
- 24
- Views
- 1K