Progress Thread 88 Gt T-top- Project problem child

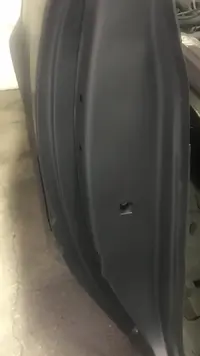
Passenger side door jamb is basically done. This was all much easier going than expected. Took about 1.5 hours to get the jamb, the edge going into the quarter panel , and a spot inside the window frame blocked out. Then a second coat of primer and a final blocking tomorrow.

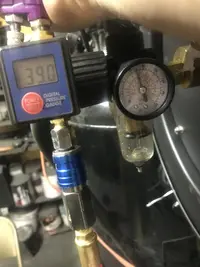
I know I’ve posted several times about learning my paint tools more and getting better, but I found and leaped another huge hurdle. I picked up a digital gauge to find the psi at my gun ( I remove whike
Painting). With the gauge I found I have nearly a 25
Psi drop from my regulator to the tool after the 50’ run. Knowing what was going on made adjusting the gun much easier than ever before. This is the smoothest I’ve sprayed primer. I’m very excited to practice with paint hopefully in the next couple weeks.
 

Attachments

  • C43A28A9-B392-41AF-8257-8316F7351980.png
    C43A28A9-B392-41AF-8257-8316F7351980.png
    1.4 MB · Views: 183
  • 29876CAD-6528-4562-AD18-55329D3B59C2.jpeg
    29876CAD-6528-4562-AD18-55329D3B59C2.jpeg
    191.3 KB · Views: 158
  • Like
Reactions: 4 users
  • Sponsors (?)


Nothing special to report. Finished sanding the passenger door jam and did my first once over on the passenger quarter panel. I went over everything with 600 grit one more time. Found some overspray and a scratch and a few oddball imperfections that needed attention . Gonna keep going over it all slowly and cleaning as I go. I’ve been wiping dowm each panel with a wet cloth when I stop. Wish I would of done that from the get go.
 
  • Like
Reactions: 1 user
First sanding of the drivers side door jamb is done. Went back over the quarter and the roof with 600 . It’s beem sitting collecting dust for so long it’s got a layer of crud.

I also decided to strip the t top frame area again. I primed and painted it once before but it was not nice at all. Pics tonight .
 
  • Like
Reactions: 1 users
T top area stripped and primed pretty easy. Much better than before. Getting close to calling the shell done.
 

Attachments

  • 3FDA3311-AF75-4870-9657-51EFED57EC79.jpeg
    3FDA3311-AF75-4870-9657-51EFED57EC79.jpeg
    148.5 KB · Views: 155
  • Like
Reactions: 3 users
Got rained out of work today. Got more of the sanding done and trying to nit pick little things I missed before. Starting to wish I could go back 2 years and kick myself, but I’ve learned a ton so the fixes are mostly quick.

Decided to re strip the floor pans behind the front seats. I kinda did it before but put way way too much primer on and it’s just flaking off. Taking it to bare metal to make sure it’s right this time.

As said above, hoping to call the shell done this week.
 
Nothing fancy to look at. But floor pan stripped and primed. Working on a small dent I found on the rocker . Took the shop vac and a rag to the inside. Clean is becoming a thing. It’s really a 2 part job, first you remove the pile of dust, then you actually clean it.
 

Attachments

  • 152BFD79-312E-4671-BE3B-C6B8D799334D.jpeg
    152BFD79-312E-4671-BE3B-C6B8D799334D.jpeg
    281.3 KB · Views: 147
  • Like
  • Haha
Reactions: 1 users
Finally got my overflow installed on my contour dual fans. Fit right up with ease. It’s the same one LMR sells for $45 but without the logo. ~~ eBay $20. Only mod I had to make was for the fittings on the bottom. It was about 2 sizes smaller than the fitting on my radiator. I simply found the right size hose that would fit in the other but fit snug onto the overflow, It went together without only slight encouragement. Tomorrow I’ll start the flushing and power wash the dust off this bad boy.i promise, there is a motor in there.


Last week I stripped and primed the rear floor pans. I went ahead and got a protective rubberized coating on them. Note the spot where I knocked on it to check the sound... that was when I leaned it takes more than 5 min for it to dry.
 
Last edited:
  • Haha
Reactions: 1 user
Washed the car and started coolant flush. I gotta run the car an hour a day the new few days while the flush does its job. It was pretty dirty.
Engine bay cleaned right back up.

Went ahead and wired and installed my led lights. These things are awesome!
C29FDE27-B682-43CD-8DA2-7F9EBC3A36B9.jpeg
BD2D7FC7-9278-4A5D-B9F5-27BF9D573B0A.jpeg
97F7E9BD-F739-4B4A-BF5D-A85412F8B124.jpeg
 
Last edited by a moderator:
  • Like
Reactions: 3 users
Thought I was gonna finish sanding the door jambs the night. Got most of the way done and started starting at the lower ground effect bracket. Before I knew it I had it drilled and removed. It had rusted and the rockers had contact rust. Stripping them now to prime. Posting some pics while I take a brake.
 

Attachments

  • 16248FA6-EB95-4CC4-B578-C2BEF42A436A.jpeg
    16248FA6-EB95-4CC4-B578-C2BEF42A436A.jpeg
    112.6 KB · Views: 148
  • 23483051-E50E-4636-B4B6-B564C53BF983.jpeg
    23483051-E50E-4636-B4B6-B564C53BF983.jpeg
    104.4 KB · Views: 147
  • Like
Reactions: 3 users
Sooo much work! Your engine cleaned up nice. It looked rough at first!
Yup. Lots of the work is because I’m learning as I go and do things a few times, but it’s getting there.

The bay looks great. Only downside is I had painted my tensioner and steering pump and the pressure washer took the paint off. Ill
Add that to the end of the list though. I’m getting real close to paint though. I’m being as thorough as I can so I keep finding more stuff .
 
No pics but had some good progress this weekend. The jambs, quarters, t top frame, cowl and windshield pillars are chcecked and ready. The rear taillight panel fell victim to the same “good enough” job as the door jambs and got stripped and primed. The wing got double checked and is ready. Doing a little touch up and final prep on the rear bumper next. Hoping to have all the final checks done in the next 2 weeks.
 
  • Like
Reactions: 1 users
Well, let’s start with the good news. Both fenders and both doors and rear bumper have been gone over and cleaned and put up. That leaves the front bumper , hood, hatch and 2 long ground effects.

Started with the bumper and it needed more work. No biggie. Mostly sanding in the lower section that lets air in. Cut the hole for the cobra insert, figured an easy easy to secure it with bolts. Found 2 peeling areas in the trim area, sanded them smooth and ready for primer.

This is where it got fun. Put the hatch on the stand , and started to wash and wet sand it with 400. It’s beem sitting collecting dust for awhile, I’d have to dig through this post to see how long. My guess is maybe 12 months. So it had a lot of grime and what not. I’m about done with it and one area has a burn though and I knotice the water was separating the primer... so I took my air hose to it and was met this this awesome experience.

View: https://youtu.be/USSlRQiXyvg


After talking to my paint rep, I believe I had used purple power instead of proper wax and grease remover that day. So it’s getting rest ripped and primed tomorrow. Gonna see if I can get it back to ready by Monday. Gonna pull the glass this time though .

I feel like I should be mad but I’m not surprised at this point. I’ve given up on deadlines lol.
 
  • Like
  • Surprised
Reactions: 1 users
Well, let’s start with the good news. Both fenders and both doors and rear bumper have been gone over and cleaned and put up. That leaves the front bumper , hood, hatch and 2 long ground effects.

Started with the bumper and it needed more work. No biggie. Mostly sanding in the lower section that lets air in. Cut the hole for the cobra insert, figured an easy easy to secure it with bolts. Found 2 peeling areas in the trim area, sanded them smooth and ready for primer.

This is where it got fun. Put the hatch on the stand , and started to wash and wet sand it with 400. It’s beem sitting collecting dust for awhile, I’d have to dig through this post to see how long. My guess is maybe 12 months. So it had a lot of grime and what not. I’m about done with it and one area has a burn though and I knotice the water was separating the primer... so I took my air hose to it and was met this this awesome experience.

View: https://youtu.be/USSlRQiXyvg


After talking to my paint rep, I believe I had used purple power instead of proper wax and grease remover that day. So it’s getting rest ripped and primed tomorrow. Gonna see if I can get it back to ready by Monday. Gonna pull the glass this time though .

I feel like I should be mad but I’m not surprised at this point. I’ve given up on deadlines lol.

I looked back in your thread about the primer.

I don’t remember what we had talked about in detail. What primer did you use?

If it wasn’t an epoxy, did you use etch primer first?