You want someone to troubleshoot electrical problems over the Internet without knowing exactly what you did and how you did it?

You'll have to wait until I get up off the floor from where I was rolling around laughing...
There are 2 likely prospects:
1.) You pulled the wiring out of the ignition switch plastic wiring connector and didn't get the wires put back in the right places or the wires are so loose that they aren't making good contact..
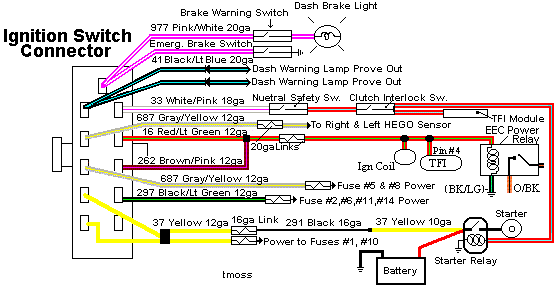
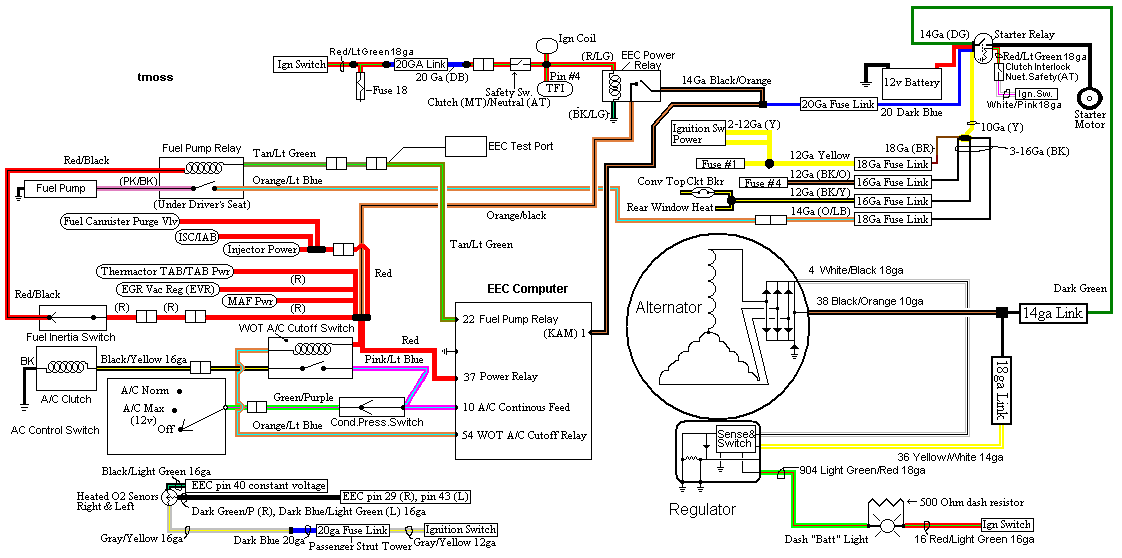
The following are diagrams courtesy of Tmoss & Stang&2birds
Ignition switch wiring
2.) The ignition switch is coming apart.
Recall on Ford Ignition switches:
Revised 7-June-2014 to add Torx bit picture and source. Also added replacement ignition switch wiring pigtail picture, part numbers and sources.
Some of the symptoms of ignition switch problems are things that don’t work or are intermittent like radio, turn signals, wipers or heater.
There was a FREE recall on Ford ignition switches. They overheat and sometimes catch fire. That burns up the steering column and sometimes the car interior. Since this is very old information, you may not be able to get the switch replaced for free anymore. The auto parts stores sell the switches for $13-$15.
While you are working on the switch, check the wiring and connector closely. A replacement connector with new wiring pigtails is available from most auto parts stores
AutoZone and Advanced Auto Parts have the same Part Number: 434 - may have to order, not always in stock
Advanced Auto Parts alternate part number: PT5534
Saleen0679 was nice enough to dig this up for us awhile back:
http://www.mustangandfords.com/how-to/engine/5657/
Torx bit set from Advance Auto Parts
Autocraft torx bit set – have small hole in tip for tamper proof screws.
Part No. AC571/W1386 Cost approx. $12 +tax
Diagrams courtesy of Tmoss & Stang&2birds
Ignition switch wiring
Fuel, alternator, A/C and ignition wiring
Since you have said that you have a low level of proficiency in electrical matters, here's some help before you get started.
Automotive circuits are mostly simple stuff: a power source, a connection path, a control device, a load, and a ground.
The battery/alternator is the positive power source.
The wire and fuses are the connection path.
Control devices are switches, relays and sensors.
A load is a light, motor, solenoid, relay coil or heater element.
In automotive circuits, grounds are the return path so the electrical power can flow from the load to the negative side of the power source.
Electricity flows like water:
Voltage is like pressure,
Current in amps is like volume,
Resistance is like the kink you put in a garden hose to decrease the pressure or volume.
Power is pressure multiplied by volume or voltage multiplied by current (amps)
Digest that, and you just got the first 3 days of Electricity 101.
Use some jumper wires (connection path and ground) to hook up a switch (control device), a battery (power source), a light bulb (load). Now make the light turn on and off with the switch.
That's the electrical lab for the first week of Electricity 101.
For free automotive electrical training, see
Automotive Training and Resource Site . Once you are there, select online instruction. I have personally reviewed the material and it is very good. If you are new to automotive electrical troubleshooting, I highly recommend you spend a hour or so going through the material. You'll save at least that much time troubleshooting problems.
Using a Multimeter or DVM
Almost every meter has a different method for showing an open circuit. An open circuit is one with a break in it somewhere. That break can be a switch turned off, a fuse blown, a lamp burned out, a bad connector, a damaged circuit board or a cut or burned wire.
Without reading the instruction manual that came with your meter, I would not try to guess what your readings mean.
Step 1.) Find the instruction book that came with your Multimeter or DVM. Read it and familiarize yourself with how it works and how use it. If you lost the book or didn’t get one with it, do a Google search on the web to find the manufacturer’s web site & download a copy of the manual. Remember that while some meters auto-range to find the correct voltage range, the Ohms function ranges are usually set by the selector switch. Most of the resistance testing done in automotive troubleshooting uses the lowest Ohms range possible.
Step 2. ) Make sure that you know what test lead plugs into which jacks on the Multimeter or DVM. There are usually several different jacks on most Multimeter or DVMs, and they have different functions. Make sure that your battery(s) in the Multimeter are good: if you have any doubts, replace the battery(s).
Step 3.) Once you are sure that the Multimeter or DVM is functional and you have the leads plugged into the jacks for Ohms ( the Ω symbol), do some simple measurements to make sure that you know how to use it correctly. Set the switch to the lowest range and touch the leads together: you should not see “nothing” but you should see 0.3-1.0 ohms. Measure a 60 watt light bulb: cold it will measure about 17.5 Ohms. It you measure it while it is hot, the reading will be greater.
Step 4.) Make several test measurements using the ohms function and the DC volts function.
Remember all resistance measurements must be done with the power off the circuit. This avoids false readings and possible damage to the ohmmeter.. Repeat steps 3 & 4 until you are sure that you can do it without making any mistakes.
Step 5.) Then see
| Repair Guides | Understanding And Troubleshooting Electrical Systems | Basic Electrical Theory | AutoZone.com and carefully study ALL the information under the Heading Chassis Electrical, Basic Electricity – Understanding & Troubleshooting
Step 6.) Apply what you have learned and make the test measurements using the information in the wiring diagrams & my previous posts.
Don't be in too much of a hurry to bolt all the new, pretty, shiny parts together. Take the simple steps now and you will save yourself lots of time and trouble later.
Some Diagram resources:
See the following website for some help from Tmoss (diagram designer) & Stang&2Birds (website host) for help on 88-95 wiring
http://www.veryuseful.com/mustang/tech/engine/ Everyone should bookmark this site.
Complete computer, actuator & sensor wiring diagram for 91-93 Mass Air Mustangs
http://www.veryuseful.com/mustang/tech/engine/images/91-93_5.0_EEC_Wiring_Diagram.gif
Complete computer, actuator & sensor wiring diagram for 88-91 Mass Air Mustangs
http://www.veryuseful.com/mustang/tech/engine/images/88-91_5.0_EEC_Wiring_Diagram.gif
Ignition switch wiring
http://www.veryuseful.com/mustang/tech/engine/images/IgnitionSwitchWiring.gif
Fuel, alternator, A/C and ignition wiring
http://www.veryuseful.com/mustang/tech/engine/images/fuel-alt-links-ign-ac.gif
O2 sensor wiring harness
http://www.veryuseful.com/mustang/tech/engine/images/mustangO2Harness.gif
Vacuum diagram 89-93 Mustangs
http://www.veryuseful.com/mustang/tech/engine/images/mustangFoxFordVacuumDiagram.jpg
HVAC vacuum diagram
http://www.veryuseful.com/mustang/tech/engine/images/Mustang_AC_heat_vacuum_controls.gif
TFI module differences & pin out
http://www.veryuseful.com/mustang/tech/engine/images/TFI_5.0_comparison.gif
Fuse box layout
http://www.veryuseful.com/mustang/tech/engine/images/MustangFuseBox.gif
87-92 power window wiring
http://www.veryuseful.com/mustang/tech/engine/images/mustang87-92 PowerWindowWiring.gif
93 power window wiring
http://www.veryuseful.com/mustang/tech/engine/images/mustang93PowerWindows.gif
Visual comparison of the Ford Fuel Injectors, picture by TMoss:
http://www.veryuseful.com/mustang/tech/engine/images/Ford_Injector_Guide.jpg