Code 14 - Ignition pickup (PIP) was erratic – the hall effect sensor in the distributor is failing. Bad sensor, bad wiring, dirty contacts.
Revised 10-Dec-2012 to add PIP diagnostic testing & Wells info
The PIP is a Hall Effect magnetic sensor that triggers the TFI and injectors. There is a shutter wheel alternately covers and uncovers a fixed magnet as it rotates. The change in the magnetic field triggers the sensor.
They are often heat sensitive, increasing the failure rate as the temperature increases.
PIP Sensor functionality, testing and replacement:
The PIP is a Hall Effect magnetic sensor that triggers the TFI and injectors. There is a shutter wheel alternately covers and uncovers a fixed magnet as it rotates. The change in the magnetic field triggers the sensor. A failing PIP sensor will often set code 14 in the computer. They are often heat sensitive, increasing the failure rate as the temperature increases.
Some simple checks to do
before replacing the PIP sensor or distributor:
You will need a Multimeter or DVM with good batteries: test or replace them before you get started.. You may also need some extra 16-18 gauge wire to extend the length of the meter’s test leads.
Visual check first: look for chaffed or damaged wiring and loose connector pins in the TFI harness connector.
Check the IDM wiring – dark green/yellow wire from the TFI module to pin 4 on the computer. There is a 22K Ohm resistor in the wiring between the TFI and the computer. Use an ohmmeter to measure the wire resistance from the TFI to the computer. You should see 22,000 ohms +/- 10%.
Check the PIP wiring - dark blue from the TFI module to pin 56 on the computer. Use an ohmmeter to measure the wire resistance from the TFI to the computer. You should see 0.2-1.5 ohms.
Check the SPOUT wiring – yellow/lt green from the TFI module to pin 36 on the computer. Use an ohmmeter to measure the wire resistance from the TFI to the computer. You should see 0.2-1.5 ohms.
Check the black/orange wire from the TFI module to pin 16 on the computer. Use an ohmmeter to measure the wire resistance from the TFI to the computer. You should see 0.2-1.5 ohms.
Check the red/green wire; it should have a steady 12-13 volts with the ignition switch on and the engine not running.
Check the red/blue wire; it should have a steady 12-13 volts with the ignition switch in Start and the engine not running. Watch out for the fan blades when you do this test, since the engine will be cranking.
If you do not find any chaffed or broken wires, high resistance connections or loose pins in the wiring harness, replace the PIP sensor or the distributor.
The PIP sensor is mounted in the bottom of the distributor under the shutter wheel. In stock Ford distributors, you have to press the gear off the distributor shaft to get access to it to replace it. Most guys just end up replacing the distributor with a reman unit for about $75 exchange
PIP problems & diagnostic info
Spark with the SPOUT out, but not with the SPOUT in suggests a PIP problem. The PIP signal level needs to be above 6.5 volts to trigger the computer, but only needs to be 5.75 volts to trigger the TFI module. Hence with a weak PIP signal, you could get spark but no injector pulse. You will need an oscilloscope or graphing DVM to measure the output voltage since it is not a straight DC voltage.
Code 33 - Insufficient EGR flow detected.
Look for vacuum leaks, cracked vacuum lines, failed EGR vacuum regulator. Check to see if you have 10” of vacuum at the EGR vacuum connection coming from the intake manifold. Look for electrical signal at the vacuum regulator solenoid valves located on the rear of the passenger side wheel well. Using a test light across the electrical connector, it should flicker as the electrical signal changes. Remember that the computer does not source any power, but provides the ground necessary to complete the circuit. That means one side of the circuit will always be hot, and the other side will go to ground or below 1 volt as the computer switches on that circuit.
Check for resistance between the brown/lt green wire on the EGR sensor and pin 27 on the computer: you should have less than 1.5 ohm.
Backside view of the computer wiring connector:
See the following website for some help from Tmoss (diagram designer) & Stang&2Birds (website host)
http://www.veryuseful.com/mustang/tech/engine/images/fuel-alt-links-ign-ac.gif
http://www.veryuseful.com/mustang/tech/engine/images/88-91eecPinout.gif
EGR test procedure courtesy of cjones
to check the EGR valve:
bring the engine to normal temp.
connect a vacuum pump to the EGR Valve or
see the EGR test jig drawing below. Connnect the test jig or to directly to manifold vacuum.
Do not connect the EGR test jig to the EVR (Electronic Vacuum Regulator).
apply 5in vacuum to the valve.
Using the test jig, use your finger to vary the vacuum
if engine stumbled or died then EGR Valve and passage(there is a passageway through the heads and intake) are good.
if engine did NOT stumble or die then either the EGR Valve is bad and/or the passage is blocked.
if engine stumbled,
connect EGR test jig to the hose coming off of the EGR Valve.
Use your finger to cap the open port on the vacuum tee.
snap throttle to 2500 RPM (remember snap the throttle don't hold it there).
did the vacuum gauge show about 2-5 in vacuum?
if not the EVR has failed
EGR test jig
The operation of the EGR vacuum regulator can be checked by using a test light applied across the wiring connector. Jumper the computer into self test mode and turn the key on but do not start the engine. You will hear all the actuators (including the EVR vacuum regulator) cycle. Watch for the light to flicker: that means the computer has signaled the EGR vacuum regulator successfully.
Code 66 MAF below minimum test voltage.
Insufficient or no voltage from MAF. Dirty MAF element, bad MAF, bad MAF wiring, missing power to MAF. Check for missing +12 volts on this circuit. Check the two links for a wiring diagram to help you find the red wire for computer power relay switched +12 volts. Check for 12 volts between the red and black wires on the MAF heater (usually pins A & B). while the connector is plugged into the MAF. This may require the use of a couple of safety pins to probe the MAF connector from the back side of it.
There are three parts in a MAF: the heater, the sensor element and the amplifier. The heater heats the MAF sensor element causing the resistance to increase. The amplifier buffers the MAF output signal and has a resistor that is laser trimmed to provide an output range compatible with the computer's load tables. Changes in RPM causes the airflow to increase or decrease, changing the voltage output.. The increase of air across the MAF sensor element causes it to cool, allowing more voltage to pass and telling the computer to increase the fuel flow. A decrease in airflow causes the MAF sensor element to get warmer, decreasing the voltage and reducing the fuel flow.
The MAF element is secured by 2 screws & has 1 wiring connector. To clean the element, remove it from the MAF housing and spray it down with electronic parts cleaner or non-inflammable brake parts cleaner (same stuff in a bigger can and cheaper too).
Measure the MAF output at pins C & D on the MAF connector (dark blue/orange and tan/light blue) or at pins 50 & 9 on the computer. Be sure to measure the sensor output by measuring across the pins and not between the pins and ground.
At idle = approximately .6 volt
20 MPH = approximately 1.10 volt
40 MPH = approximately 1.70 volt
60 MPH = approximately 2.10 volt
Check the resistance of the MAF signal wiring. Pin D on the MAF and pin 50 on the computer (dark blue/orange wire) should be less than 2 ohms. Pin C on the MAF and pin 9 on the computer (tan/light blue wire) should be less than 2 ohms.
There should be a minimum of 10K ohms between either pin C or D on the MAF wiring connector and pins A or B. Make your measurement with the MAF disconnected from the wiring harness.
See the following website for some help from Tmoss (diagram designer) & Stang&2Birds (website host) for help on 88-95 wiring
http://www.veryuseful.com/mustang/tech/engine/
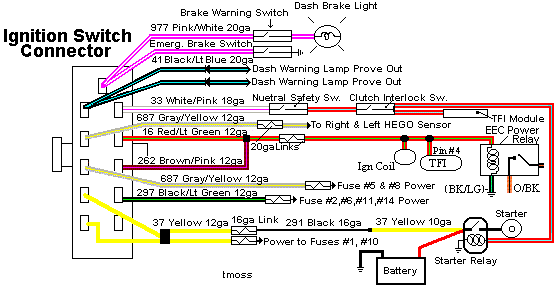
Ignition switch wiring
http://www.veryuseful.com/mustang/tech/engine/images/IgnitionSwitchWiring.gif
Fuel pump, alternator, ignition & A/C wiring
http://www.veryuseful.com/mustang/tech/engine/images/fuel-alt-links-ign-ac.gif
Computer,. actuator & sensor wiring
http://www.veryuseful.com/mustang/tech/engine/images/88-91_5.0_EEC_Wiring_Diagram.gif
Fuse panel layout
http://www.veryuseful.com/mustang/tech/engine/images/MustangFuseBox.gif
Vacuum routing
http://www.veryuseful.com/mustang/tech/engine/images/mustangFoxFordVacuumDiagram.jpg
Code 96 causes & tests 91-93 models. – KOEO- Fuel pump monitor circuit shows no power - Fuel pump relay or battery power feed was open - Power / Fuel Pump Circuits. The fuel pump circuit lost power at one time or another.
Revised 07-apr-2013 to add check for corrosion and damage in fuel pump relay socket
Clear the codes by disconnecting the battery and turning on the headlights for about 5 minutes before reconnecting the battery. This will clear any remaining codes. Drive the car for several days and dump the codes again. In many cases, this clears the 96 code.
Look for a failing fuel pump relay, bad connections or broken wiring. The fuel pump relay is located under the Mass Air Meter on Fox bodied stangs built after 91. On earlier model cars is under the passenger seat. On Mass Air Conversions, the signal lead that tells the computer that the fuel pump has power may not have been wired correctly. See
Mustang Mass Air Conversion | StangNet
Diagram of the fuel pump wiring for 91-93 cars.
Look for power at the fuel pump - the fuel pump has a connector at the rear of the car with a pink/black wire and a black wire that goes to the fuel pump. The pink/black wire should be hot when the test connector is jumpered to the test position. To trick the fuel pump into running, find the ECC test connector and jump the connector in the lower RH corner to ground. No voltage when jumpered, check the fuel pump relay and fuse links.
Power feed: Look for 12 volts at the pink/black wire (power source for fuel pump relay). No voltage or low voltage, bad fuse link, bad wiring, or connections. Remember that on 92 or later models the fuel pump relay is located under the Mass Air meter. Watch out for the WOT A/C control relay on these cars, as it is located in the same place and can easily be mistaken for the fuel pump relay.
Relay: Turn on the key and jumper the ECC test connector as previously described. Look for 12 volts at the dark green\yellow wire (relay controlled power for the fuel pump). No voltage there means that the relay has failed, or there is a broken wire in the relay control circuit.
Be sure to closely check the condition of the relay, wiring & socket for corrosion and damage.
91-93 Models:
Using the diagram, check the dark green/yellow wire from the fuel pump relay: you should see 12 volts or so. If not the relay has failed or is intermittent. Check the inertia switch: on a hatch it is on the drivers side by the taillight. Look for a black rubber plug that pops out: if you don't find it, then loosen up the plastic trim. Check for voltage on both sides of the switch. If there is voltage on both sides, then check the Pink/black wire on the fuel pump relay: it is the power feed to the fuel pump. Good voltage there, then the fuel pump is the likely culprit since it is getting power. No voltage there, check the Pink/black wire, it is the power feed to the fuel pump relay & has a fuse link in it. Good voltage there & at the dark green/yellow wire, swap the relay.
All testing is done with the ignition switch in the Run position. Do not forget this crucial step.
The pink/black wire s should have the same voltage as the battery positive terminal +/- 0.25 volt. If not, then the fuse link for the fuel pump has opened up.
With the test jumper in place the green/yellow wire should be the same voltage as the pink/black wire +/- 0.25 volt.
If not, look at the red wire: should have the same voltage as the battery positive terminal +/- 0.25 volt.
If not, then check the yellow wire on the EEC relay located on top of the computer. This one is hard to get to. It should have the same voltage as the battery positive terminal +/- 0.25 volt. If not, then the fuse link for the computer has opened up.
If the red wire does not have the same voltage as the battery positive terminal +/- 0.25 volt and the yellow wire on the EEC relay does, then check the red/green wire on the EEC relay. It should have the same voltage as the battery positive terminal +/- 0.25 volt. If not, then the ignition switch is defective or the fuse link in the ignition wiring harness has opened up, or the EEC relay is defective.
Diagram courtesy of Tmoss & Stang&2birds
O2 Sensor harness interchange and modification
Originally Posted by 302EFI
Revised 16-Oct-2011 to add O2 sensor harness warnings
The wires for the 02's and low oil did not change throughout the years, they are all in the same place.
The main ones you need to worry about are (on the harness end (ECU) that plugs into the 02 plug) is:
\- 1. Lightblue / yellow
- 2. White / Purple
- 3. Purple / Yellow
The White/Purple & Purple/Yellow gets looped for a automatic ECU
The Purple/Yellow & Lightblue/Yellow for a manual ECU
See
http://forums.corral.net/forums/gen...manual-auto-differences-year-differences.html for more O2 sensor wiring harness info
Basic premise to use with transmission swaps:
Only run a 5 speed trans O2 harness with an A9L. Do not run an Auto O2 sensor harness with an A9L. Doing so will damage the computer’s internal signal ground.
Only run an Auto trans O2 sensor harness with an A9P in a car that has an Auto trans. Using a 5 speed trans O2 sensor harness with an Auto trans will cause no crank problems.
See http://www.stangnet.com/mustang-forums/749974-computer-issue.html#post7490537 for Joel5.0’s fix to the computer internal signal ground.
90 model year harness only works with 90 model cars without inspection/rework.
The 4 cylinder O2 harness uses 4 wire O2 sensors. It probably won’t work correctly without modifying it.


")
")