Engine Foxbody Mustang A/C Compressor Reseal - Nippon-Denso 6P148A

It's the same.

I installed a YF-879 on my low side fitting on the actual compressor.
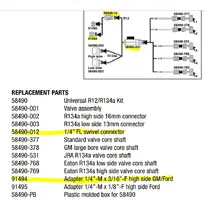
1679941461013.png

1679941487159.png
Perfect...Thanks! Any recommendations on which caps to get? Does brand really matter here?
 
Last edited:
  • Sponsors (?)


I would. It's just cheap insurance

Generally it's assumed that the valve cores all leak somewhat. The caps are what creates the final backup seal. There's a small rubber gasket in the bottom that helps seal the valve and that can dry out over time. SO really you are installing fresh caps with soft rubber to help seal.

You can also use Nylog, which is a sticky compound that is used to help seal A/C components. It's sort of an assembly lube. I use a little on the valves on the threads and at the end of the cap. Very sticky stuff and somewhat a pain to work with because of this, but that quality is what makes it work so well. It’s good for the connections like your manifold guages and the caps.


It can be found on Amazon. Nylog blue is what you want to use as it's compatible with all refrigerants and oils. Nylog red is more for mineral oil systems (original R12).
 
Last edited:
  • Like
Reactions: 1 user
If and when you evacuate and recharge the a/c system
That is when to replace both Schrader valves
It is the primary seal and the cap is the secondary seal
Quite common to take a cap off when checking pressures, and hear a hiss from a leaking Schrader valve
At that point you need to evac the system to replace them
So, anytime you have the system down and out of freon, replace the valves
 
While swapping the value out on a depressurized system is ideal, there is a way that you can replace the low side with a pressurized system using a valve core tool.

This is the one I have, but there are cheaper options.

Appion MGAVCT 1/4" MegaFlow Vacuum-Rated Valve Core Removal Tool https://a.co/d/bbtXhqS


This is only for the low side port, which is 1/4” flare. I have not found an equivalent tool for the high side fitting.

Edit: I think it does the one on the accumulator under the low pressure switch as well, assuming that’s a 1/4” flare type fitting too.


But videos on yourtube showing how it work. But very easy to remove and replace the valve on a fully pressurized system. I’ve done it.

F3F49657-AB3B-414A-BA5D-995946DE533B.jpeg
 
Last edited:
Wonderful tool, but it's the high side ones that always leak, well I see them leak
I have A/C recycler machines, so for me it is easy to evac and recharge
That tool is cool though, and if that is your car... It sure is clean
 
  • Like
Reactions: 1 user
Yup. That’s my car.

I agree. Shame it doesn’t work in the high side. I have yet to see one that will do the high side, but I haven’t looked much for it as I did mine with system empty so no need.

No A/C machine here , so must seek alternative methods.
 
So I do hear a hiss when removing the cap on the high side :)

I have found a valve core removal tool for the high side except its only available in kit form ($$$).


Attachments

  • adapters.JPG
    adapters.JPG
    134.7 KB · Views: 26
  • Like
Reactions: 1 user
You will not find me using much sealant or the nylog oil in an AC
Reason being, AC system should have just freon and oil in it, not sealers and additives
They lessen system performance, at least that is how I learned
If it has a leak, you fix it.
If too ignorant or costly, then adding freon and some oil occasionally is the way I go
Luckily I just acquired another 30 lb. tank of R12 for 300 bucks
I work on a few old Corvettes and older Mercedes not to mention old Camaros and Fords
Some do not like the R134a conversion
You all can get certified in 15 minutes, and older (Robinaire et al.) R12 machines are getting cheaper these days
AC systems collect air and moisture over time, and need to be evacuated and recharged once in a while, to get the air and moisture out
Newer smaller systems with 134a will be full of freon pressure wise but blowing luke warm / cold air
Those are the ones that could benefit by being evacuated and recharged
 
Nylog technically is refrigerant oil. It's just in a highly viscous state and will break down and homogenize with the oil in the system if it were to infiltrate. All my HVAC trade buddies swear by it which is what got me looking into it.

But it's not something folks need to go out of their way to get. I only put a little bit on the caps. I would use standard refrigerant oil for everything else like lubricating O-rings and seals and other standard assembly/disassembly.
 
Last edited:
I think you are misunderstanding what I am saying.

The dab of Nylog was just a small suggestion for added insurance for the external cap seals or perhaps on your manifold guage connections but is not necessary.

But for all internal seals and o-rings absolutely stick to the PAG/Mineral oil.
 
Last edited:
So I just resealed my AC compressor on my 83.... Used this post mulitiple times, so thanks for the help..
I installed the compressor on the car to do the final torque of the 6 long bolts, as I thought that would be a good way to hold it.... I seem to have a leak ( Pag oil) from the center oring in the main body..
Wasn't sure if this was some residual oil from assembly, but I don't think I will be that lucky..
Pulled it back off the car and I have it setting on top of some paper towels to watch it.
If I pinpoint the leak coming from the center connection, I guess I will disassemble it and check for a pinched Oring??
Any other thoughts here? thanks
DSCF1369.JPG
DSCF1370.JPG
 
Last edited:
I can't see the leak from the pics.

Inspect the groove that the O-ring is seated in Make sure it's clean and doesn't have physical damage. The o-ring should compress and seal there, so it's possible it's just residual oil from the assembly.

I found reference to a ford doc stating to pressure test the compressor. WIsh i could see how it's done. I haven't been able to find any off-the-shelf connections to show how to build a fixture to block off the ports and fill with gas to do a leak-down test.

Problem is you shouldn't really be pumping moisture laiden compressed air into the compressor. Will just make pulling a vac more difficult. Should really use Nitrogen here, but not many folks will have a tank of this kicking around like I do.
 
  • Like
Reactions: 1 user
The groove was spotless and I actually lightly flat sanded the other side down just a touch with some 600 grit to clean it up a touch...
Compressor was in excellent condition.....
Was hoping to measure for the new belt today... Close to first start....
I have it set on the bench ( top up, bottom down) with a clean paper towel under it, and I will watch it for a day or so... If it still leaks I guess I have no option but opening it up again....
 
Problem is you shouldn't really be pumping moisture laiden compressed air into the compressor. Will just make pulling a vac more difficult. Should really use Nitrogen here, but not many folks will have a tank of this kicking around like I do.

I think compressed air would work just fine with a water separator inline. We're not dealing with much volume here (it's just the compressor casing). I might service it with new oil afterward (or prior to installation if it's going on the shelf).

Another thought: If you decide to create a tester, I might use an air tank with a pressure gauge mounted on it and just slave it in series with the compressor. You can have a line dryer in that setup as well. Then it's just a matter of watching the gauge on the tank for however long you want to test.