
After putting the upper intake manifold and valve covers back on my 92 5.0 AOD it is not wanting to idle lower than 1500 and is a pain to get to run. Cranks every time and fires, runs ten seconds stumbles and dies. If I keep at it it will eventually start and run smooth but at a high idle. I have cleaned the IAC and checked it by removing the wiring with the engine running and a very small drop in idle occurs. Cleaned and checked every other wire and vacuum line I can find and tested the fuel pressure regulator as described here with nothing throwing a red flag. I have sprayed around the engine trying to find a vacuum leak to no avail. If I were to get up tomorrow morning and try to start it it will crank but not start without a little pedal and will stumble and backfire. After at least 20 tries it will eventually fire and run at 2000 rpm for 2 seconds and then drop to 1500 and run flawlessly at that idle speed. With it eventually having the ability to start and run without backfires or any misses I was thinking the no start checklist may not apply here. I was thinking that perhaps the previous owner may have "modded" it by setting the idle higher or some other awful thing. Any ideas here? Also it is a catless H pipe now so exhaust smells rich to me, but richer than I would have expected.
You are using an out of date browser. It may not display this or other websites correctly.
You should upgrade or use an alternative browser.
You should upgrade or use an alternative browser.
Engine High Idle, Rough Start
- Thread starter jcgafford
- Start date
Check for vacuum leaks as advised. It is easy to crack the vacuum lines or leave one off. Once you have completely checked all the vacuum lines, then look elsewhere.
Finding vacuum leaks
Revised 04-Aug-2011 to add pintle cap, PCV grommet & power brake check valve grommet to checklist.
There is no easy way to find vacuum leaks. It is a time consuming job that requires close inspection of each and every hose and connection.
Small vacuum leaks may not show much change using a vacuum gauge. The range of "good readings" varies so much from engine to engine that it may be difficult to detect small leaks. The engine in my first Mustang pulled about 16.5" of vacuum at 650-725 RPM, which I consider rather low. It was a mass market remanufactured rebuild, so no telling what kind of camshaft it had. Average readings seem to run 16"-18" inches at idle and 18"-21" at 1000 RPM. The only sure comparison is a reading taken when your car was performing at its best through all the RPM ranges and what it is doing now. Use one of the spare ports on the vacuum tree that is mounted on the firewall near the windshield wiper motor.
Use a squirt can of motor oil to squirt around the mating surfaces of the manifold & TB. The oil will be sucked into the leaking area and the engine will change speed. Avoid using flammable substitutes for the oil such as propane or throttle body cleaner. Fire is an excellent hair removal agent, and no eyebrows is not cool...
The vacuum line plumbing is old and brittle on many of these cars, so replacing the lines with new hose is a good plan. The common 1/8” and ¼” vacuum hose works well and isn’t expensive.
The PCV grommet and the power brake booster check valve grommet are two places that often get overlooked when checking for vacuum leaks. The rubber grommets get hard and lose their ability to seal properly. The PVC grommet is difficult to see if it is correctly seated and fitting snugly.
Fuel injector O rings can get old and hard. When they do, they are prone to leaking once the engine warms up. This can be difficult to troubleshoot, since it is almost impossible to get to the injectors to squirt oil into the fuel injector mounting bosses. If the plastic caps on the fuel injectors (pintle caps) are missing, the O rings will slide off the injectors and fall into the intake manifold.
Fuel injector seal kits with 2 O rings and a pintle cap (Borg-Warner P/N 274081) are available at Pep Boys auto parts. Cost is about $3-$4 per kit. The following are listed at the Borg-Warner site ( http://www.borg-warner.com ) as being resellers of Borg-Warner parts:
http://www.partsplus.com/ or http://www.autovalue.com/ or http://www.pepboys.com/ or http://www.federatedautoparts.com/
Most of the links above have store locators for find a store in your area.
Use motor oil on the O rings when you re-assemble them & everything will slide into place. The gasoline will wash away any excess oil that gets in the wrong places and it will burn up in the combustion chamber. Heat the pintle caps in boiling water to soften them to make them easier to install.
Diagram courtesy of Tmoss & Stang&2birds

Vacuum leak due to slipped lower intake manifold gasket...
Ask Nicoleb3x3 about the intake gasket that slipped out of place and caused idle and vacuum leak problems that could not be seen or found by external examination. I don't care what you spray with, you won't find the leak when it is sucking air from the lifter valley. It simply isn't possible to spray anything in there with the lower manifold bolted in place.

See the "Surging Idle Checklist” for help with all your idle/stall problems. You can guess at the problem and throw parts at it, or you can use the checklist to help you find the problem quickly and inexpensively. The checklist is right here in the Stangnet 5.0 Tech forum and you don’t have navigate to some other unknown web site. It‘s free and doesn’t cost anything: at last count there were more than 103,000 visits and still climbing
The quick and easy way to dump the codes is in there too, and all you need to do it is a paper clip! The first two posts contain all the fixes & updates. At last count there were 24 possible causes and fixes for surging idle/stall problems. I continue to update it as more people post fixes or ask questions.
See the following website for some help from Tmoss (diagram designer) & Stang&2Birds (website host) for help on 88-95 wiring http://www.veryuseful.com/mustang/tech/engine/ Everyone should bookmark this site.
Ignition switch wiring
http://www.veryuseful.com/mustang/tech/engine/images/IgnitionSwitchWiring.gif
Fuel, alternator, A/C and ignition wiring
http://www.veryuseful.com/mustang/tech/engine/images/fuel-alt-links-ign-ac.gif
Complete computer, actuator & sensor wiring diagram for 88-91 Mass Air Mustangs
http://www.veryuseful.com/mustang/tech/engine/images/88-91_5.0_EEC_Wiring_Diagram.gif
Vacuum diagram 89-93 Mustangs
http://www.veryuseful.com/mustang/tech/engine/images/mustangFoxFordVacuumDiagram.jpg
HVAC vacuum diagram
http://www.veryuseful.com/mustang/tech/engine/images/Mustang_AC_heat_vacuum_controls.gif
TFI module differences & pinout
http://www.veryuseful.com/mustang/tech/engine/images/TFI_5.0_comparison.gif
Fuse box layout
http://www.veryuseful.com/mustang/tech/engine/images/MustangFuseBox.gif
Finding vacuum leaks
Revised 04-Aug-2011 to add pintle cap, PCV grommet & power brake check valve grommet to checklist.
There is no easy way to find vacuum leaks. It is a time consuming job that requires close inspection of each and every hose and connection.
Small vacuum leaks may not show much change using a vacuum gauge. The range of "good readings" varies so much from engine to engine that it may be difficult to detect small leaks. The engine in my first Mustang pulled about 16.5" of vacuum at 650-725 RPM, which I consider rather low. It was a mass market remanufactured rebuild, so no telling what kind of camshaft it had. Average readings seem to run 16"-18" inches at idle and 18"-21" at 1000 RPM. The only sure comparison is a reading taken when your car was performing at its best through all the RPM ranges and what it is doing now. Use one of the spare ports on the vacuum tree that is mounted on the firewall near the windshield wiper motor.
Use a squirt can of motor oil to squirt around the mating surfaces of the manifold & TB. The oil will be sucked into the leaking area and the engine will change speed. Avoid using flammable substitutes for the oil such as propane or throttle body cleaner. Fire is an excellent hair removal agent, and no eyebrows is not cool...
The vacuum line plumbing is old and brittle on many of these cars, so replacing the lines with new hose is a good plan. The common 1/8” and ¼” vacuum hose works well and isn’t expensive.
The PCV grommet and the power brake booster check valve grommet are two places that often get overlooked when checking for vacuum leaks. The rubber grommets get hard and lose their ability to seal properly. The PVC grommet is difficult to see if it is correctly seated and fitting snugly.
Fuel injector O rings can get old and hard. When they do, they are prone to leaking once the engine warms up. This can be difficult to troubleshoot, since it is almost impossible to get to the injectors to squirt oil into the fuel injector mounting bosses. If the plastic caps on the fuel injectors (pintle caps) are missing, the O rings will slide off the injectors and fall into the intake manifold.
Fuel injector seal kits with 2 O rings and a pintle cap (Borg-Warner P/N 274081) are available at Pep Boys auto parts. Cost is about $3-$4 per kit. The following are listed at the Borg-Warner site ( http://www.borg-warner.com ) as being resellers of Borg-Warner parts:
http://www.partsplus.com/ or http://www.autovalue.com/ or http://www.pepboys.com/ or http://www.federatedautoparts.com/
Most of the links above have store locators for find a store in your area.
Use motor oil on the O rings when you re-assemble them & everything will slide into place. The gasoline will wash away any excess oil that gets in the wrong places and it will burn up in the combustion chamber. Heat the pintle caps in boiling water to soften them to make them easier to install.
Diagram courtesy of Tmoss & Stang&2birds
Vacuum leak due to slipped lower intake manifold gasket...
Ask Nicoleb3x3 about the intake gasket that slipped out of place and caused idle and vacuum leak problems that could not be seen or found by external examination. I don't care what you spray with, you won't find the leak when it is sucking air from the lifter valley. It simply isn't possible to spray anything in there with the lower manifold bolted in place.
See the "Surging Idle Checklist” for help with all your idle/stall problems. You can guess at the problem and throw parts at it, or you can use the checklist to help you find the problem quickly and inexpensively. The checklist is right here in the Stangnet 5.0 Tech forum and you don’t have navigate to some other unknown web site. It‘s free and doesn’t cost anything: at last count there were more than 103,000 visits and still climbing
The quick and easy way to dump the codes is in there too, and all you need to do it is a paper clip! The first two posts contain all the fixes & updates. At last count there were 24 possible causes and fixes for surging idle/stall problems. I continue to update it as more people post fixes or ask questions.
See the following website for some help from Tmoss (diagram designer) & Stang&2Birds (website host) for help on 88-95 wiring http://www.veryuseful.com/mustang/tech/engine/ Everyone should bookmark this site.
Ignition switch wiring
http://www.veryuseful.com/mustang/tech/engine/images/IgnitionSwitchWiring.gif
Fuel, alternator, A/C and ignition wiring
http://www.veryuseful.com/mustang/tech/engine/images/fuel-alt-links-ign-ac.gif
Complete computer, actuator & sensor wiring diagram for 88-91 Mass Air Mustangs
http://www.veryuseful.com/mustang/tech/engine/images/88-91_5.0_EEC_Wiring_Diagram.gif
Vacuum diagram 89-93 Mustangs
http://www.veryuseful.com/mustang/tech/engine/images/mustangFoxFordVacuumDiagram.jpg
HVAC vacuum diagram
http://www.veryuseful.com/mustang/tech/engine/images/Mustang_AC_heat_vacuum_controls.gif
TFI module differences & pinout
http://www.veryuseful.com/mustang/tech/engine/images/TFI_5.0_comparison.gif
Fuse box layout
http://www.veryuseful.com/mustang/tech/engine/images/MustangFuseBox.gif
on it tonight, will recheck everything. is it recommended to use rtv silicone on the plenum gasket? it was dry when i removed it.
started by dumping codes tonight after rechecking everything i could see and re-clipping all electrical plugs. my vehicle would not dump codes before but that was due to dirty terminals on the test plugs. here is what i got, some are repeated. these are key on engine off as it would not start.
first a fast pulse of 3 flashes, then 23, 81, 23, 81, 11, 85, 38, 79, 61, 85, 38, 79 and 6
ran it 6 times to make sure my eyes were actually not lying to me. so without repeating codes they are: 23, 81, 11, 85, 38, 79, 61, 6
first a fast pulse of 3 flashes, then 23, 81, 23, 81, 11, 85, 38, 79, 61, 85, 38, 79 and 6
ran it 6 times to make sure my eyes were actually not lying to me. so without repeating codes they are: 23, 81, 11, 85, 38, 79, 61, 6
Code 23 - Throttle sensor out of range or throttle set too high - TPS needs to be reset to below 1.2 volts at idle. Keep in mind that when you turn the idle screw to set the idle speed, you change the TPS setting.
You'll need a Digital Voltmeter (DVM) to do the job.
Wire colors & functions:
Orange/white = 5 volt VREF from the computer
Dark Green/lt green = TPS output to computer
Black/white = Signal ground from computer
Always use the Dark Green/lt green & Black/white wires to set the TPS base voltage.
Do the test with the ignition switch in the Run position without the engine running.
Use the Orange/white & Black white wires to verify the TPS has the correct 5 volts source from the computer.
When you installed the sensor make sure you place it on the peg right and then tighten it down properly. Loosen the back screw a tiny bit so the sensor can pivot and loosen the front screw enough so you can move it just a little in very small increments. I wouldn’t try to adjust it using marks. Set it at .6.v-.9 v.
1. Always adjust the TPS and Idle with the engine at operating temp. Dive it around for a bit if you can and get it nice and warm.
2. When you probe the leads of the TPS, do not use an engine ground, put the ground probe into the lead of the TPS. You should be connecting both meter probes to the TPS and not one to the TPS and the other to ground.
If setting the TPS doesn’t fix the problem, then you may have wiring problems.
With the power off, measure the resistance between the black/white wire and battery ground. You should see less than 2 ohms. Check the same black /white wire on the TPS and MAP/Baro sensor. More than 1 ohm there and the wire is probably broken in the harness between the engine and the computer. The 10 pin connectors pass the black/white wire back to the computer, and can cause problems.
See the following website for some help from Tmoss (diagram designer) & Stang&2Birds (website host)
http://www.veryuseful.com/mustang/tech/engine/images/88-91eecPinout.gif
See the graphic for the 10 pin connector circuit layout.

The injector power pin is the VPWR pin in the black 10 pin connector.
code 11 - computer passed it's internal self test OK. No need to worry or fix this one.
Code 81 – Secondary Air Injection Diverter Solenoid failure AM2. The solenoid valve located on the back side of the passenger side wheel well is not functional. Possible bad wiring, bad connections, missing or defective solenoid valve. Check the solenoid valve for +12 volts at the Red wire and look for the Lt Green/Black wire to switch from +12 volts to 1 volt or less. The computer controls the valve by providing a ground path on the LT Green/Black wire for the solenoid valve.
With the with the ignition on, look for 12 volts on the red wire on the solenoid connector. No 12 volts and you have wiring problems.
With the engine running, stick a safety pin in the LT Green/Black wire for the solenoid valve & ground it. That should turn the solenoid on and cause air to flow out the port that goes to the pipe connected to the cats. If it doesn't, the valve is bad. If it does cause the airflow to switch, the computer or wiring going to the computer is not signaling the solenoid valve to open.
Putting the computer into self test mode will cause the solenoid valve to toggle. If you listen carefully, you may hear it change states.
Code 85 - CANP solenoid - The Carbon Canister solenoid is inoperative or missing. Check vacuum lines for leaks and cracks. Check electrical wiring for loose connections, damaged wiring and insulation. Check solenoid valve operation by grounding the gray/yellow wire to the solenoid and blowing through it.
The computer provides the ground for the solenoid. The red wire to the solenoid is always energized any time the ignition switch is in the run position.
Charcoal canister plumbing - one 3/8" tube from the bottom of the upper manifold to the rubber hose. Rubber hose connects to one side of the canister solenoid valve. Other side of the solenoid valve connects to one side of the canister. The other side of the canister connects to a rubber hose that connects to a line that goes all the way back to the gas tank. There is an electrical connector coming from the passenger side injector harness near #1 injector that plugs into the canister solenoid valve. It's purpose is to vent the gas tank. The solenoid valve opens at cruse to provide some extra fuel. The canister is normally mounted on the passenger side frame rail near the smog pump pulley.

It does not weigh but a pound or so and helps richen up the cruse mixture. It draws no HP & keeps the car from smelling like gasoline in a closed garage. So with all these good things and no bad ones, why not hook it up & use it?
The purge valve solenoid connector is a dangling wire that is near the ECT sensor and oil filler on the passenger side rocker cover. The actual solenoid valve is down next to the carbon canister. There is about 12"-16" of wire that runs parallel to the canister vent hose that comes off the bottom side of the upper intake manifold. That hose connects one port of the solenoid valve; the other port connects to the carbon canister.
The purge valve solenoid should be available at your local auto parts store.
Purge valve solenoid:

The carbon canister is normally mounted on the passenger side frame rail near the smog pump pulley.
Carbon Canister:

No valid code 38 for 5.0 Mustangs- probable misread of flashes.
Code 79 - A/C is on, or computer pin 10 is shorted to power.
See the diagram below and you will find the very first wire starting from the bottom of the computer connector is a pink/lt blue wire that connects to pin 10. Disconnect all the items plugged into the pink/lt blue wire like the pressure cutout switch and the A/C defrost switch. Look for the 12 volts to go away when the pressure cutout switch and the A/C defrost are disconnected. If they don't, the WOT relay wiring may be bad. The WOT relay is located on the inner wheel well under the Mass Air meter.
Diagram courtesy of Tmoss & Stang&2birds

See the following website for some help from Tmoss (diagram designer) & Stang&2Birds (website host) for help on 88-95 wiring http://www.veryuseful.com/mustang/tech/engine/ Everyone should bookmark this site.
Ignition switch wiring
http://www.veryuseful.com/mustang/tech/engine/images/IgnitionSwitchWiring.gif
Fuel, alternator, A/C and ignition wiring
http://www.veryuseful.com/mustang/tech/engine/images/fuel-alt-links-ign-ac.gif
Complete computer, actuator & sensor wiring diagram for 88-91 Mass Air Mustangs
http://www.veryuseful.com/mustang/tech/engine/images/88-91_5.0_EEC_Wiring_Diagram.gif
Vacuum diagram 89-93 Mustangs
http://www.veryuseful.com/mustang/tech/engine/images/mustangFoxFordVacuumDiagram.jpg
HVAC vacuum diagram
http://www.veryuseful.com/mustang/tech/engine/images/Mustang_AC_heat_vacuum_controls.gif
TFI module differences & pinout
http://www.veryuseful.com/mustang/tech/engine/images/TFI_5.0_comparison.gif
Fuse box layout
http://www.veryuseful.com/mustang/tech/engine/images/MustangFuseBox.gif
Code 61 - Engine Coolant Temperature (ECT) sensor is or was too low. Failed sensor or bad wiring for the ECT.
Note that that if the outside air temp is below 50 degrees F that the test for the
ECT can be in error.
Check the resistance of the black/white wire to battery ground. If it is less than 1 ohm, it is good. If it is more than 1 ohm, the black/white wire has bad connections or a broken wire. Always take resistance measurements with the circuit powered off. Make sure that you do not touch the metal probe tips when you you’re your measurements. If you do, your readings will be off. Check the resistance of the Lt green/yellow wire at the sensor connector and Pin 7 on the computer. It should be less than 1 ohm. If it is more than 1 ohm, the Lt green/yellow wire has bad connections or a broken wire.
If those tests pass, remove the passenger side kick panel. Disconnect the computer connector and disconnect the sensor from the wiring connector. Measure the resistance between the Lt green/yellow wire at the sensor connector and ground. You should see 1 meg ohm or an infinite open circuit. Less than 1 meg ohm means you have some bad wiring, or the Lt green/yellow wire is shorted to ground.
The ECT sensor has absolutely nothing to do with the temperature gauge. They are
different animals. The ECT sensor is normally located it the RH front of the engine in
the water feed tubes for the heater.
The ACT & ECT have the same thermistor, so the table values are the same
ACT & ECT test data:
Use Pin 46 on the computer for ground for both ECT & ACT to get most accurate
readings.
Pin 7 on the computer - ECT signal in. at 176 degrees F it should be .80 volts
Voltages may be measured across the ECT/ACT by probing the connector from
the rear. A pair of safety pins may be helpful in doing this. Use care in doing it
so that you don't damage the wiring or connector.
50 degrees F = 3.52 v
68 degrees F = 3.02 v
86 degrees F = 2.62 v
104 degrees F = 2.16 v
122 degrees F = 1.72 v
140 degrees F = 1.35 v
158 degrees F = 1.04 v
176 degrees F = .80 v
194 degrees F = .61
212 degrees F = .47 v
230 degrees F = .36 v
248 degrees F = .28 v
Ohms measures at the computer with the computer disconnected, or at the sensor with the sensor disconnected.
50 degrees F = 58.75 K ohms
68 degrees F = 37.30 K ohms
86 degrees F = 27.27 K ohms
104 degrees F = 16.15 K ohms
122 degrees F = 10.97 K ohms
No valid code 6 for 5.0 Mustangs- probable misread of flashes.
check the code on the end of the computer to see if you have something other than A9P, or CW3.
You'll need a Digital Voltmeter (DVM) to do the job.
Wire colors & functions:
Orange/white = 5 volt VREF from the computer
Dark Green/lt green = TPS output to computer
Black/white = Signal ground from computer
Always use the Dark Green/lt green & Black/white wires to set the TPS base voltage.
Do the test with the ignition switch in the Run position without the engine running.
Use the Orange/white & Black white wires to verify the TPS has the correct 5 volts source from the computer.
When you installed the sensor make sure you place it on the peg right and then tighten it down properly. Loosen the back screw a tiny bit so the sensor can pivot and loosen the front screw enough so you can move it just a little in very small increments. I wouldn’t try to adjust it using marks. Set it at .6.v-.9 v.
1. Always adjust the TPS and Idle with the engine at operating temp. Dive it around for a bit if you can and get it nice and warm.
2. When you probe the leads of the TPS, do not use an engine ground, put the ground probe into the lead of the TPS. You should be connecting both meter probes to the TPS and not one to the TPS and the other to ground.
If setting the TPS doesn’t fix the problem, then you may have wiring problems.
With the power off, measure the resistance between the black/white wire and battery ground. You should see less than 2 ohms. Check the same black /white wire on the TPS and MAP/Baro sensor. More than 1 ohm there and the wire is probably broken in the harness between the engine and the computer. The 10 pin connectors pass the black/white wire back to the computer, and can cause problems.
See the following website for some help from Tmoss (diagram designer) & Stang&2Birds (website host)
http://www.veryuseful.com/mustang/tech/engine/images/88-91eecPinout.gif
See the graphic for the 10 pin connector circuit layout.
The injector power pin is the VPWR pin in the black 10 pin connector.
code 11 - computer passed it's internal self test OK. No need to worry or fix this one.
Code 81 – Secondary Air Injection Diverter Solenoid failure AM2. The solenoid valve located on the back side of the passenger side wheel well is not functional. Possible bad wiring, bad connections, missing or defective solenoid valve. Check the solenoid valve for +12 volts at the Red wire and look for the Lt Green/Black wire to switch from +12 volts to 1 volt or less. The computer controls the valve by providing a ground path on the LT Green/Black wire for the solenoid valve.
With the with the ignition on, look for 12 volts on the red wire on the solenoid connector. No 12 volts and you have wiring problems.
With the engine running, stick a safety pin in the LT Green/Black wire for the solenoid valve & ground it. That should turn the solenoid on and cause air to flow out the port that goes to the pipe connected to the cats. If it doesn't, the valve is bad. If it does cause the airflow to switch, the computer or wiring going to the computer is not signaling the solenoid valve to open.
Putting the computer into self test mode will cause the solenoid valve to toggle. If you listen carefully, you may hear it change states.
Code 85 - CANP solenoid - The Carbon Canister solenoid is inoperative or missing. Check vacuum lines for leaks and cracks. Check electrical wiring for loose connections, damaged wiring and insulation. Check solenoid valve operation by grounding the gray/yellow wire to the solenoid and blowing through it.
The computer provides the ground for the solenoid. The red wire to the solenoid is always energized any time the ignition switch is in the run position.
Charcoal canister plumbing - one 3/8" tube from the bottom of the upper manifold to the rubber hose. Rubber hose connects to one side of the canister solenoid valve. Other side of the solenoid valve connects to one side of the canister. The other side of the canister connects to a rubber hose that connects to a line that goes all the way back to the gas tank. There is an electrical connector coming from the passenger side injector harness near #1 injector that plugs into the canister solenoid valve. It's purpose is to vent the gas tank. The solenoid valve opens at cruse to provide some extra fuel. The canister is normally mounted on the passenger side frame rail near the smog pump pulley.
It does not weigh but a pound or so and helps richen up the cruse mixture. It draws no HP & keeps the car from smelling like gasoline in a closed garage. So with all these good things and no bad ones, why not hook it up & use it?
The purge valve solenoid connector is a dangling wire that is near the ECT sensor and oil filler on the passenger side rocker cover. The actual solenoid valve is down next to the carbon canister. There is about 12"-16" of wire that runs parallel to the canister vent hose that comes off the bottom side of the upper intake manifold. That hose connects one port of the solenoid valve; the other port connects to the carbon canister.
The purge valve solenoid should be available at your local auto parts store.
Purge valve solenoid:
The carbon canister is normally mounted on the passenger side frame rail near the smog pump pulley.
Carbon Canister:
No valid code 38 for 5.0 Mustangs- probable misread of flashes.
Code 79 - A/C is on, or computer pin 10 is shorted to power.
See the diagram below and you will find the very first wire starting from the bottom of the computer connector is a pink/lt blue wire that connects to pin 10. Disconnect all the items plugged into the pink/lt blue wire like the pressure cutout switch and the A/C defrost switch. Look for the 12 volts to go away when the pressure cutout switch and the A/C defrost are disconnected. If they don't, the WOT relay wiring may be bad. The WOT relay is located on the inner wheel well under the Mass Air meter.
Diagram courtesy of Tmoss & Stang&2birds
See the following website for some help from Tmoss (diagram designer) & Stang&2Birds (website host) for help on 88-95 wiring http://www.veryuseful.com/mustang/tech/engine/ Everyone should bookmark this site.
Ignition switch wiring
http://www.veryuseful.com/mustang/tech/engine/images/IgnitionSwitchWiring.gif
Fuel, alternator, A/C and ignition wiring
http://www.veryuseful.com/mustang/tech/engine/images/fuel-alt-links-ign-ac.gif
Complete computer, actuator & sensor wiring diagram for 88-91 Mass Air Mustangs
http://www.veryuseful.com/mustang/tech/engine/images/88-91_5.0_EEC_Wiring_Diagram.gif
Vacuum diagram 89-93 Mustangs
http://www.veryuseful.com/mustang/tech/engine/images/mustangFoxFordVacuumDiagram.jpg
HVAC vacuum diagram
http://www.veryuseful.com/mustang/tech/engine/images/Mustang_AC_heat_vacuum_controls.gif
TFI module differences & pinout
http://www.veryuseful.com/mustang/tech/engine/images/TFI_5.0_comparison.gif
Fuse box layout
http://www.veryuseful.com/mustang/tech/engine/images/MustangFuseBox.gif
Code 61 - Engine Coolant Temperature (ECT) sensor is or was too low. Failed sensor or bad wiring for the ECT.
Note that that if the outside air temp is below 50 degrees F that the test for the
ECT can be in error.
Check the resistance of the black/white wire to battery ground. If it is less than 1 ohm, it is good. If it is more than 1 ohm, the black/white wire has bad connections or a broken wire. Always take resistance measurements with the circuit powered off. Make sure that you do not touch the metal probe tips when you you’re your measurements. If you do, your readings will be off. Check the resistance of the Lt green/yellow wire at the sensor connector and Pin 7 on the computer. It should be less than 1 ohm. If it is more than 1 ohm, the Lt green/yellow wire has bad connections or a broken wire.
If those tests pass, remove the passenger side kick panel. Disconnect the computer connector and disconnect the sensor from the wiring connector. Measure the resistance between the Lt green/yellow wire at the sensor connector and ground. You should see 1 meg ohm or an infinite open circuit. Less than 1 meg ohm means you have some bad wiring, or the Lt green/yellow wire is shorted to ground.
The ECT sensor has absolutely nothing to do with the temperature gauge. They are
different animals. The ECT sensor is normally located it the RH front of the engine in
the water feed tubes for the heater.
The ACT & ECT have the same thermistor, so the table values are the same
ACT & ECT test data:
Use Pin 46 on the computer for ground for both ECT & ACT to get most accurate
readings.
Pin 7 on the computer - ECT signal in. at 176 degrees F it should be .80 volts
Voltages may be measured across the ECT/ACT by probing the connector from
the rear. A pair of safety pins may be helpful in doing this. Use care in doing it
so that you don't damage the wiring or connector.
50 degrees F = 3.52 v
68 degrees F = 3.02 v
86 degrees F = 2.62 v
104 degrees F = 2.16 v
122 degrees F = 1.72 v
140 degrees F = 1.35 v
158 degrees F = 1.04 v
176 degrees F = .80 v
194 degrees F = .61
212 degrees F = .47 v
230 degrees F = .36 v
248 degrees F = .28 v
Ohms measures at the computer with the computer disconnected, or at the sensor with the sensor disconnected.
50 degrees F = 58.75 K ohms
68 degrees F = 37.30 K ohms
86 degrees F = 27.27 K ohms
104 degrees F = 16.15 K ohms
122 degrees F = 10.97 K ohms
No valid code 6 for 5.0 Mustangs- probable misread of flashes.
check the code on the end of the computer to see if you have something other than A9P, or CW3.
are any of these things related? perhaps a common fault? And i assume some of these are causing my no start condition, any order i should start checking these or just go through them any way? computer is an a9p, recently replaced with a reman... it fired right up after changing then the starter died and after painting upper intake manifold and valve covers and re installing them and a new starter to boot this is what i get to play with now.
haynes manual says code 38 is "idle control circuit", can you confirm or is this a repetition of other codes and therefore useless? still getting this as a code.
code 23- 5.0 volts from red wire, 4.2 volts from green. tried to adjust it by moving tps around with screws loosened and maybe a 0.1 volt difference. tps sensor fried? had a very hard time trying to keep both meter pins in the connector, had to use a body ground for these values. went back and removed the tps and had it free hanging, so no pressure from the butterfly valve. retested the green wire that way and got 3.9 volts, 5 volts on the red wire. i assume this verifies that the tps is shot?
code 81- 12 volt source is there to both diverter solenoids (egr valve left untested). unable to start to complete testing. does vacuum play a role in the code being set or is it just dependent on power source and ground? e.g. the vacuum line is plugged, it will or will not throw the code?
code 85- 12 volt source is there, seems to be power to both wires and cannot blow thru solenoid. checked all the way up to the snap connection inline, solenoid plugged in and key on is power thru both wires, unplug solenoid and only red has power. (will replace)
code 79- this one may be my fault, i switched the fuel pump relay and the wot relay way back because fuel relay was not working. i thought i replaced it but may not have. are all these relays really the same thing or is there a specific relay for each? parts store says they are all the same. (will replace)
code 61- black andwhite wire is less than 1 ohm, terminals were corroded on sensor. (will replace)
The code 23 is the only possible no start condition.
Setting the TPS at .98 volt is a Bozo Internet Myth. When the computer powers up and initializes the TPS sensor, whatever it reads is the zero starting point for it. In other words your .98 volt becomes 0 volts and the computer watches for increases in voltage from that point upward.
Setting the TPS: you'll need a good Digital Voltmeter (DVM) to do the job. Set the TPS voltage at .5- 1.1 range. Because of the variables involved with the tolerances of both computer and DVM, I would shoot for somewhere between .6 and 1.0 volts. Unless you have a Fluke or other high grade DVM, the second digit past the decimal point on cheap DVM’s is probably fantasy. Since the computer zeros out the TPS voltage every time it powers up, playing with the settings isn't an effective aid to performance or drivability. The main purpose of checking the TPS is to make sure it isn't way out of range and causing problems.
Wire colors & functions:
Orange/white = 5 volt VREF from the computer
Dark Green/lt green = TPS output to computer
Black/white = Signal ground from computer
TPS troubleshooting steps:
1.) Use the Orange/white & Black white wires to verify the TPS has the correct 5 volts source from the computer.
2.) Use the Dark Green/lt green & Black/white wires to set the TPS base voltage. Try this... All you need is less than 1.0 volt at idle and more than 4.25 at Wide Open Throttle (WOT). You'll need a voltmeter with a 1 or 3 volt low scale to do the job.
The Orange/White wire is the VREF 5 volts from the computer. You use the Dark Green/Lt green wire (TPS signal) and the Black/White wire (TPS ground) to set the TPS. Use a pair of safety pins to probe the TPS connector from the rear of the connector. You may find it a little difficult to make a good connection, but keep trying. Put the safety pins in the Dark Green/Lt green wire and Black/White wire. Make sure the ignition switch is in the Run position but the engine isn't running. Set the voltmeter on the 2 volt range if it doesn’t auto range.
Here’s a TPS tip I got from NoGo50
When you installed the sensor make sure you place it on the peg right and then tighten it down properly. Loosen the back screw a tiny bit so the sensor can pivot and loosen the front screw enough so you can move it just a little in very small increments. I wouldn’t try to adjust it using marks.
(copied from MustangMax, Glendale AZ)
A.) Always adjust the TPS and Idle with the engine at operating temp. Dive it around for a bit if you can and get it nice and warm.
B.) When you probe the leads of the TPS, do not use an engine ground, put the ground probe into the lead of the TPS. You should be connecting both meter probes to the TPS and not one to the TPS and the other to ground.
C.) Always reset the computer whenever you adjust the TPS or clean/change any sensors. I just pull the battery lead for 10 minutes.
D.) The key is to adjust the TPS voltage and reset the computer whenever the idle screw is changed.
The TPS is a variable resistor, must like the volume control knob on a cheap radio. We have all heard them crackle and pop when the volume is adjusted. The TPS sensor has the same problem: wear on the resistor element makes places that create electrical noise. This electrical noise confuses the computer, because it expects to see a smooth increase or decrease as the throttle is opened or closed.
TPS testing: most of the time a failed TPS will set code 23 or 63, but not always. Use either an analog meter or a DVM with an analog bar graph and connect the leads as instructed above. Turn the ignition switch to the Run position, but do not start the engine. Note the voltage with the throttle closed. Slowly open the throttle and watch the voltage increase smoothly, slowly close the throttle and watch the voltage decrease smoothly. If the voltage jumps around and isn’t smooth, the TPS has some worn places in the resistor element. When the throttle is closed, make sure that the voltage is the same as what it was when you started. If it varies more than 10%, the TPS is suspect of being worn in the idle range of its travel.
TPS will not go below 1 volt
Engine mounted sensor circuit: Check the resistance between the black/white wire on the TPS and battery ground. It should be less than 1.5 ohms. Higher resistance than 1.5 ohms indicates a problem with the 10 pin connector, computer or the splice inside the main harness where the wire from the 10 pin connectors joins the rest of the black/white wire.

See the graphic for the location of the 10 pin connectors:
Diagram courtesy of Tmoss & Stang&2birds
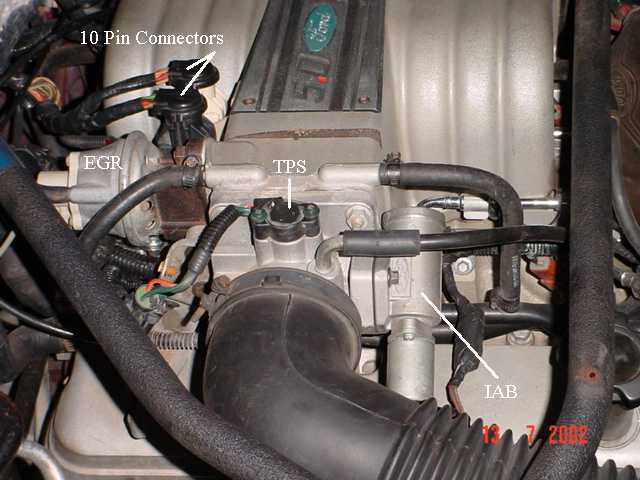
See the graphic for the 10 pin connector circuit layout.
Unplug the white 10 pin connector to do some resistance testing. It is good time to clean the connector pins and examine the connector for corrosion, broken wire or other damage. See http://oldfuelinjection.com/?p=85 for help in this department.
If the resistance on the TPS Black/White wire and pin 1 of the white engine fuel injector harness 10 pin connector is more than 1.0 ohm, you have bad connection or broken wiring. If your readings are 1.0 Ohm or less, repeat the test using the pin 1 of the white body side 10 pin connector and battery ground. You should have less that 1.5 ohm. More than that is a damaged signal ground inside the computer or bad connections or wiring.[/b]
Setting the TPS at .98 volt is a Bozo Internet Myth. When the computer powers up and initializes the TPS sensor, whatever it reads is the zero starting point for it. In other words your .98 volt becomes 0 volts and the computer watches for increases in voltage from that point upward.
Setting the TPS: you'll need a good Digital Voltmeter (DVM) to do the job. Set the TPS voltage at .5- 1.1 range. Because of the variables involved with the tolerances of both computer and DVM, I would shoot for somewhere between .6 and 1.0 volts. Unless you have a Fluke or other high grade DVM, the second digit past the decimal point on cheap DVM’s is probably fantasy. Since the computer zeros out the TPS voltage every time it powers up, playing with the settings isn't an effective aid to performance or drivability. The main purpose of checking the TPS is to make sure it isn't way out of range and causing problems.
Wire colors & functions:
Orange/white = 5 volt VREF from the computer
Dark Green/lt green = TPS output to computer
Black/white = Signal ground from computer
TPS troubleshooting steps:
1.) Use the Orange/white & Black white wires to verify the TPS has the correct 5 volts source from the computer.
2.) Use the Dark Green/lt green & Black/white wires to set the TPS base voltage. Try this... All you need is less than 1.0 volt at idle and more than 4.25 at Wide Open Throttle (WOT). You'll need a voltmeter with a 1 or 3 volt low scale to do the job.
The Orange/White wire is the VREF 5 volts from the computer. You use the Dark Green/Lt green wire (TPS signal) and the Black/White wire (TPS ground) to set the TPS. Use a pair of safety pins to probe the TPS connector from the rear of the connector. You may find it a little difficult to make a good connection, but keep trying. Put the safety pins in the Dark Green/Lt green wire and Black/White wire. Make sure the ignition switch is in the Run position but the engine isn't running. Set the voltmeter on the 2 volt range if it doesn’t auto range.
Here’s a TPS tip I got from NoGo50
When you installed the sensor make sure you place it on the peg right and then tighten it down properly. Loosen the back screw a tiny bit so the sensor can pivot and loosen the front screw enough so you can move it just a little in very small increments. I wouldn’t try to adjust it using marks.
(copied from MustangMax, Glendale AZ)
A.) Always adjust the TPS and Idle with the engine at operating temp. Dive it around for a bit if you can and get it nice and warm.
B.) When you probe the leads of the TPS, do not use an engine ground, put the ground probe into the lead of the TPS. You should be connecting both meter probes to the TPS and not one to the TPS and the other to ground.
C.) Always reset the computer whenever you adjust the TPS or clean/change any sensors. I just pull the battery lead for 10 minutes.
D.) The key is to adjust the TPS voltage and reset the computer whenever the idle screw is changed.
The TPS is a variable resistor, must like the volume control knob on a cheap radio. We have all heard them crackle and pop when the volume is adjusted. The TPS sensor has the same problem: wear on the resistor element makes places that create electrical noise. This electrical noise confuses the computer, because it expects to see a smooth increase or decrease as the throttle is opened or closed.
TPS testing: most of the time a failed TPS will set code 23 or 63, but not always. Use either an analog meter or a DVM with an analog bar graph and connect the leads as instructed above. Turn the ignition switch to the Run position, but do not start the engine. Note the voltage with the throttle closed. Slowly open the throttle and watch the voltage increase smoothly, slowly close the throttle and watch the voltage decrease smoothly. If the voltage jumps around and isn’t smooth, the TPS has some worn places in the resistor element. When the throttle is closed, make sure that the voltage is the same as what it was when you started. If it varies more than 10%, the TPS is suspect of being worn in the idle range of its travel.
TPS will not go below 1 volt
Engine mounted sensor circuit: Check the resistance between the black/white wire on the TPS and battery ground. It should be less than 1.5 ohms. Higher resistance than 1.5 ohms indicates a problem with the 10 pin connector, computer or the splice inside the main harness where the wire from the 10 pin connectors joins the rest of the black/white wire.
See the graphic for the location of the 10 pin connectors:
Diagram courtesy of Tmoss & Stang&2birds
See the graphic for the 10 pin connector circuit layout.
Unplug the white 10 pin connector to do some resistance testing. It is good time to clean the connector pins and examine the connector for corrosion, broken wire or other damage. See http://oldfuelinjection.com/?p=85 for help in this department.
If the resistance on the TPS Black/White wire and pin 1 of the white engine fuel injector harness 10 pin connector is more than 1.0 ohm, you have bad connection or broken wiring. If your readings are 1.0 Ohm or less, repeat the test using the pin 1 of the white body side 10 pin connector and battery ground. You should have less that 1.5 ohm. More than that is a damaged signal ground inside the computer or bad connections or wiring.[/b]
will test this today.
Setting the TPS at .98 volt is a Bozo Internet Myth. When the computer powers up and initializes the TPS sensor, whatever it reads is the zero starting point for it. In other words your .98 volt becomes 0 volts and the computer watches for increases in voltage from that point upward.
does this include my high voltage readings of 4.2?
does this include my high voltage readings of 4.2?
black wire to pin 1, key on engine off was 0.02.
pin 1 to battery ground, key on engine off was 0.03.
installing new tps...
pin 1 to battery ground, key on engine off was 0.03.
installing new tps...
installed new tps. car fires right up, no cranking at all, runs then dies. ran codes
81, 11, 89, 59, 61, 6 -some were repeated twice...
code 23 is gone! well thats a bonus. but car will not run for more than a minute.
egr valve holds no vacuum, going to find a replacement
81, 11, 89, 59, 61, 6 -some were repeated twice...
code 23 is gone! well thats a bonus. but car will not run for more than a minute.
egr valve holds no vacuum, going to find a replacement
That's why you got code 23.Setting the TPS at .98 volt is a Bozo Internet Myth. When the computer powers up and initializes the TPS sensor, whatever it reads is the zero starting point for it. In other words your .98 volt becomes 0 volts and the computer watches for increases in voltage from that point upward.
does this include my high voltage readings of 4.2?
Check the fuel pressure with a test gauge rented or loaned from the auto parts store. The code 59 referrers back to some obscure fuel pump problem I have not seen before.
Use a noid light on one of the easily accessible fuel injectors. Watch for a continuous series of flashes as the engine tries to run.
gotcha, why the change in engine codes though? and the bad egr, is that my run problem now?That's why you got code 23.
also, the throttle screw has a few marks on it... i would bet it has been moved. any way to set it back to factory? e.g. it should only move the butterfly valve 1/4 inch...
That's why you got code 23.
Check the fuel pressure with a test gauge rented or loaned from the auto parts store. The code 59 referrers back to some obscure fuel pump problem I have not seen before.
Use a noid light on one of the easily accessible fuel injectors. Watch for a continuous series of flashes as the engine tries to run.
ok, got a fuel pressure tester at a buddies. see if i can do it tonight. fuel pump is new. and it ran after installing it.
haynes manual says 59 is a transmission throttle pressure switch circuit. should i just throw this haynes manual out? seems it is very basic and would lead me astray if not for you.
That code doesn't sound right, but honestly I'm not very familiar with the AOD since not too many have come in my shop. The "throttle pressure switch circuit" doesn't sound right because the only thing electrical with the AOD is the lock up for the torque converter. And, the AOD has a throttle pressure cable, so there's nothing electrical to do with throttle pressure at all.ok, got a fuel pressure tester at a buddies. see if i can do it tonight. fuel pump is new. and it ran after installing it.
haynes manual says 59 is a transmission throttle pressure switch circuit. should i just throw this haynes manual out? seems it is very basic and would lead me astray if not for you.
Similar threads
- Replies
- 25
- Views
- 768
- Replies
- 1
- Views
- 127
- Replies
- 6
- Views
- 80
- Replies
- 2
- Views
- 571
- Replies
- 16
- Views
- 931