
TPS Troubleshooting and testing
Revised 2 July 2014 to reflect changes in resistance values for testing of TPS wiring.
Setting the TPS: you'll need a good Digital Voltmeter (DVM) to do the job. Set the TPS voltage at .5- 1.1 range. Because of the variables involved with the tolerances of both computer and DVM, I would shoot for somewhere between .6 and 1.0 volts. Unless you have a Fluke or other high grade DVM, the second digit past the decimal point on cheap DVM’s is probably fantasy.
Since the computer zeros out the TPS voltage every time it powers up, playing with the settings isn't an effective aid to performance or drivability. The main purpose of checking the TPS is to make sure it isn't way out of range and causing problems.
Wire colors & functions:
Orange/white = 5 volt VREF from the computer
Dark Green/lt green = TPS output to computer
Black/white = Signal ground from computer Always use the black/white wire when testing the TPS. This is the signal ground for the computer Use any other ground and you may get erroneous results.
TPS troubleshooting steps:
1.) Use the Orange/white & Black white wires to verify the TPS has the correct 5 volts source from the computer.
2.) Use the Dark Green/lt green & Black/white wires to set the TPS base voltage. Try this... All you need is less than 1.0 volt at idle and more than 4.25 at Wide Open Throttle (WOT). You'll need a voltmeter with a 1 or 3 volt low scale to do the job.
The Orange/White wire is the VREF 5 volts from the computer. You use the Dark Green/Lt green wire (TPS signal) and the Black/White wire (TPS ground) to set the TPS. Use a pair of safety pins to probe the TPS connector from the rear of the connector. You may find it a little difficult to make a good connection, but keep trying. Put the safety pins in the Dark Green/Lt green wire and Black/White wire. Make sure the ignition switch is in the Run position but the engine isn't running. Set the voltmeter on the 2 volt range if it doesn’t auto range.
Here’s a TPS tip I got from NoGo50
When you installed the sensor make sure you place it on the peg right and then tighten it down properly. Loosen the back screw a tiny bit so the sensor can pivot and loosen the front screw enough so you can move it just a little in very small increments. I wouldn’t try to adjust it using marks.
(copied from MustangMax, Glendale AZ)
A.) Always adjust the TPS and Idle with the engine at operating temp. Dive it around for a bit if you can and get it nice and warm.
B.) When you probe the leads of the TPS, do not use an engine ground, put the ground probe into the lead of the TPS. You should be connecting both meter probes to the TPS and not one to the TPS and the other to ground.
C.) Always reset the computer whenever you adjust the TPS or clean/change any sensors. I just pull the battery lead for 10 minutes.
D.) The key is to adjust the TPS voltage and reset the computer whenever the idle screw is changed.
The TPS is a variable resistor, must like the volume control knob on a cheap radio. We have all heard them crackle and pop when the volume is adjusted. The TPS sensor has the same problem: wear on the resistor element makes places that create electrical noise. This electrical noise confuses the computer, because it expects to see a smooth increase or decrease as the throttle is opened or closed.
TPS testing: most of the time a failed TPS will set code 23 or 63, but not always. Use either an analog meter or a DVM with an analog bar graph and connect the leads as instructed above. Turn the ignition switch to the Run position, but do not start the engine. Note the voltage with the throttle closed. Slowly open the throttle and watch the voltage increase smoothly, slowly close the throttle and watch the voltage decrease smoothly. If the voltage jumps around and isn’t smooth, the TPS has some worn places in the resistor element. When the throttle is closed, make sure that the voltage is the same as what it was when you started. If it varies more than 10%, the TPS is suspect of being worn in the idle range of its travel.
TPS will not go below 1 volt
Note: Make all resistance checks with the ignition switch in the OFF position. Failure to do so will result in incorrect results and may possibly damage the meter.
Engine mounted sensor circuit: Check the resistance between the black/white wire on the TPS and battery ground. It should be less than 1 ohm. Higher resistance than 1 ohm indicates a problem with the 10 pin connector, computer or the splice inside the main harness where the wire from the 10 pin connectors joins the rest of the black/white wire.

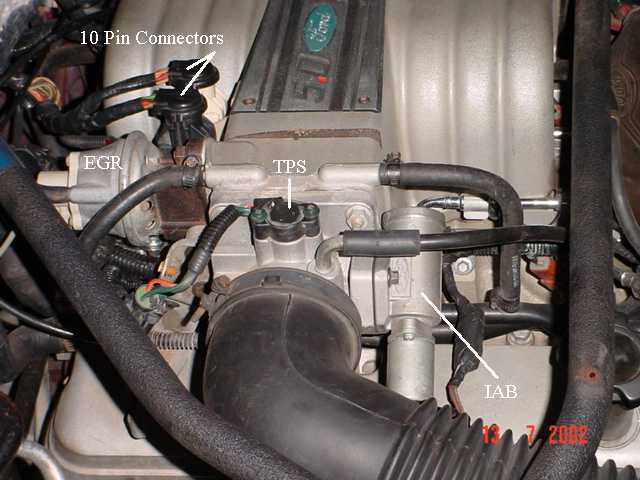
See the graphic for the location of the 10 pin connectors:
Diagram courtesy of Tmoss & Stang&2birds
See the graphic for the 10 pin connector circuit layout.

Unplug the white 10 pin connector to do some resistance testing. It is good time to clean the connector pins and examine the connector for corrosion, broken wire or other damage. See http://oldfuelinjection.com/?p=85 for help in this department.
If the resistance on the TPS Black/White wire and pin 1 of the white engine fuel injector harness 10 pin connector, is more than 1.0 ohm, you have bad connection or broken wiring. Repeat the test using the pin 1 of the white body side 10 pin connector and battery ground. You should have less that 1 ohm. More than that is a damaged signal ground inside the computer or bad connections or wiring.[/b]
Code 34 Or 334 - EGR voltage above closed limit –
Revised 26-Sep-2011 to add EGR cleaning and movement test for pintle when vacuum is applied to diaphragm
Failed sensor, carbon between EGR pintle valve and seat holding the valve off its seat. Remove the EGR valve and clean it with carbon remover. Prior to re-installing see if you can blow air through the flange side of the EGR by mouth. If it leaks, there is carbon stuck on the pintle valve seat clean or, replace the EGR valve ($85-$95).
Recommended procedure for cleaning the EGR:
Conventional cleaning methods like throttle body cleaner aren’t very effective. The best method is a soak type cleaner used for carburetors. If you are into fixing motorcycles, jet skis, snowmobiles or anything else with a small carburetor, you probably have used the one gallon soak cleaners like Gunk or Berryman. One of the two should be available at your local auto parts store for $22-$29. There is a basket to set the parts in while they are soaking. Soak the metal body in the carb cleaner overnight. Don’t immerse the diaphragm side, since the carb cleaner may damage the diaphragm. If you get any of the carb cleaner on the diaphragm, rinse it off with water immediately. Rinse the part off with water and blow it dry with compressed air. Once it has dried, try blowing through the either hole and it should block the air flow. Do not put parts with water on them or in them in the carb cleaner. If you do, it will weaken the carb cleaner and it won’t clean as effectively.
Gunk Dip type carb & parts soaker:

If you have a handy vacuum source, apply it to the diaphragm and watch to see if the pintle moves freely. Try blowing air through either side and make sure it flows when the pintle retracts and blocks when the pintle is seated. If it does not, replace the EGR.
If the blow by test passes, and you have replaced the sensor, then you have electrical ground problems. Check the resistance between the black/white wire on the MAP/BARO sensor and then the black/white wire on the EGR and the same wire on the TPS. It should be less than 1.5 ohm. Next check the resistance between the black/white wire and the negative battery post. It should be less than 1.5 ohm.
Note that all resistance tests must be done with power off. Measuring resistance with a circuit powered on will give false readings and possibly damage the meter.
Let’s put on our Inspector Gadget propeller head beanies and think about how this works:
The EGR sensor is a variable resistor with ground on one leg and Vref (5 volts) on the other. Its’ resistance ranges from 4000 to 5500 Ohms measured between Vref & ground, depending on the sensor. The center connection of the variable resistor is the slider that moves in response to the amount of vacuum applied. The slider has some minimum value of resistance greater than 100 ohms so that the computer always sees a voltage present at its’ input. If the value was 0 ohms, there would be no voltage output. Then the computer would not be able to distinguish between a properly functioning sensor and one that had a broken wire or bad connection. The EGR I have in hand reads 700 Ohms between the slider (EPV) and ground (SIG RTN) at rest with no vacuum applied. The EGR valve or sensor may cause the voltage to be above closed limits due to the manufacturing tolerances that cause the EGR sensor to rest at a higher position than it should.
The following sensors are connected to the white 10 pin connector (salt & pepper engine harness connectors)
This will affect idle quality by diluting the intake air charge
Screeeech! Brakes... JR... Last season (before the finale) the OP had what appeared to be an SD harness that may or may not have been properly converted to MAF. There was also an SD computer installed which we believe may have been swapped in during the sale. We know this because there's a MAF sensor under the hood that appears to be wired into the EEC but and SD computer was installed. See quoted text below:
Hello everyone back again and happy holidays to you guys.
Ok so busy busy this summer replacing front and rear suspention then work got in the way and now finally getting back to sorting the speed density issues I've had for quite a while.
Thus far I've done all the regular maintenance: plugs, wires, fuel filter and new O2's.
Also bought a used A9L ECM that came off of a running 91 hatch 5 speed that I haven't installed yet.
I also have a stock maff installed in my intake pipe but not connected.
Don't remember mentioning that my car is also automatic but I'm sure I did earlier in this thread last year.
So going over the info I posted regarding my car when I bought it, we are in agreement that it's a botched maff conversion.
My goal is to do this conversion correctly with the items needed of which I have.
Maff, A9L and maff harness that's been integrated or an actual 89-93 V8 harness installed.
I haven't checked for codes yet but will post new codes with its current VM1 ECM and we will go from there.
One question is since I did purchase a stick ECM for an auto, what are the dos and donts?
I know you can put an A9P or A9L in a stick car but how about an automatic?
limegold92 JRichker is the wiring/troubleshooting guru ( I think he must have been ELEN or AFIN or CNAD I'm not sure
 ). Holler if I can help.