New look! To an old fox

killrb said:
John, are you still looking for a hood? I can make you a sweet deal on the Boss Cyber Stallion hood I bought for my car and never used. It is un-painted and has the metal reinforcments from the factory for using hood lifters ($75 upgrade). All I did was put the two holes in it for the hood pins I was using. That thing cost me about $700 by the time it was shipped to me. $350 and it's yours!!!!!

Brandon

Hey you got pics of that hood? I've been looking for a 3" cowl hood.
 
  • Sponsors (?)


killrb said:
John, are you still looking for a hood? I can make you a sweet deal on the Boss Cyber Stallion hood I bought for my car and never used. It is un-painted and has the metal reinforcments from the factory for using hood lifters ($75 upgrade). All I did was put the two holes in it for the hood pins I was using. That thing cost me about $700 by the time it was shipped to me. $350 and it's yours!!!!!

Brandon
[email protected] lets see um? peace


john:p
 
Well heres an update on the progress dont have any pics yet but i'll post them up tomorrow night. Yesturday i got up at 4 A.M and ran around with roger getting seats and loading up the welder, till about 2:30P.M. Then i went to get the kids from school then came home went to applebees and started on the stang till 2 A.M this morning. Today i got up at 8:30 and started in on it again took a 2 hour break to go eat again and just finished for the day at 10:15 P.M. So today and lastnight i got eveything welded sanded and pulled the tranny cleaned it cleaned the engine put the harmonic balancer on put the oil pan gasket and pan back on put one coat of paint on the engine polished the throttle body and started to polish the radiator. Cleaned the garage up after today's work (always have a clean garage!) Tomorrow i wont work on it much exceptfor another coat or 2 of paint on the engine, cause we go bowling every sunday as a family and after wards i'll be meeting back up with chris for some more goodies then our family dinner tomorow night. My plans as it stands now for monday are clean and wash the grinding dust from the engine bay and puddy eveywhere where i ground the welds for smoooooooothness.
I have one question tho in these pics below on the firewall to the left of the wiper motor is a vac, block/T the line running over to the passenger side is labeled A/C so is this for the A/C or for the controls inside? Ive noticed when you turn the selctor knob from floor to vents to defrost you can kinda here a ssssssssss what i'm wanting to know is since i dont have A/C if i delete this line will my controls still work inside? What part of the "A/C" does this work?

emptybay1.jpg


engine1.jpg


peace


john:p
 

Attachments

  • emptybay1.jpg
    emptybay1.jpg
    42 KB · Views: 66
  • engine1.jpg
    engine1.jpg
    41.7 KB · Views: 67
Well just another update and some more pics. I got the intake painted the cover painted and polished, and got the holes puddy over to smooth them out, i also got them sanded but wont post them till tomorrow night. But here are some of the holes after puddy but before sanding:

puddybefore3.jpg


puddybefore2.jpg


puddybefore1.jpg


Oh BTW thanks to MONGOOSE for alll the pics!


peace


john:p
 

Attachments

  • puddybefore3.jpg
    puddybefore3.jpg
    64.1 KB · Views: 62
  • puddybefore1.jpg
    puddybefore1.jpg
    77.3 KB · Views: 62
  • puddybefore2.jpg
    puddybefore2.jpg
    78.6 KB · Views: 63
Couple more pics after sanding, but i had a little touch up to do so i need to sand it as well. I plan on priming and painting it this weekend and hopefully reassembly!

sandedbay3.jpg


sandedbay2.jpg


sandedbay1.jpg


peace


john:p
 

Attachments

  • sandedbay3.jpg
    sandedbay3.jpg
    80.7 KB · Views: 59
  • sandedbay2.jpg
    sandedbay2.jpg
    79.2 KB · Views: 60
  • sandedbay1.jpg
    sandedbay1.jpg
    88 KB · Views: 62
Well another update as of 4/02, i have everything sanded and 1 coat of primer, i located the battery to the trunk and ran the cable to the starter sylnoid, got the new wires, plugs and valve covers on and now waiting on the 3/8 spacer from summit i also boxed in the front frame rails, I will be sanding and then repriming again tomorrow and then again on wensday then paint and reassembly come thursday and friday night, and hopefully finishing this weekend, all i'll have left to do is the piece on the firewall and over the hood latch the hood shocks and get the headers done. Then its on to the line locks and rearend gurtel. I will post the pics as soon as "MONGOOSE" can make it over. peace


john:p
 
So well i just put down a coat of paint and will be doing so all night. But now that i've started to spray it i'm seeing little things i dont like. So when we meet up and ya see the job give me your HONEST OPINION! Dont worry you cant hurt my feelings, if it dosent look right well i guess it's back to the drawing board. peace


john:p
 
Man your kicking some butt. I wish I had that much time off to work on my little projects that never seem to get done. Thanks, now I want to pull my motor and start welding. What is your trick to plug the holes? Rivets? Brass blade?
 
DNA DOA said:
Man your kicking some butt. I wish I had that much time off to work on my little projects that never seem to get done. Thanks, now I want to pull my motor and start welding. What is your trick to plug the holes? Rivets? Brass blade?
Ancheint chinesee sercret :D No piece of cake man all but maybe a hand full of holes were done by triggering it in, for the big one where the window washer goes threw i cut a piece of sheet metal from work and the one on the passenger side i did the same with. The smaller bigger ones i put a backing on it and bondo'd them over. After i welded all the others up i bondo'd them as well to smooth them out. Turn the machine low cause alot of the sheet metal is realy thin, and i'm sure you know this but grind all the paint away before you weld the hole, makes it a tid bit easier. I'm not 100% satisfied with the way it's turning out as for i'm kinda anel like most of us are and i'm not no body man. "MONGOOSE" just left a little bit ago so the pics will be up tomorrow after 4 P.M. peace


john:p
 
Ok guys here are the pics
This one is of the passenger side after i boxed in the frameand filled the hole that is opened for some reason, there are 2 diffrent angles of it:


passengerside2.jpg


passengerside1.jpg


Here is a shot of the passenger side after some paint:


paintedpassengerside1.jpg


Here is a shot of the driver side aftresome paint:


painteddriverside1.jpg


Here are 2 shots of the wireing of the driver side:

driverside2.jpg


driverside1.jpg


This one is kinda dark but it's of the whole bay after some paint:


wholebaypainted.jpg


So now it's to the garage for some more painting, i did my headers at work today and should be getting my spacer from summit today or tomorrow so after i get it i will post before and after pics of the engine as well. peace


john:p
 

Attachments

  • passengerside2.jpg
    passengerside2.jpg
    53.6 KB · Views: 60
  • passengerside1.jpg
    passengerside1.jpg
    57.9 KB · Views: 59
  • paintedpassengerside1.jpg
    paintedpassengerside1.jpg
    52.1 KB · Views: 62
  • painteddriverside1.jpg
    painteddriverside1.jpg
    64.1 KB · Views: 58
  • wholebaypainted.jpg
    wholebaypainted.jpg
    57 KB · Views: 65
  • driverside1.jpg
    driverside1.jpg
    79.3 KB · Views: 60
  • driverside2.jpg
    driverside2.jpg
    84 KB · Views: 61
DNA DOA said:
Man you have coil overs too? Looks great. How are you applying the paint? Spray gun? What type of paint?
Well beleive it or not it's another ancient chineese secret again! :D No really it's just rattle can and i beleive krylon? Yes i have coil overs to ! All i can think of that i need or want is ther rearend gurtal. peace


john:p
 
Well some more pics after another 8 hour day and help from "MONGOOSE" all that is left to do now is extend the coolent resoiver wires and bleed the brakes, freash oil,filter, and coolant. So here is a shot of the engine before we droped it in for a test fit:


engineonstand2.jpg


engineonstand1.jpg


Here is two shots of the engine bay one is dark and one is bright:


finishedenigine2.jpg


finishedengine.jpg


I'm going to finish it up tomorrow morning and fire it up with open L/T"s :D. It piss's me off cause the polished valve covers i wanted to use hit the throttle bracket so i'm gonna have to take it to work on monday or tuesday and fix it, so for now i will run the stocker's? peace


john:p
 

Attachments

  • engineonstand2.jpg
    engineonstand2.jpg
    78.2 KB · Views: 63
  • engineonstand1.jpg
    engineonstand1.jpg
    76.5 KB · Views: 65
  • finishedenigine2.jpg
    finishedenigine2.jpg
    80 KB · Views: 66
  • finishedengine.jpg
    finishedengine.jpg
    54.6 KB · Views: 62
Well its 99.9999% done, well at least that part of the project is. Now i need to get the bottle installed and going and ah chit more wires to hide and other stuff :nonono: 
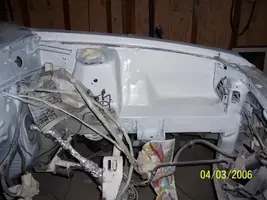
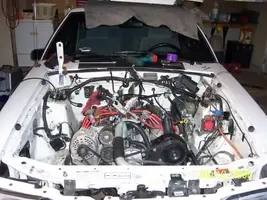
. So i figured it up and i have about 126 or so hours in the project. I've had 4 people see it and they all said looks good killer great :shrug: 
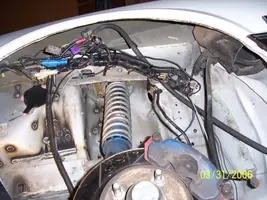
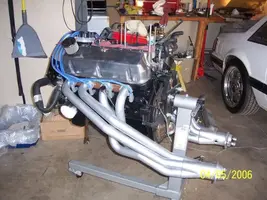
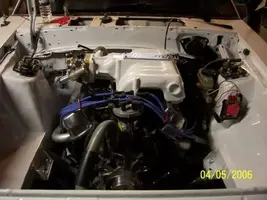
Me i'm not satisfied with it tho. Sooooo this winter it's back at it again. I think it came out fair but not what i expected. The stock valve covers dont look right in ther but as soon as i get the polished ones in it will look better!. So at our next meet up if ya wanna see my ****ty work just ask! Big thanks to roger & rod for all the help they put in and the lonnnnng work nights. BTW those damn tremecs are heavy! peace


john:p
 
Well everything is done except for a few minor details, so here are some pics:

This is a pic of the engine compartment before i loomed the coil and overflow sencer and without the polished valve covers:
finishedproject1.jpg


Here is a couple of the underside :D preaty cool pic if ya ask me:


cannons2.jpg


cannons1.jpg


peace


john:p
 

Attachments

  • cannons2.jpg
    cannons2.jpg
    22.6 KB · Views: 61
  • finishedproject1.jpg
    finishedproject1.jpg
    39.7 KB · Views: 62
  • cannons1.jpg
    cannons1.jpg
    18.5 KB · Views: 62