Figure I'd make this thread to keep track of my work vs having it mixed into my progress thread. I'm going through both my original mirrors and have learned a few tips/tricks. This might be of value to someone in the future that wants to preserve their original mirrors for some reason, or not want to take a chance buying used junk, or maybe have custom painted mirrors.
First off, remove your mirror. Door panel needs to come off to reach the electrical plug, but after that, simply remove the inside cover (1 screw) and then remove the two small nuts and you can get the mirror off.
Glass removal. Up to around 1990/1992, the glass frame was bonded to the motor by plastic. After that it was a clip on style that could easily be removed and replaced. I do not know what year exactly this change happened though.
To remove the motor/glass assembly, you need to tilt the mirror full up and in. Hopefully your mirror still works and you can do this. If not, you'll need to try and carefully break the mirror free at the 4 posts holding the glass frame in (pics below to understand what I mean). In my case, the mirror would go up/down, but not side to side. If I "helped" it along, it would move a bit, so that is how I got it in positon to remove.
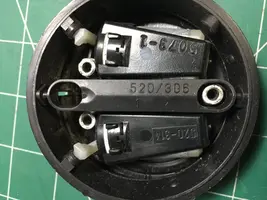
With the mirror tilted, there are two screws inside to be removed, and 1 screw where the mirror bolts to the door. (pic below of two behind glass - one screw removed already)

The motor/glass will pull out like so. At this point, your mirror housing is empty, so clean it, paint it, sand it, etc. Now's the perfect time.

Now, if you managed to get it off with the glass intact, you can see the 4 plastic melt points holding the frame on. These will usually break if you try to pry the mirror glass off. You can try to melt them off with a soldering iron, but then you might run into trouble when it comes time to reinstall

I took a sharp exacto knife and sliced off the heads.

I removed the motor, and trimmed the area flush, as seen below

Now, using a #40 drill bit, I drilled a hole where each pin was located. Go slowly and let the bit do the work. I went down until I felt contact with the glass

Afte that, some 4-40 x 1/4" long screws thread themselves right in, and you can reassemble with a new motor/glass or whatever you need to do.


First off, remove your mirror. Door panel needs to come off to reach the electrical plug, but after that, simply remove the inside cover (1 screw) and then remove the two small nuts and you can get the mirror off.
Glass removal. Up to around 1990/1992, the glass frame was bonded to the motor by plastic. After that it was a clip on style that could easily be removed and replaced. I do not know what year exactly this change happened though.
To remove the motor/glass assembly, you need to tilt the mirror full up and in. Hopefully your mirror still works and you can do this. If not, you'll need to try and carefully break the mirror free at the 4 posts holding the glass frame in (pics below to understand what I mean). In my case, the mirror would go up/down, but not side to side. If I "helped" it along, it would move a bit, so that is how I got it in positon to remove.
With the mirror tilted, there are two screws inside to be removed, and 1 screw where the mirror bolts to the door. (pic below of two behind glass - one screw removed already)
The motor/glass will pull out like so. At this point, your mirror housing is empty, so clean it, paint it, sand it, etc. Now's the perfect time.
Now, if you managed to get it off with the glass intact, you can see the 4 plastic melt points holding the frame on. These will usually break if you try to pry the mirror glass off. You can try to melt them off with a soldering iron, but then you might run into trouble when it comes time to reinstall
I took a sharp exacto knife and sliced off the heads.
I removed the motor, and trimmed the area flush, as seen below
Now, using a #40 drill bit, I drilled a hole where each pin was located. Go slowly and let the bit do the work. I went down until I felt contact with the glass
Afte that, some 4-40 x 1/4" long screws thread themselves right in, and you can reassemble with a new motor/glass or whatever you need to do.
Last edited: