
Worked on Dynamat yesterday and today. Still more to go on the doors.


You are using an out of date browser. It may not display this or other websites correctly.
You should upgrade or use an alternative browser.
You should upgrade or use an alternative browser.
Progress Thread 43 years later
- Thread starter Enzio
- Start date

Spent the day in frustration. I'm trying to adjust the door windows. Does anyone here have any suggestions? For example do you try to make one adjustment at a time or do you loosen all adjustments and hold the window in place while an unnamed helper tightens everything down?
Spent the day in frustration. I'm trying to adjust the door windows. Does anyone here have any suggestions? For example do you try to make one adjustment at a time or do you loosen all adjustments and hold the window in place while an unnamed helper tightens everything down?
I don't know if I'll be of any real help, but I did mine one adjustment at a time. I started off with the closed height and kept it short intentionally. Then messed with the up/down angle. Once that was set I adjusted the top stops. Honestly, I don't think I was ever able to get my driver side right again. Passenger side isn't too bad though.....


Got both windows very close. Happy for now. Will try to adjust one more time before I close up the doors. What do we use for lubricant on the weather stripping?
Tore the dash apart to get after the heater core. (The last time I did this my father was there to help...get more beer.) Here's what that mess looks like.
Yes there's a massive mouse nest.
So I'll replace the blower motor and clean everything up. But not tomorrow. I'm going to relax by discharging firearms.
Attachments


Yes there's a massive mouse nest.
At them rat bastards!I'm going to relax by discharging firearms.
Did well today. Removed the old heater core and got the new one in the heater box. Everything went pretty well except drilling out the old pop rivets. Now I'm waiting for the replacement blower motor.

Now to take care of this mess!

I call this progress...

Now to take care of this mess!
I call this progress...
You were able to get it out without removing the dash?! I've only had mine out when I tore my car completely down, but good to see it can be done without tearing everything apart.
Yes. This is the third time I've done it. And, I think it was the easiest. The trick is to place some plastic in the passenger well to catch the antifreeze left in the core itself. (and most of the mouse crap)You were able to get it out without removing the dash?! I've only had mine out when I tore my car completely down, but good to see it can be done without tearing everything apart.
I've been working too hard for a retired guy so I'm taking the rest of the afternoon off. Besides it's 83 and the dewpoint is around 70. Really muggy for May in Minnesota. And I'm waiting for a few parts.
Heater core is back in. It went well. Before I put it in I tore out all the old insulation I could reach and covered it with Dynomat. I'm still working on the dash pad and other stuff.


Yesterday I replaced the heater hoses and today I cleaned up the engine bay. It is cleaner now than ever before and probably cleaner than it'll ever be again. I still have some stuff to do but this is where it's at.


Heater core is back in. It went well. Before I put it in I tore out all the old insulation I could reach and covered it with Dynomat. I'm still working on the dash pad and other stuff.
Yesterday I replaced the heater hoses and today I cleaned up the engine bay. It is cleaner now than ever before and probably cleaner than it'll ever be again. I still have some stuff to do but this is where it's at.
extra_stout
5 Year Member
What are you doing to it? Put on new vinyl? Or do you paint it?I'm still working on the dash pad
I put new vinyl on mine, but yours look much better
")
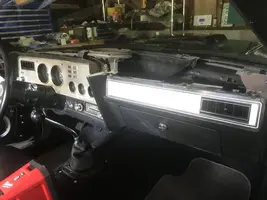
Although my dash pad was in reasonable shape it was cracked and bubbled. I bought a wrap from Classic Auto Reproductions and glued it on with the provided silicone. I think it looks substantially better but feels like plastic which it is. You loose the soft feel. Now though, I'm going to need to match the color by painting all the panels in the car.What are you doing to it? Put on new vinyl? Or do you paint it?
I put new vinyl on mine, but yours look much better
It's just a protective strip of film on the chrome. I'll peel it off when I put it in.What with the blue strip on console
Man it's weird weather. High today of 46. Raining hard all day. I'm typing real slow cause my hands are cold. Anyway, I took care of a problem that's been bugging me for a long time. Because I've got a hydraulic clutch now I can finally close up the hole for the clutch fork. Here's what I started with.

So I went to the hardware store and bought a small piece of sheet steel, bent it close to what it needed to be. I also bought a heavy 4" rubber plumbing fitting and cut it to match.

Then after crawling under the car multiple times...


So I went to the hardware store and bought a small piece of sheet steel, bent it close to what it needed to be. I also bought a heavy 4" rubber plumbing fitting and cut it to match.
Then after crawling under the car multiple times...
extra_stout
5 Year Member

Good point! I could use some gasket material but I can't think of how to protect the hydraulic lines from wearing on the edge of the hole without taking apart the line and feeding it through a chase nipple. Then re-bleeding. Ideas? I'm still waiting on some parts so I'll take time to see what I can find.I worry about the rubber, so close to the exhaust and so few friends.
Similar threads
- Replies
- 1
- Views
- 171
- Replies
- 21
- Views
- 648
- Replies
- 24
- Views
- 1K
- Replies
- 27
- Views
- 615