'88 GT Convertible - Croatia, Europe

snovak

Active Member
Oct 9, 2020
254
137
53
Croatia
Hi!

As I allready mentioned in welcome wagon, will repeat partly:

So, beside work, kids, motorcycle... about a week ago I bought myself a worries... :)
GT Convertible, 1988, Scarlet Red. AOD - Automatic. 140.000km's on the clock (Canadian), ~87.500 miles if you want.
I would say stock (until I start to more seriously take it apart). From history I can tell that car was back in '88 sold to Ontario, Canada and first time appears in Croatia in 1996.

Mustang support is awful in Europe, especially for foxbody. I have one parts store in Croatia, but don't ask for prices (3-4 days delivery like +20%), but also for normal 30-days delivery prices are awful (taxes, import fees).
No junkyards with mustangs or 302 engines here, it is a rarity :-(. A lot of Yugo, Fiat coffe grinders, but V8 is rarity. So I will have to put a lot effort in this one.

Bought it to save and restore as much as I can (time + $ allowance).
Registration for historic vehicle license plates in process, so we will use it for enjoying sunny weekends (I have 7 and 9yo boys)


What we saw before actually buying car:
- vacuum leak (engine a little bit rough at idle)
- visible traces of valve cover leaks to back of engine
- AC not working (or AC delete, didn't explain - "don't know" face)
- cylinder 4 weak exhaust temperature, but working (spark plugs apparently 8 yo)
- roof vinyl damaged (two holes, patched, not so bad)
- a little bit rust in engine compartment (visually surface rust)
- exhaust in weak condition


Okay, what we found out after 100km (~62 miles) drive home and in short time:
- steering from time to time...hmm more single "click" than loose, not always
- horn not working
- passenger window not working
- passenger door has to be slammed real good to close, trouble to lock
- hood not opening on button from glove box
- a little bit of low volume humming in cruise (pedal not pressed or depressed, just keeping feather foot), coming under the car (clutch/gearbox?).
- wiggling on rough road, like I drive a banana skin (not used to that here in VW/Audi's)
- LEAKING in back of oil pan, I suppose comming from valve cover (visible fresh layer of oil)

Apparently car was parked since 2014. Top engine leakage opening and brake cylinders may be the proof the seller was not lying.
Due to engine dirtiness, we may have luck and have a virgin engine.... but we will see when we open it up.

I went to pre-registration check:
- back brakes only 10% (checked, back wheel brake cylinders locked, orderd new ones, arrived today)
- front right tie rod (that was clicking when steering, ordered arriving today)

Fixing both last mentioned tomorrow morning.
I hope we will pass registration check tomorrow!

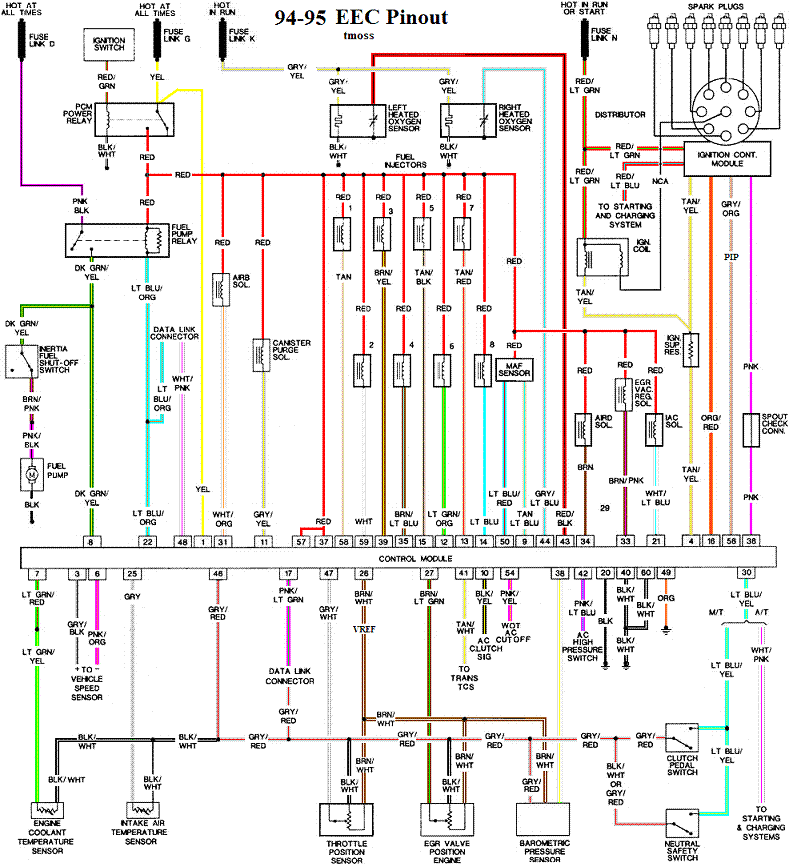
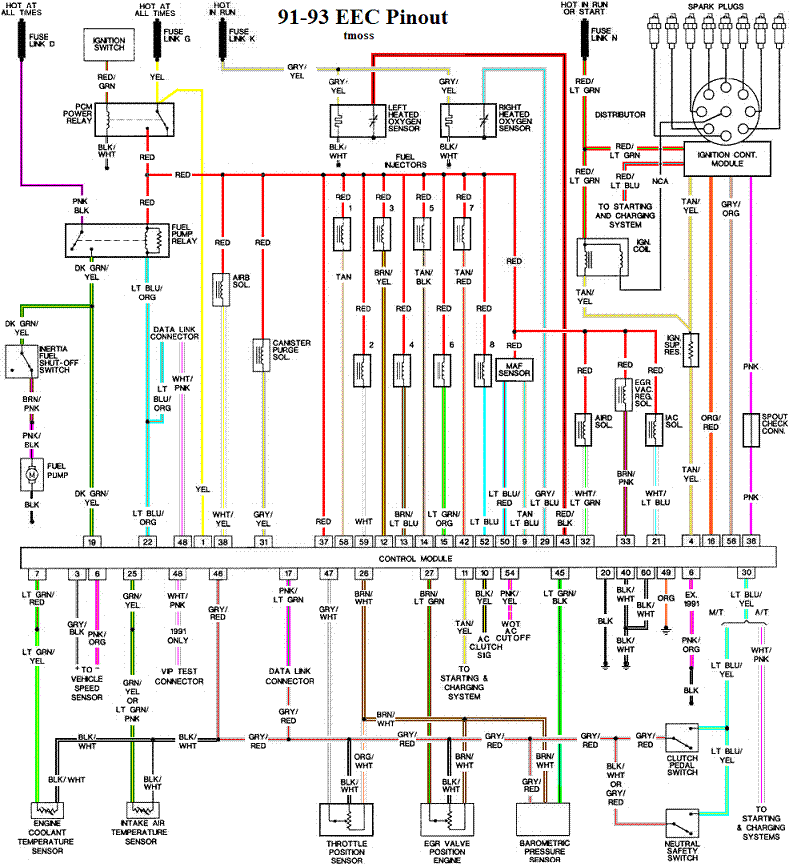
I checked simple things here on forum search as horn fix (still need to try).
BTW also must check cigarette lighter, cause horn and back hood could share a same circuit and could only be a simple blown fuse as I read here...
What I have done? Took rear brake drums, sandblasted them good and painted in black 600°C paint to have much nicer upcoming cylinders change job :)

Eitherway I will have thousands of questions... first of them:
1) I ordered NGK 6945 (UR45) spark plugs (more accessable in Europe than us brands). Shall I try to change plugs even before vacuum leak fix or leave it for after a point 2 will be done?
2) I have Felpro 260-1445 set. The plan is to open engine up to valves, fix that leak. Shall we go further or better not touch the head when it is not leaking as many say?

Thank You fellow foxbody lovers and greetings from Croatia!
 

Attachments

  • IMG_20201001_172546.jpg
    IMG_20201001_172546.jpg
    673 KB · Views: 248
  • IMG_20201001_172727.jpg
    IMG_20201001_172727.jpg
    685.9 KB · Views: 235
  • Like
Reactions: 3 users
  • Sponsors (?)


Fortunately, vacuum hose is something your parts shop should have for a reasonable price.
 
  • Like
Reactions: 1 user
Okay, except for enjoying ride in sun and watching closely for temperatures (which I have to say are rock stable), I noticed following:
**bought car three weeks ago, assuming a vacuum problem**
- engine still shaking at idle
- washed all deposits off the engine and I assume now it's a bottom intake leak at back side of engine instead of valve cover as initial suspect (but they leak top). seems like oil is coming from middle of the engine where intake manifold meets block. strangely, I can see thin oil traces like sourcing from valve cover bolts?!?
- new oil marks between water pump and ignition, can't confirm or source them 100% confidently...
- oil is draining back down thru bellhouse on floor, easily beeing mistaked for a main seal or transmission leak being thrown with wind in drive to transmission pan....
- brake hissing when beeing pressed (like on old trucks or buses). then it holds brake, no hissing. is this normal for a fox? I know how brake booster leak should sound: it will hiss all the time when You hold it.
- oil temperature drops slightly when hot and when I push it really - this is normal on 5.0 fox? (something like from middle of scale to almost 1/4 on scale - so down)
- area around throttle body and IAF got dirty (looking like carbon)
- on cold start engine shuts down and soon as it revs by itself. second start will catch up with a little bit of looking for idle RPM, but then it stabilizes in few seconds
- engine shakes more when it is hot
- proportional valve has a DOT3 slight leak (just to fill screw hole) at front bottom screw (looking from front of the car)
- cylinder 5 inspected with chinese boroscope cam, looking good, stock piston, crosslines still visible (~88k), spark plug for a reference picture. still did not check others
- loud and intensive/huge suck sound when I kill the engine from area below EGR and sometimes not loud but very high pitch noise/squil (cant describe it) at high RPM approx from that area, not continuos
- also that cylinder below EGR has lower exhaust manifold temperature (vacuum leak?)

When waiting for oil to come and drip I fixed following:
- cooling system drained, filled with radiator cleaning additive and poured in new antifreeze
- reverse engineered 3D printer door striker bushing design. used ABS. doors are closing now like on Audi :)
- reverse engineered 3D hood support retaining clip (not sure how you call that). used PLA
- got new ngk ur45 spark plugs

Regarding 3d printer design, is there a topic where we can share stl models?

If anybody has advice or recommendation based on facts mentioned I am listening carefully...

My next steps, hopefully today, include:
- taking PCV valve out and checking if it's also bone stock 32 yo.... maybe all od the leaks may be caused by clogged PCV screen. will clean the hell out of it eitherway
- try to read errors with jump wire and bulb

Greetings from Croatia to all!
 
Hello

Okay, bad news. Maybe.
After I run error codes I found the problem why the car goes like :poo:...
I looked for PCV valve and looked for a thing looking like on LMR site.
What I found was a loose hose routed to front of intake manifold.
At the end of hose where PCV should be was a black plastic part connected straight, not angled like LMR PCV. I put my fingers in PCV hole and had a feeling there is nothing inside, no grommet, no screen/filter, just a pile of sticky oil residues.
At that point I needed to leave so I stuck that plastic to PCV hole. Went in tight. Holy crap...
First thing tomorrow after work I will check what the black part is, a fitting only or maybe some PCV from other car improvised.
I wont start the car before that, but that thing was loose, loose out of bottom PCV hole so it may be the whole vacuum problem....

Was that a PO improvisation?

If there was a direct hose, no PCV or filter, for x years (dont know when PO did that)... What are the consequences? Everything from there was sucked into upper intake....

Any advices?
 
Ohh, I got codes before PCV shock:

KOEO, engine off:
1st run: 87
2nd run: 87
KOER, engine on, intentional cold start:
1st run: 12 21 41 13
2nd run: 12 21 41
3rn run: 12 41
4th run: 12 41

Okay, KOER complaints about ECT out of range cause of cold start and ISC motor.
After 2 runs there are only IAB low idle and 41 lean.

I should adjust idle. What about 41, lean?
 
PCV pleaded not guilty.
Was dirty but I think not enough to be clogged. Rubber is plastic allthru... need to change that.

Next steps are cleaning IAB and TB...
 

Attachments

  • IMG_20201029_151458.jpg
    IMG_20201029_151458.jpg
    150.7 KB · Views: 227
Yap. Cleaned it with 1 carb + 1 brake cleaner can. Shining bright as new.

Today I cleaned also IAB and TB. Found sticker from factory in IAB, is from Ford plant '88. IAB seal is bad... More as I dig, more I think I may own a 'virgin' car. Today I also saw factory label on test cables....

Didn't fix too much with idling situation. I am more and more sure it is a bottom intake. You can hear around cylinder 4 something like dentist drill sound and then RPM dances a little bit. I suppose we will find a leak of the bottom intake there.

Still error 12 and 41. God knows if O2 sensors are in place... Are those 02 a generic car parts? Anyone has a ID?

Run a cylinder balance test, result 9. Now I read I can do also 2nd and 3rd pass... Tomorrow :)
 
  • Like
Reactions: 1 user
Code 12 & 412 -Idle Air Bypass motor not controlling idle properly (generally idle too low) - IAB dirty or not working. Clean the electrical contacts with non flammable brake parts cleaner at the same time.

IAC doesn't work: look for +12 volts at the IAC red wire. Then check for continuity between the white/lt blue wire and pin 21 on the computer. The IAC connector contacts will sometimes corrode and make the IAC not work. The red wire on the IAC is always hot with the engine in run mode. The computer provides a ground for the current for the IAC. It switches the ground on and off, making a square wave with a varying duty cycle. A normal square wave would be on for 50% of the time and off for 50% of the time. When the idle speed is low, the duty cycle increases more than 50% to open the IAC more. When the engine speed is high, it decreases the duty cycle to less than 50% to close the IAC. An old-fashioned dwell meter can be used to check the change: I haven’t tried it personally, but it should work. In theory, it should read ½ scale of whatever range you set it on with a 50% duty cycle. An Oscilloscope is even better if you can find someone who has one and will help.

attachments\58887


Recommended procedure for cleaning the IAC/IAB:
Conventional cleaning methods like throttle body cleaner aren’t very effective. The best method is a soak type cleaner used for carburetors. If you are into fixing motorcycles, jet skis, snowmobiles or anything else with a small carburetor, you probably have used the one gallon soak cleaners like Gunk or Berryman. One of the two should be available at your local auto parts store for $22-$29. Take the solenoid off the body and set it aside: the carb cleaner will damage some types of plastic parts. Soak the metal body in the carb cleaner overnight. There is a basket to set the parts in while they are soaking. When you finish soaking overnight, twist the stem of the IAB/IAC that sticks out while the blocker valve is seated. This removes any leftover deposits from the blocker valve seat. Rinse the part off with water and blow it dry with compressed air. The IAC/IAB should seal up nicely now. Once it has dried, try blowing through the bottom hole and it should block the air flow. Reassemble and reinstall to check it out.

Gunk Dip type carb & parts soaker:
21hb0QWbOeL._SL500_AA300_.jpg


Setting the base idle speed:
First of all, the idle needs to be adjusted to where the speed is at or below 600 RPM with the IAC disconnected. If you have a wild cam, you may have to raise this figure 100-150 RPM or so. Then the electrical signal through the IAC can vary the airflow through it under computer control. Remember that the IAC can only add air to increase the base idle speed set by the mechanical adjustment. The 600 RPM base idle speed is what you have after the mechanical adjustment. The IAC increases that speed by supplying more air under computer control to raise the RPM’s to 650-725 RPM’s. This figure will increase if you have a wild cam, and may end up between 800-950 RPM

Remember that changing the mechanical idle speed adjustment changes the TPS setting too.

This isn't the method Ford uses, but it does work. Do not attempt to set the idle speed until you have fixed all the codes and are sure that there are no vacuum leaks.

Disconnect the battery negative terminal and turn the headlights on. Leave the battery negative terminal disconnected for 5 minutes or so. Then turn the headlights off and reconnect the battery. This erases the computer settings that may affect idle performance.

Warm the engine up to operating temperature, place the transmission in neutral, and set the parking brake. Turn off lights, A/C, all unnecessary electrical loads. Disconnect the IAC electrical connector. Remove the SPOUT plug. This will lock the ignition timing so that the computer won't change the spark advance, which changes the idle speed. Note the engine RPM: use the mechanical adjustment screw under the throttle body to raise or lower the RPM until you get the 600 RPM mark +/- 25 RPM. A wild cam may make it necessary to increase the 600 RPM figure to 700 RPM or possibly a little more to get a stable idle speed.
Changing the mechanical adjustment changes the TPS, so you will need to set it.

When you are satisfied with the results, turn off the engine, and re-install the SPOUT and reconnect the IAC. The engine should idle with the range of 650-750 RPM without the A/C on or extra electrical loads. A wild cam may make this figure somewhat higher.

An engine that whose idle speed cannot be set at 600 RPM with the IAC disconnected has mechanical problems. Vacuum leaks are the #1 suspect in this case. A vacuum gauge will help pinpoint both vacuum leaks and improperly adjusted valves. A sticking valve or one adjusted too tight will cause low vacuum and a 5"-8" sweep every time the bad cylinder comes up on compression stroke. An extreme cam can make the 600 RPM set point difficult to set. Contact your cam supplier or manufacturer to get information on idle speed and quality


Code 41 or 91. Or 43 Three digit code 172 or 176 - O2 sensor indicates system lean. Look for a vacuum leak or failing O2 sensor.

Revised 01 Sep 2019 1.) To emphasize do not attempt to measure the O2 sensor resistance. Disconnect the O2 sensor from the wiring before doing any resistance checking of the sensor to computer wiring.

Code 41 is the passenger side sensor, as viewed from the driver's seat.
Code 91 is the driver side sensor, as viewed from the driver's seat.

Code 172 is the passenger side sensor as viewed from the driver's seat.
Code 176 is the driver side sensor, as viewed from the driver's seat.

Code 43 is not side specific according to the Probst Ford Fuel injection book.

The computer sees a lean mixture signal coming from the O2 sensors and tries to compensate by adding more fuel. Many times the end result is an engine that runs pig rich and stinks of unburned fuel.

The following is a Quote from Charles O. Probst, Ford fuel Injection & Electronic Engine control:

"When the mixture is lean, the exhaust gas has oxygen, about the same amount as the ambient air. So the sensor will generate less than 400 Millivolts. Remember lean = less voltage.
When the mixture is rich, there's less oxygen in the exhaust than in the ambient air , so voltage is generated between the two sides of the tip. The voltage is greater than 600 millivolts. Remember rich = more voltage.
Here's a tip: the newer the sensor, the more the voltage changes, swinging from as low as 0.1 volt to as much as 0.9 volt. As an oxygen sensor ages, the voltage changes get smaller and slower - the voltage change lags behind the change in exhaust gas oxygen.

Because the oxygen sensor generates its own voltage, never apply voltage and never measure resistance of the O2 sensor. Before checking the O2 sensor circuit wiring resistance, disconnect the O2 sensor from the rest of the circuit wiring. To measure voltage signals, use an analog voltmeter with a high input impedance, at least 10 megohms. Remember, a digital voltmeter will average a changing voltage. End Quote

Testing the O2 sensors 87-93 5.0 Mustangs

Measuring the O2 sensor voltage at the computer will give you a good idea of how well they are working. You'll have to pull the passenger side kick panel off to gain access to the computer connector. Remove the plastic wiring cover to get to the back side of the wiring. Use a safety pin or paper clip to probe the connections from the rear.


Disconnect the O2 sensor from the harness and use the body side O2 sensor harness as the starting point for testing. Do not measure the resistance of the O2 sensor, you may damage it. Resistance measurements for the O2 sensor harness are made with one meter lead on the O2 sensor harness and the other meter lead on the computer wire or pin for the O2 sensor.
Computer wiring harness connector, computer side.
88243.gif


Backside view of the computer wiring connector:
71316.gif


87-90 5.0 Mustangs:
Computer pin 43 Dark blue/Lt green – LH O2 sensor
Computer pin 29 Dark Green/Pink – RH O2 sensor

The computer pins are 29 (RH O2 with a dark green/pink wire) and 43 (LH O2 with a dark blue/lt green wire). Use the ground next to the computer to ground the voltmeter. The O2 sensor voltage should switch between .2-.9 volt at idle.


91-93 5.0 Mustangs:
Computer pin 43 Red/Black – LH O2 sensor
Computer pin 29 Gray/Lt blue – RH O2 sensor

The computer pins are 29 (RH O2 with a Gray/Lt blue wire) and 43 (LH O2 with a Red/Black wire). Use the ground next to the computer to ground the voltmeter. The O2 sensor voltage should switch between .2-.9 volt at idle.


94-95 5.0 Mustangs; note that the 94-95 uses a 4 wire O2 sensor.
The computer pins are 29 (LH O2 with a red/black wire) and 27 (RH O2 with a gray/lt blue wire). Use pin 32 (gray/red wire) to ground the voltmeter. . The O2 sensor voltage should switch between .2-.9 volt at idle.


Note that all resistance tests must be done with power off. Measuring resistance with a circuit powered on will give false readings and possibly damage the meter. Do not attempt to measure the resistance of the O2 sensors, it may damage them.

Testing the O2 sensor wiring harness
Most of the common multimeters have a resistance scale. Be sure the O2 sensors are disconnected and measure the resistance from the O2 sensor body harness to the pins on the computer. Using the Low Ohms range (usually 200 Ohms) you should see less than 1.5 Ohms.


87-90 5.0 Mustangs:
Computer pin 43 Dark blue/Lt green – LH O2 sensor
Computer pin 29 Dark Green/Pink – RH O2 sensor
Disconnect the connector from the O2 sensor and measure the resistance:
From the Dark blue/Lt green wire in the LH O2 sensor harness and the Dark blue/Lt green wire on the computer pin 43
From the Dark Green/Pink wire on the RH O2 sensor harness and the Dark Green/Pink wire on the computer pin 29


91-93 5.0 Mustangs:
Computer pin 43 Red/Black – LH O2 sensor
Computer pin 29 Gray/Lt blue – RH O2 sensor
Disconnect the connector from the O2 sensor and measure the resistance:
From the Red/Black wire in the LH O2 sensor harness and the Red/Black wire on the computer pin 43
From the Gray/Lt blue wire on the RH O2 sensor harness and the Gray/Lt blue wire on the computer pin 29

94-95 5.0 Mustangs:
Computer pin 29 Red/Black – LH O2 sensor
Computer pin 27 Gray/Lt blue – RH O2 sensor
From the Red/Black wire in the LH O2 sensor harness and the Red/Black wire on the computer pin 29
From the Dark Green/Pink Gray/Lt blue wire on the RH O2 sensor harness and the Gray/Lt blue wire on the computer pin 27


There is a connector between the body harness and the O2 sensor harness. Make sure the connectors are mated together, the contacts and wiring are not damaged, and the contacts are clean and not coated with oil.

The O2 sensor ground (orange wire with a ring terminal on it) is in the wiring harness for the fuel injection wiring. I grounded mine to one of the intake manifold bolts

Check the fuel pressure – the fuel pressure is 37-41 PSI with the vacuum disconnected and the engine idling. Fuel pressure out of range can cause the 41 & 91 codes together. It will not cause a single code, only both codes together.

Make sure you have the proper 3 wire O2 sensors. Only the 4 cylinder cars used a 4 wire sensor, which is not compatible with the V8 wiring harness. The exception is that the 94-95 uses a 4 wire O2 sensor.

Replace the O2 sensors in pairs if replacement is indicated. If one is weak or bad, the other one probably isn't far behind.

Code 41 can also be due to carbon plugging the driver’s side Thermactor air crossover tube on the back of the engine. The tube fills up with carbon and does not pass air to the driver’s side head ports. This puts an excess amount of air in the passenger side exhaust and can set the code 41. Remove the tube and clean it out so that both sides get good airflow: this may be more difficult than it sounds. You need something like a mini rotor-rooter to do the job because of the curves in the tube. Something like the outer spiral jacket of a flexible push-pull cable may be the thing that does the trick.

If you get only code 41 and have changed the sensor, look for vacuum leaks. This is especially true if you are having idle problems. The small plastic tubing is very brittle after many years of the heating it receives. Replace the tubing and check the PVC and the hoses connected to it.

Complete computer, actuator & sensor wiring diagram for 94-95 Mustangs
94-95_5.0_EEC_Wiring_Diagram.gif


Complete computer, actuator & sensor wiring diagram for 91-93 Mass Air Mustangs
91-93_5.0_EEC_Wiring_Diagram.gif


Complete computer, actuator & sensor wiring diagram for 88-90 Mass Air Mustangs
88-91_5.0_EEC_Wiring_Diagram.gif
 
  • Like
Reactions: 1 user