Fuel Car Runs Unbelievably Rich

Blake Willis

Active User
Sep 21, 2016
10
1
13
Hey guys! I've been trying to figure out this problem since I bought the car back in June. The car is a 1990 Mustang Gt. Now this is how the problem started, the car had a idle fluctuation. The connector to the MAF had a broken clip so it wouldn't stay plugged in. So I got a new one, replaced it to see if that would fix the issue. It did not. So my next thought was to replace the MAF sensor itself. Which I did with OEM MAF from Ford. This fixed the idle issue for a moment. This is when the frustrating part started happening, when the MAF was plugged in the car started running rich, which at first was drivable, but quickly started to diminish. This is when I got the codes read. At first there was about 3 or 4 codes dealing with the MAF cleared the codes then no codes came up. Well the car kept getting worse and worse, it would start pumping so much fuel through it, black smoke would start to pour out of the exhaust. It got so bad that it would literally flood the engine. After literally weeks and weeks of trying to find someone with a similar issue I found some information that it could be a fuel pump relay. So fast forward to this evening I replaced that relay which worked!! Only for about 10 minutes. The car actually held an idle 1100 rpm a little high but it was a start. I was excited it started to feel like I was getting somewhere. Right around the 10 minute mark, the car start fluctuating idle, then the fuel started flowing, black smoke, all the old problem was bad. But this is whats interesting when the idle started fluctuating the CEL started flashing with the fluctuation. Then it stayed solid that when it was running super rich. I'm getting close to just pouring some gas on the car and tossing a match. I plan on doing the fuel pump next, fuel pressure regulator, then possibly a new ecu. I'm just wondering if anyone has had anything similar happen to their Fox. I'm more worried about the fuel issue, not so much the idle issue. Thanks!
 
  • Sponsors (?)


Clearing the codes does not fix what caused them.

Guessing and throwing parts and money at a problem is a bad way to try fix a problem. You end up poorer and nothing to show for it except frustration and an empty wallet.

These cars will provide good diagnostic data for you to use it to fix the problem.
Dump the codes again, both engine not running and engine running codes and post the numeric values. I have 5.0 fox specific code definitions and fixes, and I will try to help you.
 
Last edited:
Clearing the codes does not fix what caused them.

Guessing and throwing parts and money at a problem is a bad way to try fix a problem. You end up poorer and nothing to show for it except frustration and an empty wallet.

These cars will provide good diagnostic data for you to use it to fix the problem.
Dump the codes again, both engine not running and engine running codes and post the numeric values. I have 5.0 fox specific code definitions and fixes, and I will try to help you.
The codes that came up, only came up because I disconnected the maf, so I could limp it to a friend that had a scanner for OBD1
 
Clearing the codes does not fix what caused them.

Guessing and throwing parts and money at a problem is a bad way to try fix a problem. You end up poorer and nothing to show for it except frustration and an empty wallet.

These cars will provide good diagnostic data for you to use it to fix the problem.
Dump the codes again, both engine not running and engine running codes and post the numeric values. I have 5.0 fox specific code definitions and fixes, and I will try to help you.
But I will go get the codes checked again.
 
Hey guys! I've been trying to figure out this problem since I bought the car back in June. The car is a 1990 Mustang Gt. Now this is how the problem started, the car had a idle fluctuation. The connector to the MAF had a broken clip so it wouldn't stay plugged in. So I got a new one, replaced it to see if that would fix the issue. It did not. So my next thought was to replace the MAF sensor itself. Which I did with OEM MAF from Ford. This fixed the idle issue for a moment. This is when the frustrating part started happening, when the MAF was plugged in the car started running rich, which at first was drivable, but quickly started to diminish. This is when I got the codes read. At first there was about 3 or 4 codes dealing with the MAF cleared the codes then no codes came up. Well the car kept getting worse and worse, it would start pumping so much fuel through it, black smoke would start to pour out of the exhaust. It got so bad that it would literally flood the engine. After literally weeks and weeks of trying to find someone with a similar issue I found some information that it could be a fuel pump relay. So fast forward to this evening I replaced that relay which worked!! Only for about 10 minutes. The car actually held an idle 1100 rpm a little high but it was a start. I was excited it started to feel like I was getting somewhere. Right around the 10 minute mark, the car start fluctuating idle, then the fuel started flowing, black smoke, all the old problem was bad. But this is whats interesting when the idle started fluctuating the CEL started flashing with the fluctuation. Then it stayed solid that when it was running super rich. I'm getting close to just pouring some gas on the car and tossing a match. I plan on doing the fuel pump next, fuel pressure regulator, then possibly a new ecu. I'm just wondering if anyone has had anything similar happen to their Fox. I'm more worried about the fuel issue, not so much the idle issue. Thanks!
I messed up one detail. The CEL flashing with the fluctuation, the CEL didn't stay solid it went off. So it started dumping fuel with no CEL.
 
  • Like
Reactions: 1 user
Dump the codes: Codes may be present even if the Check Engine Light (CEL) isn't on.

Dumping the computer diagnostic codes on 86-95 Mustangs

Revised 26-July-2011. Added need to make sure the clutch is pressed when dumping codes.

Codes may be present even if the check engine light hasn’t come on, so be sure to check for them.

Here's the way to dump the computer codes with only a jumper wire or paper clip and the check engine light, or test light or voltmeter. I’ve used it for years, and it works great. You watch the flashing test lamp or Check Engine Light and count the flashes.

Post the codes you get and I will post 86-93 model 5.0 Mustang specific code definitions and fixes. I do not have a complete listing for 94-95 model 5.0 Mustangs at this time.

Be sure to turn off the A/C, and put the transmission in neutral when dumping the codes. On a manual transmission car, be sure to press the clutch to the floor.
Fail to do this and you will generate a code 67 and not be able to dump the Engine Running codes.

Underhoodpictures007-01.jpg


Underhoodpictures010.jpg


If your car is an 86-88 stang, you'll have to use the test lamp or voltmeter method. There is no functional check engine light on the 86-88's except possibly the Cali Mass Air cars.

attachment.php?attachmentid=58312&stc=1&d=1242744354%20.gif
The STI has a gray connector shell and a white/red wire. It comes from the same bundle of wires as the self test connector.

89 through 95 cars have a working Check Engine light. Watch it instead of using a test lamp.

attachment.php


The STI has a gray connector shell and a white/red wire. It comes from the same bundle of wires as the self test connector.


WARNING!!! There is a single dark brown connector with a black/orange wire. It is the 12 volt power to the under the hood light. Do not jumper it to the computer test connector. If you do, you will damage the computer.

What to expect:
You should get a code 11 (two single flashes in succession). This says that the computer's internal workings are OK, and that the wiring to put the computer into diagnostic mode is good. No code 11 and you have some wiring problems. This is crucial: the same wire that provides the ground to dump the codes provides signal ground for the TPS, EGR, ACT and Map/Baro sensors. If it fails, you will have poor performance, economy and driveablity problems

Some codes have different answers if the engine is running from the answers that it has when the engine isn't running. It helps a lot to know if you had the engine running when you ran the test.

Dumping the Engine Running codes: The procedure is the same, you start the engine with the test jumper in place. Be sure the A/C is off, and clutch (if present) is pressed to the floor, and the transmission is in neutral. You'll get an 11, then a 4 and the engine will speed up to do the EGR test. After the engine speed decreases back to idle, it will dump the engine running codes.

Trouble codes are either 2 digit or 3 digit, there are no cars that use both 2 digit codes and 3 digit codes.

Your 86-88 5.0 won't have a working Check Engine Light, so you'll need a test light.
See AutoZone Part Number: 25886 , $10
4


Alternate methods:
For those who are intimidated by all the wires & connections, see Actron® for what a typical hand scanner looks like. Normal retail price is about $30 or so at AutoZone or Wal-Mart.

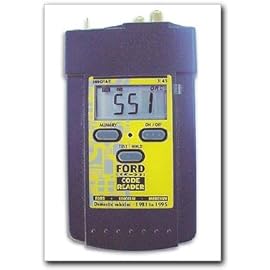
Or for a nicer scanner see www.midwayautosupply.com/Equus-Digital-Ford-Code-Reader/dp/B000EW0KHW Equus - Digital Ford Code Reader 3145.
It has a 3 digit LCD display so that you don’t have to count flashes or beeps.. Cost is $22-$36.
41P3GQVDSHL._SS270_.jpg
 
Dump the codes: Codes may be present even if the Check Engine Light (CEL) isn't on.

Dumping the computer diagnostic codes on 86-95 Mustangs

Revised 26-July-2011. Added need to make sure the clutch is pressed when dumping codes.

Codes may be present even if the check engine light hasn’t come on, so be sure to check for them.

Here's the way to dump the computer codes with only a jumper wire or paper clip and the check engine light, or test light or voltmeter. I’ve used it for years, and it works great. You watch the flashing test lamp or Check Engine Light and count the flashes.

Post the codes you get and I will post 86-93 model 5.0 Mustang specific code definitions and fixes. I do not have a complete listing for 94-95 model 5.0 Mustangs at this time.

Be sure to turn off the A/C, and put the transmission in neutral when dumping the codes. On a manual transmission car, be sure to press the clutch to the floor.
Fail to do this and you will generate a code 67 and not be able to dump the Engine Running codes.

Underhoodpictures007-01.jpg


Underhoodpictures010.jpg


If your car is an 86-88 stang, you'll have to use the test lamp or voltmeter method. There is no functional check engine light on the 86-88's except possibly the Cali Mass Air cars.

attachment.php?attachmentid=58312&stc=1&d=1242744354%20.gif
The STI has a gray connector shell and a white/red wire. It comes from the same bundle of wires as the self test connector.

89 through 95 cars have a working Check Engine light. Watch it instead of using a test lamp.

attachment.php?attachmentid=57945&stc=1&d=1240584741.gif


The STI has a gray connector shell and a white/red wire. It comes from the same bundle of wires as the self test connector.


WARNING!!! There is a single dark brown connector with a black/orange wire. It is the 12 volt power to the under the hood light. Do not jumper it to the computer test connector. If you do, you will damage the computer.

What to expect:
You should get a code 11 (two single flashes in succession). This says that the computer's internal workings are OK, and that the wiring to put the computer into diagnostic mode is good. No code 11 and you have some wiring problems. This is crucial: the same wire that provides the ground to dump the codes provides signal ground for the TPS, EGR, ACT and Map/Baro sensors. If it fails, you will have poor performance, economy and driveablity problems

Some codes have different answers if the engine is running from the answers that it has when the engine isn't running. It helps a lot to know if you had the engine running when you ran the test.

Dumping the Engine Running codes: The procedure is the same, you start the engine with the test jumper in place. Be sure the A/C is off, and clutch (if present) is pressed to the floor, and the transmission is in neutral. You'll get an 11, then a 4 and the engine will speed up to do the EGR test. After the engine speed decreases back to idle, it will dump the engine running codes.

Trouble codes are either 2 digit or 3 digit, there are no cars that use both 2 digit codes and 3 digit codes.

Your 86-88 5.0 won't have a working Check Engine Light, so you'll need a test light.
See AutoZone Part Number: 25886 , $10
4.jpg


Alternate methods:
For those who are intimidated by all the wires & connections, see Actron® for what a typical hand scanner looks like. Normal retail price is about $30 or so at AutoZone or Wal-Mart.

Or for a nicer scanner see www.midwayautosupply.com/Equus-Digital-Ford-Code-Reader/dp/B000EW0KHW Equus - Digital Ford Code Reader 3145.
It has a 3 digit LCD display so that you don’t have to count flashes or beeps.. Cost is $22-$36.
41P3GQVDSHL._SS270_.jpg

Thanks for the Info. I've done the paper clip trick a couple times. But I did not know there was a Ford scanner I'll be sure to pick one of those up.
 
Last edited by a moderator:
Flashing CEL is indicator of Misfire. Also, only 13 of the possible 90 codes trip the CEL

You're really gonna need this on you at all time. It's a vital tool to diagnosing what's going on with these cars, and beats guessing. It's cheap enough that everyone with a Mustang should have one.

Amazon product ASIN B000EW0KHWView: https://www.amazon.com/INNOVA-3145-Ford-Digital-Reader/dp/B000EW0KHW
Thanks for the info! I wasn't aware of this scanning tool I'll be sure to pick one up.
 
If this is really a barn car, there are some things you need to do....

Barn car find checklist: first steps to get it back on the road.

First of all, carefully check the underhood area to make sure that rodents haven’t had a feast on the electrical wiring, air ducts and vacuum lines. Replace and repair any visible damage. Replace the battery if you haven’t already done so.

Next, drain ALL the engine fluids, pump the fuel tank and fuel lines clear.

Get several cans of brake fluid, you will need it to flush the brakes. Loosen all 4 brake bleeders one at a time and flush the brake system by pumping the brake pedal. You will need to bleed the brakes when you finish flushing them. Brake fluid absorbs moisture if it sits for a long time and corrosive compounds start to brew themselves in the brake system.

Pumping out the old gas - do this before replacing the fuel filter if possible;
If the old pump still works, you can use it to pump the tank out.
1.) Separate the pressure line (the one with the Schrader valve on it) using the fuel line tools.
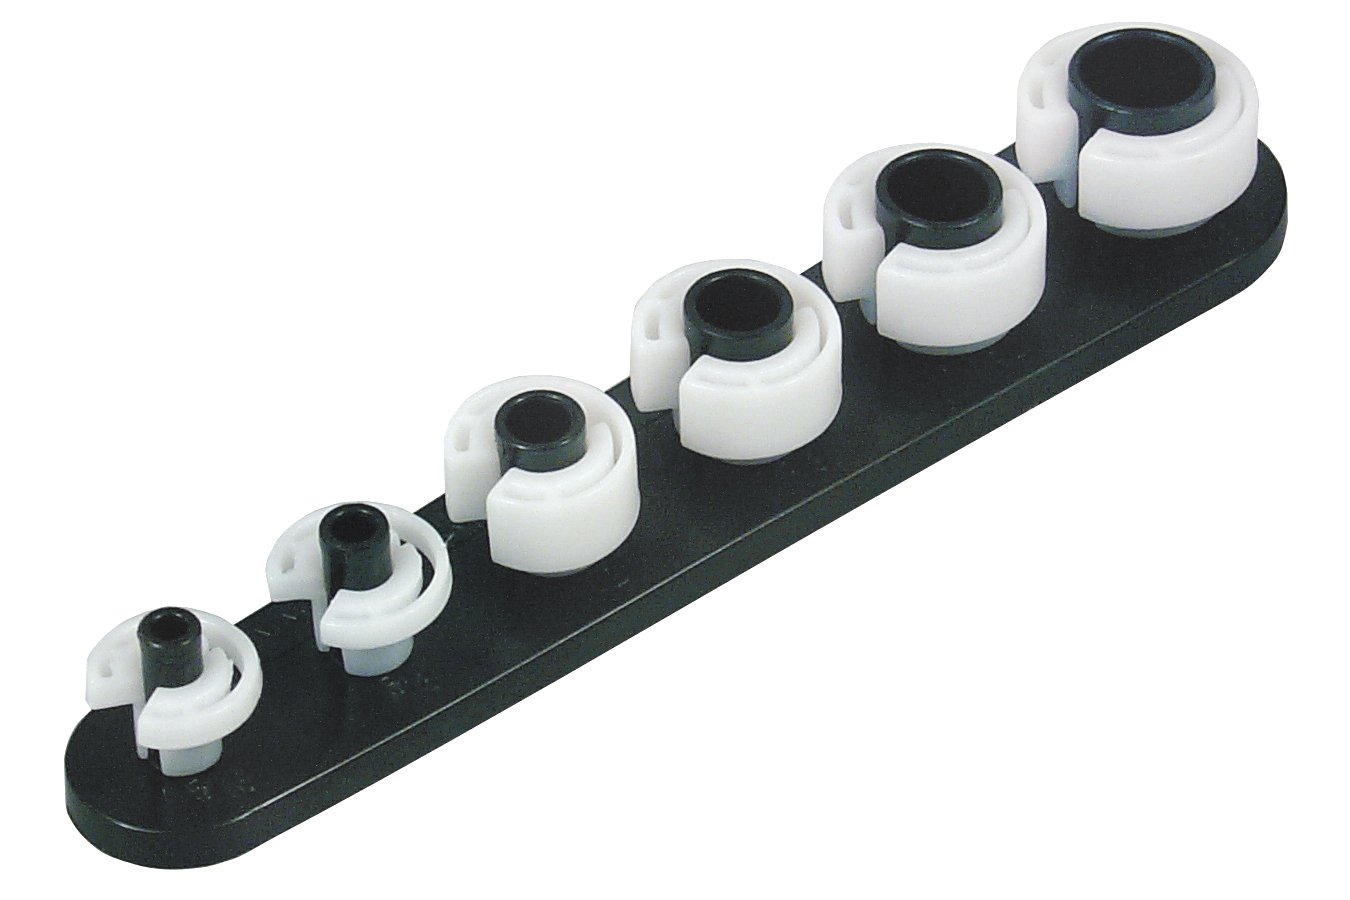
Look in the A/C repair section for the fuel line tools. They look like little plastic top hats. You will need the 1/2" & 5/8" ones. The hat shaped section goes on facing the large part of the coupling. Then you press hard on the brim until it forces the sleeve into the coupling and releases the spring. You may need someone to pull on the line while you press on the coupling.

61yoVRLxcXL._SL1350_.jpg


OR

images


View: https://www.youtube.com/watch?v=vRTjYAxvaCs


Use a piece of garden hose to run from the pressure line to your bucket or gas can. Make sure it is as leak proof as you can make it. Fire and explosion are not part of the repair process...

2.) Jumper the fuel pump’s test point to ground.

attachment.php


Turn the ignition switch to the Run position. the fuel pump will pump the tank almost dry unless the battery runs down first.

Some 5 gallon paint pails lined with garbage bags are good to hold the gas. The garbage bags provide a clean liner for the pails and keep the loose trash out of the gas. If you decide to use a siphon, a piece of 1/2" garden hose stuck down the filler neck will siphon all but a gallon or so of the gas.

The fuel filter is on the passenger side of the car on the body just over the rear axle housing. Pull the plastic clips out by grasping the tabs with a pair of needle nose pliers or a screwdriver.


]View: https://www.youtube.com/watch?v=i-JU54w7FL4]

At this point you have fresh engine fluids, fresh gasoline, new filters, new battery fresh brake fluid, and have replaced or repaired any rodent damage.
Then change ALL the filters (fuel, air & oil). Then put in new oil, new antifreeze, and 5 gallons or so of new gasoline. Be sure to replace the all the fan belt or belts. Reusing old belts are an invitation to break and leave you stranded or overheated.

Pull the spark plugs out and squirt some oil down inside the cylinders to lube them up. While the spark plugs are out, examine them for signs of damage or fouling. Write down which plug came from which cylinder and write down any negative things that you saw when you examined the spark plugs.

This next step is for those who have successfully removed and reinstalled a 5.0 Mustang distributor. Pre-oil the engine to insure that everything is lubed up good before the engine starts. Turn the engine up to where the distributor rotor points to #1 cylinder. Mark the distributor base with a scratch mark or something else that isn’t going to get rubbed off. Then remove the distributor and stick a ¼” socket on a12” extension on an electric drill. Place this rig on the oil pump shaft in the hole below the distributor. Turn the ignition switch to Run but don’t crank the engine. Run the drill counterclockwise while your assistant watches the oil pressure gauge.

For the less experienced DIY’er, here is a less complicated procedure.
While the spark plugs are out, crank the engine until you see the oil pressure gauge indicate pressure. If you don’t see any indication of oil pressure at the gauge after 30 seconds or so of cranking, you have some other problems. This is the time to stop and investigate them.

Put the old spark plugs back in if they look good; replace the ones that don’t. Have a spare set of new spark plugs handy for installation once you get the engine running. Why? The oil you squirted in the cylinders will lube things up, but it may also foul the spark plugs. Don’t foul the new plugs by putting them in cylinders that may oil foul the plugs.

Remove the distributor cap, and examine it and the rotor for signs of moisture and tracks. Lightly spray the inside of the distributor cap with WD40 to displace any moisture, and then wipe it up with a clean paper towel. Replace any cap or rotor that shows signs of damage, excessive corrosion or tracking that won’t wipe up with a shot of WD40.

Put the distributor cap back on, secure any loose wiring, vacuum lines, check the fluid levels, check belt tension and tighten any fasteners that you may have loosened. You are now ready to see if the engine will run.