Garage workshop setup

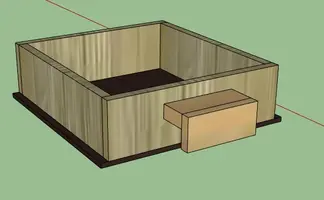
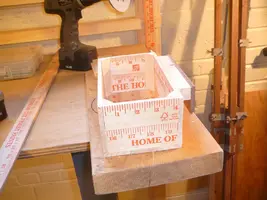
Here is a rendering of the first 2 holders I have made: the top one is to hold my pencil and tape measure, the lower one is for the quick change bits for my drill/driver. They all have 1/4" shafts, so a 5/16" hole holds them all ...

holders-1.webp


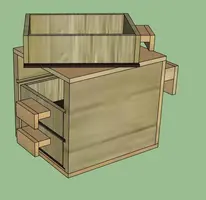
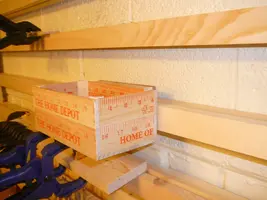
Here is another holder the guy who wrote the article has ... this one for allen wrenches (he uses plywood for everything):

14453_5F00_allenwrenches.webp
 

Attachments

  • holders-1.webp
    holders-1.webp
    51 KB · Views: 200
  • 14453_5F00_allenwrenches.webp
    14453_5F00_allenwrenches.webp
    14.9 KB · Views: 130
thanks!

my garage is not, and probably will never be, wholly dedicated to automobile related stuff. it if was, it is big enough that it would be mostly empty.

this whole project is getting me interested in woodworking and carpentry. the options are only limited by your imagination.

but i do plan on moving the lawn stuff out to a shed.

i am also probably going to paint the stuff in the charcoal/silver colors of the floor.
 
I started in earnest a few days ago. I only have few hours in the evenings becasue the bedroom where my wife sleeps is directly above the garage, so I have to stop when my wife goes to bed. :mad:

That, and the fact that I am new to this type of carpentry stuff, I tend to over-engineer things, I work slowly anyway, and am my own worst enemy, is making for some slow progress. :bang:

I have been taking pics along the way. I'll post them before long.
 
Ok, I promise to stop with the Google Sketchup stuff ... last drawing until I have real pics to post.

Here is what a little cabinet with 3 drawers would be like:
3-drawer-chest.webp
 

Attachments

  • 3-drawer-chest.webp
    3-drawer-chest.webp
    32.8 KB · Views: 144
before
0a.webp

0b.webp


the cleat
1.webp

2.webp


some bricks were sticking out
3.webp


the base
4.webp

5.webp


it is very strong
6.webp


a few hangers
7.webp

8.webp

9.webp


those home depot yardsticks happen to be just the right size for lots of things, and they are very cheap!
10.webp

11.webp

13a.webp

12.webp


i am always using my 7/16 and 10mm wrenches
13.webp


14.webp

15.webp
 

Attachments

  • 0a.webp
    0a.webp
    106.8 KB · Views: 137
  • 0b.webp
    0b.webp
    343.8 KB · Views: 142
  • 1.webp
    1.webp
    70.2 KB · Views: 143
  • 2.webp
    2.webp
    30 KB · Views: 150
  • 3.webp
    3.webp
    248.6 KB · Views: 148
  • 4.webp
    4.webp
    278.1 KB · Views: 140
  • 5.webp
    5.webp
    56.6 KB · Views: 146
  • 6.webp
    6.webp
    316.8 KB · Views: 144
  • 7.webp
    7.webp
    50.2 KB · Views: 145
  • 8.webp
    8.webp
    260.3 KB · Views: 143
  • 9.webp
    9.webp
    202.1 KB · Views: 149
  • 10.webp
    10.webp
    78 KB · Views: 145
  • 11.webp
    11.webp
    284.2 KB · Views: 148
  • 13a.webp
    13a.webp
    285.6 KB · Views: 140
  • 12.webp
    12.webp
    267.7 KB · Views: 147
  • 13.webp
    13.webp
    238.6 KB · Views: 140
  • 14.webp
    14.webp
    251.8 KB · Views: 140
  • 15.webp
    15.webp
    313.5 KB · Views: 165
thanks! yes, it has been alot of work. i'm probably at 20 hours i bet. but i work slowly, and at least a few were from changing course and going to this hook and slat setup.

some more pics of stuff ...
P1010720.webp

P1010721.webp

P1010722.webp

P1010723.webp

P1010724.webp

P1010725.webp
 

Attachments

  • P1010721.webp
    P1010721.webp
    61.3 KB · Views: 161
  • P1010720.webp
    P1010720.webp
    47.3 KB · Views: 158
  • P1010722.webp
    P1010722.webp
    55.5 KB · Views: 167
  • P1010723.webp
    P1010723.webp
    35 KB · Views: 171
  • P1010724.webp
    P1010724.webp
    45.3 KB · Views: 164
  • P1010725.webp
    P1010725.webp
    63.9 KB · Views: 142
Still thrashing around in the garage ...

Since you folks are the people who can appreciate a DIY project, I thought I would document my latest project, a drop in top for my workbench that holds and lets me raise and lower my new router. This is (naturally) the least expensive router I could find, and 95% of the parts were in among the clutter already in the garage.

the holder for the router ...
router3-001.webp

router3-002.webp

router3-003.webp

router3-004.webp

router3-005.webp

router3-006.webp

router3-007.webp

router3-008.webp

it will slide on 4 tracks. that should keep it firmly in place ...
router3-009.webp

router3-010.webp

router3-011.webp

router3-012.webp

router3-013.webp

router3-014.webp

router3-015.webp

router3-016.webp

router3-017.webp

here it is mocked up on the table top into which it is going
router3-019.webp

router3-020.webp

A pretty getto insert huh?
router3-018.webp
 
now that's some james bond shibby if i ever saw it. now make the work bench shoot poisonous darts if someone disturbs you!

on a more serious note, how are do you turn it on? you could wire in a simple wall switch to the leg of the work bench.
 
I decided to change my bench top. It is now 2 pieces of 1/2" plywood, has a 4 1/2" open space underneath for tool storage, and 5/8" holes spaced 4" apart for holddown support:
table2-001.webp

OK, so it's still a work in progress.
The holes are just big enough for the bar of the cheap quick clamps they sell at Harbor Freight. With this approach, I will be able to secure anything anywhere on the bench:
table2-003.webp

table2-004.webp

table2-005.webp

table2-006.webp

table2-007.webp

It turns out that my vise has holes 4" apart, so it bolts up directly:
table2-002.webp

table2-011.webp

table2-008.webp

And it also just so happens that the $2 light I got at the thrift store fits underneath:
table2-012.webp

Of course, the cleat and hook thing is still there:
table2-013.webp

table2-014.webp

A stupid little ghetto glued up t-track. Maybe I'll attach it to my miter gauge on the table saw :shrug:
table2-009.webp

table2-010.webp