
Replacing a Heater core 56k warning!
Alright so here it is as per Daggars request. The entire breakdown of heater core installation. Before I start, I will say that there is a lot of talk about this process taking about 10 hours. This is totally false. Some of this info is sourced from a real good mag that I picked up, but as long you know where all of the screws are, it's a breeze. I'm working with a roller, but if you have a motor with a/c, lines have to be disconnected. I just finished and the whole deal took me about an hour and a half. The cluster was already out when I got the car, but there was still plenty to do. If you want to get real technical, let's call it two hours and that's only because my house is in the path of the sun and I kept getting paper towels and lemonade. Also, I had to memorize where the screws went so that I could ensure that they all went back in their proper place (so you may get a chance to beat my time). If there is anything that you find unclear, PM me and let me know so that I can make the changes.
Here are the tools that were used:
Torx and Philips Screwdriver - The majority of this process involves these two main tools
Wrench set.
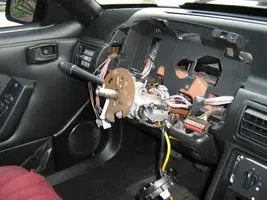
First things first. Disconnect the battery. You have to break down the cluster and all of the dash controls. You don't have to remove the steering wheel. I'm putting a Grant Wheel in. However, you do have to drop the steering column about an inch. There are four easy to find bolts in the column path that will help you acheive this. Don't take the bolts out. Just loosen.

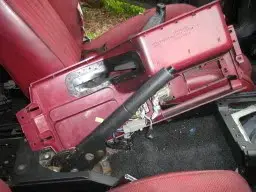
Once that's done, it's time to bust down the center console. Start by removing the four bolts that hold the armrest in place. It'll slide right out. I'll add that it is a heavy piece. I see an armrest delete in my future.

Next is the Ashtray/E-brake cover. 6 Philips screws hold it in place. 2 in the rear and four in the front.

Now, you can disconnect the cables for the lighter and the mirror switch.

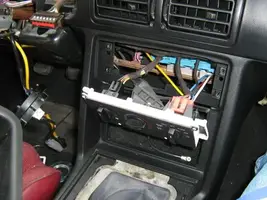
Before you can go any futher, you have to remove the glovebox and you'll see why in a sec. Two torx screws on the underside hold it in place.

Now that it's out, you can clearly see the hatch release switch (and gas door switch if you have it). The wire have to be disconnected. Notice the torx screw above the button. That has to come out along with the one below it. There are two more on the drivers side just like it.

Next, take out the stereo and the loosen the A/C control unit. The is no need to remove it, but be mindful of the vacuum lines attatched to it.

Two more bolts at back of the console and finally, it can come out. Be careful. It's very light and fragile plastic. HANDLE WITH CARE!!! OR BE

Now we can dive into the dash.....I mean remove more screws to get the damn dash out. If it hasn't occured to you already, the dash speaker grills gotta go. Those screws can be found on the side of the dash. If your sitting in the seat (get of your lazy arse!!!! lol ), you should have easy access to the Windshield defog air vent. Pop that out and yup, you guessed it. More torx screws.

Note: As I mentioned earlier, a lot of this info can be found in a Tech Article in Mustang Monthly. They did a great job of documenting, but to save space, they omitted some info about locations of particular screw. This may be in part to the fact that they are for the most part, dead in front of you. But those who may be more near sighted than I am, the next few pics cover those screws in depth. Most of them are on the drivers side:
Two about the steering column

Two big bolts to the left and right of the column
Left:

Right:

One hidden behind the dash door:

There is one more hidden above there near the latch. Maje sure to get that one.
There are two more, one in each dash spear area behind the grills. There are more in the speaker housing, but those can stay. It connect to the defogger.
Now, very gently, wriggle that bitch forward. Upon bringing my dash forward, I came to a startling discovery. The (insert obsinity here, here, here, here and here. Oh yeah, one more for good measure) that sold me the car, which I am sad to say is a member of this forum, took the girlie mans route to removing the heater core. Rather than getting the bolts, he cut a huge hole in the evaporator case and yanked it out.

I guess he figured that I would forget where he lives. Fortunately, I have a photographic memory. (pfft, maybe I should have been a detective.............................. naaaaaaaaah)
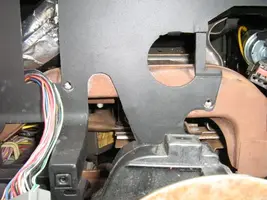
Anyway, moving on, here is the dash moved forward, fully exposing what the #### is left of the evaporator case. I would like to mention here that this case opens by lifting the case lid up. Depending on what year Fox you have, it will open differently. The one in the article opns from the side.

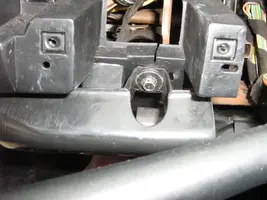
Notice the rusty metal plate with the bolt in it. There is another bolt that goes in that I took out, but you want to take the bottom one out instead. Trust me on the one. There is another set with a longer bar to the right of the on in the pic. Remove the top one from there. The reason for this is to gain leverage when prying the case open to get the core out. You can also go under the hood and get two more bolts there. There is also one more at the bottom of the dash near the floor. I didn't go for that one because my hads are big and I didn't have a good extension for my wrench. Now, all you have to do is take off the bolts that hold the case shut and pry it open. Tak out the old core and clean up in there since you have the oppurtunity.
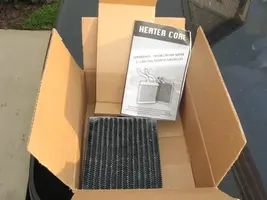
Here's the new core

If it's defective....be afraid.....be very afraid.
Slide in the new core. Go under the hood and giive the tubes a light tug to make sure it's completely in place.

Here it is from the dash side

Now it's just a complete reversal of everything that you just did. Go slow and make sure that you get ALL of the screws back in place.
Note: when putting the dash back in place, make sure that everything is pushed back UP in it's proper position so that all of the scew holes line back up. And there it is with just enough time to flag down the ice cream man for a cold treat.
I didn't put my dash back all the way because the CPU and main harness are going in after I get off of work tomorrow. But that's another story.
Alright so here it is as per Daggars request. The entire breakdown of heater core installation. Before I start, I will say that there is a lot of talk about this process taking about 10 hours. This is totally false. Some of this info is sourced from a real good mag that I picked up, but as long you know where all of the screws are, it's a breeze. I'm working with a roller, but if you have a motor with a/c, lines have to be disconnected. I just finished and the whole deal took me about an hour and a half. The cluster was already out when I got the car, but there was still plenty to do. If you want to get real technical, let's call it two hours and that's only because my house is in the path of the sun and I kept getting paper towels and lemonade. Also, I had to memorize where the screws went so that I could ensure that they all went back in their proper place (so you may get a chance to beat my time). If there is anything that you find unclear, PM me and let me know so that I can make the changes.
Here are the tools that were used:
Torx and Philips Screwdriver - The majority of this process involves these two main tools
Wrench set.
First things first. Disconnect the battery. You have to break down the cluster and all of the dash controls. You don't have to remove the steering wheel. I'm putting a Grant Wheel in. However, you do have to drop the steering column about an inch. There are four easy to find bolts in the column path that will help you acheive this. Don't take the bolts out. Just loosen.
Once that's done, it's time to bust down the center console. Start by removing the four bolts that hold the armrest in place. It'll slide right out. I'll add that it is a heavy piece. I see an armrest delete in my future.
Next is the Ashtray/E-brake cover. 6 Philips screws hold it in place. 2 in the rear and four in the front.
Now, you can disconnect the cables for the lighter and the mirror switch.
Before you can go any futher, you have to remove the glovebox and you'll see why in a sec. Two torx screws on the underside hold it in place.
Now that it's out, you can clearly see the hatch release switch (and gas door switch if you have it). The wire have to be disconnected. Notice the torx screw above the button. That has to come out along with the one below it. There are two more on the drivers side just like it.
Next, take out the stereo and the loosen the A/C control unit. The is no need to remove it, but be mindful of the vacuum lines attatched to it.
Two more bolts at back of the console and finally, it can come out. Be careful. It's very light and fragile plastic. HANDLE WITH CARE!!! OR BE
Now we can dive into the dash.....I mean remove more screws to get the damn dash out.
Note: As I mentioned earlier, a lot of this info can be found in a Tech Article in Mustang Monthly. They did a great job of documenting, but to save space, they omitted some info about locations of particular screw. This may be in part to the fact that they are for the most part, dead in front of you. But those who may be more near sighted than I am, the next few pics cover those screws in depth. Most of them are on the drivers side:
Two about the steering column
Two big bolts to the left and right of the column
Left:
Right:
One hidden behind the dash door:
There is one more hidden above there near the latch. Maje sure to get that one.
There are two more, one in each dash spear area behind the grills. There are more in the speaker housing, but those can stay. It connect to the defogger.
Now, very gently, wriggle that bitch forward. Upon bringing my dash forward, I came to a startling discovery. The (insert obsinity here, here, here, here and here. Oh yeah, one more for good measure) that sold me the car, which I am sad to say is a member of this forum, took the girlie mans route to removing the heater core. Rather than getting the bolts, he cut a huge hole in the evaporator case and yanked it out.
I guess he figured that I would forget where he lives. Fortunately, I have a photographic memory. (pfft, maybe I should have been a detective.............................. naaaaaaaaah)
Anyway, moving on, here is the dash moved forward, fully exposing what the #### is left of the evaporator case. I would like to mention here that this case opens by lifting the case lid up. Depending on what year Fox you have, it will open differently. The one in the article opns from the side.
Notice the rusty metal plate with the bolt in it. There is another bolt that goes in that I took out, but you want to take the bottom one out instead. Trust me on the one. There is another set with a longer bar to the right of the on in the pic. Remove the top one from there. The reason for this is to gain leverage when prying the case open to get the core out. You can also go under the hood and get two more bolts there. There is also one more at the bottom of the dash near the floor. I didn't go for that one because my hads are big and I didn't have a good extension for my wrench. Now, all you have to do is take off the bolts that hold the case shut and pry it open. Tak out the old core and clean up in there since you have the oppurtunity.
Here's the new core
If it's defective....be afraid.....be very afraid.
Slide in the new core. Go under the hood and giive the tubes a light tug to make sure it's completely in place.
Here it is from the dash side
Now it's just a complete reversal of everything that you just did. Go slow and make sure that you get ALL of the screws back in place.
Note: when putting the dash back in place, make sure that everything is pushed back UP in it's proper position so that all of the scew holes line back up. And there it is with just enough time to flag down the ice cream man for a cold treat.
I didn't put my dash back all the way because the CPU and main harness are going in after I get off of work tomorrow. But that's another story.
Attachments
-
 IMG_0197.webp27.8 KB · Views: 8,734
 -
 IMG_0199.webp20 KB · Views: 862
 -
 IMG_0201.webp38.1 KB · Views: 856
 -
 IMG_0202.webp9.4 KB · Views: 838
 -
 IMG_0209.webp43.3 KB · Views: 10,807
 -
 IMG_0210.webp43.8 KB · Views: 926
 -
 IMG_0204.webp30.2 KB · Views: 2,960
 -
 IMG_0211.webp44.9 KB · Views: 1,971
 -
 IMG_0208.webp35.2 KB · Views: 767
 -
 IMG_0213.webp49.8 KB · Views: 732
 -
 IMG_0215.webp37.6 KB · Views: 779
 -
 IMG_0214.webp42.4 KB · Views: 856
 -
 IMG_0209.webp43.3 KB · Views: 1,078
 -
 IMG_0218.webp46.9 KB · Views: 7,319
 -
 IMG_0220.webp38.7 KB · Views: 845
 -
 IMG_0219.webp32.1 KB · Views: 840
 -
 IMG_0221.webp33.2 KB · Views: 755
 -
 IMG_0222.webp48.6 KB · Views: 867


