The next "big" project for my Cobra

For reference:


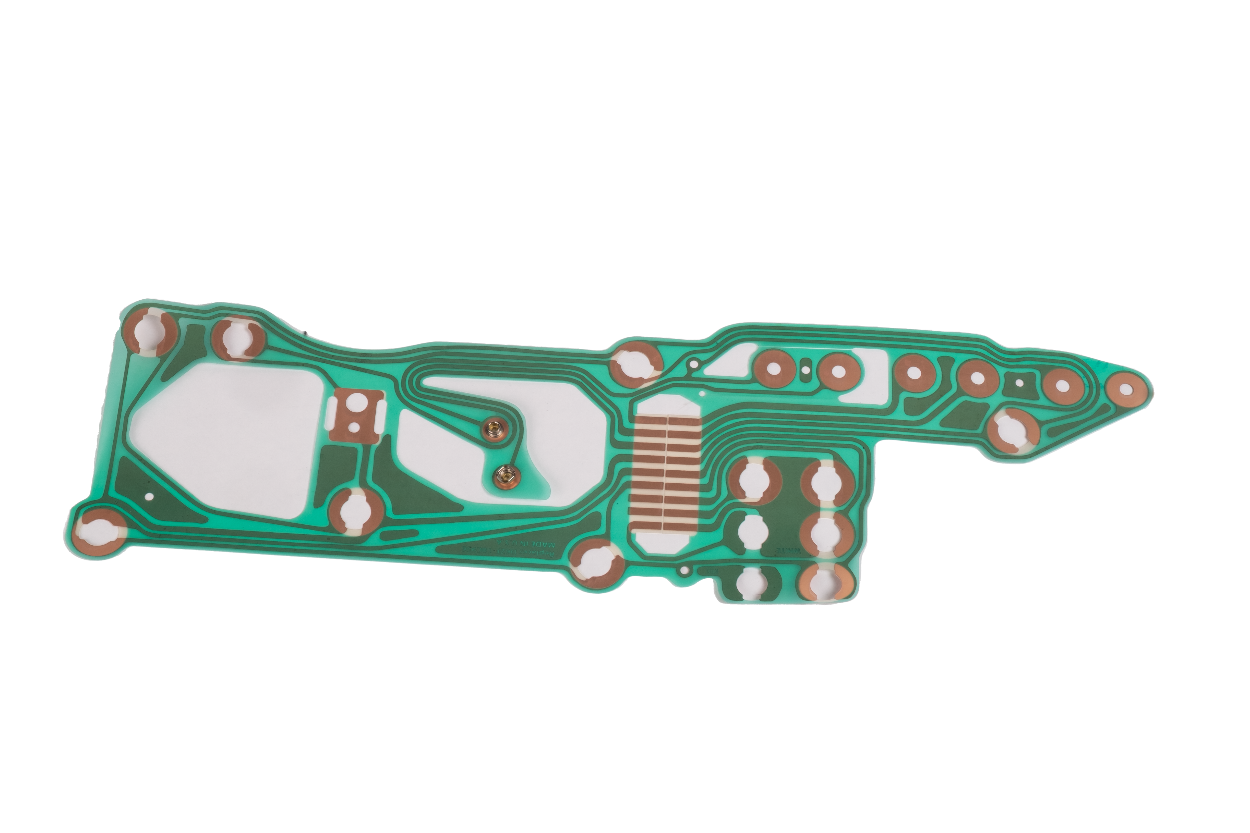
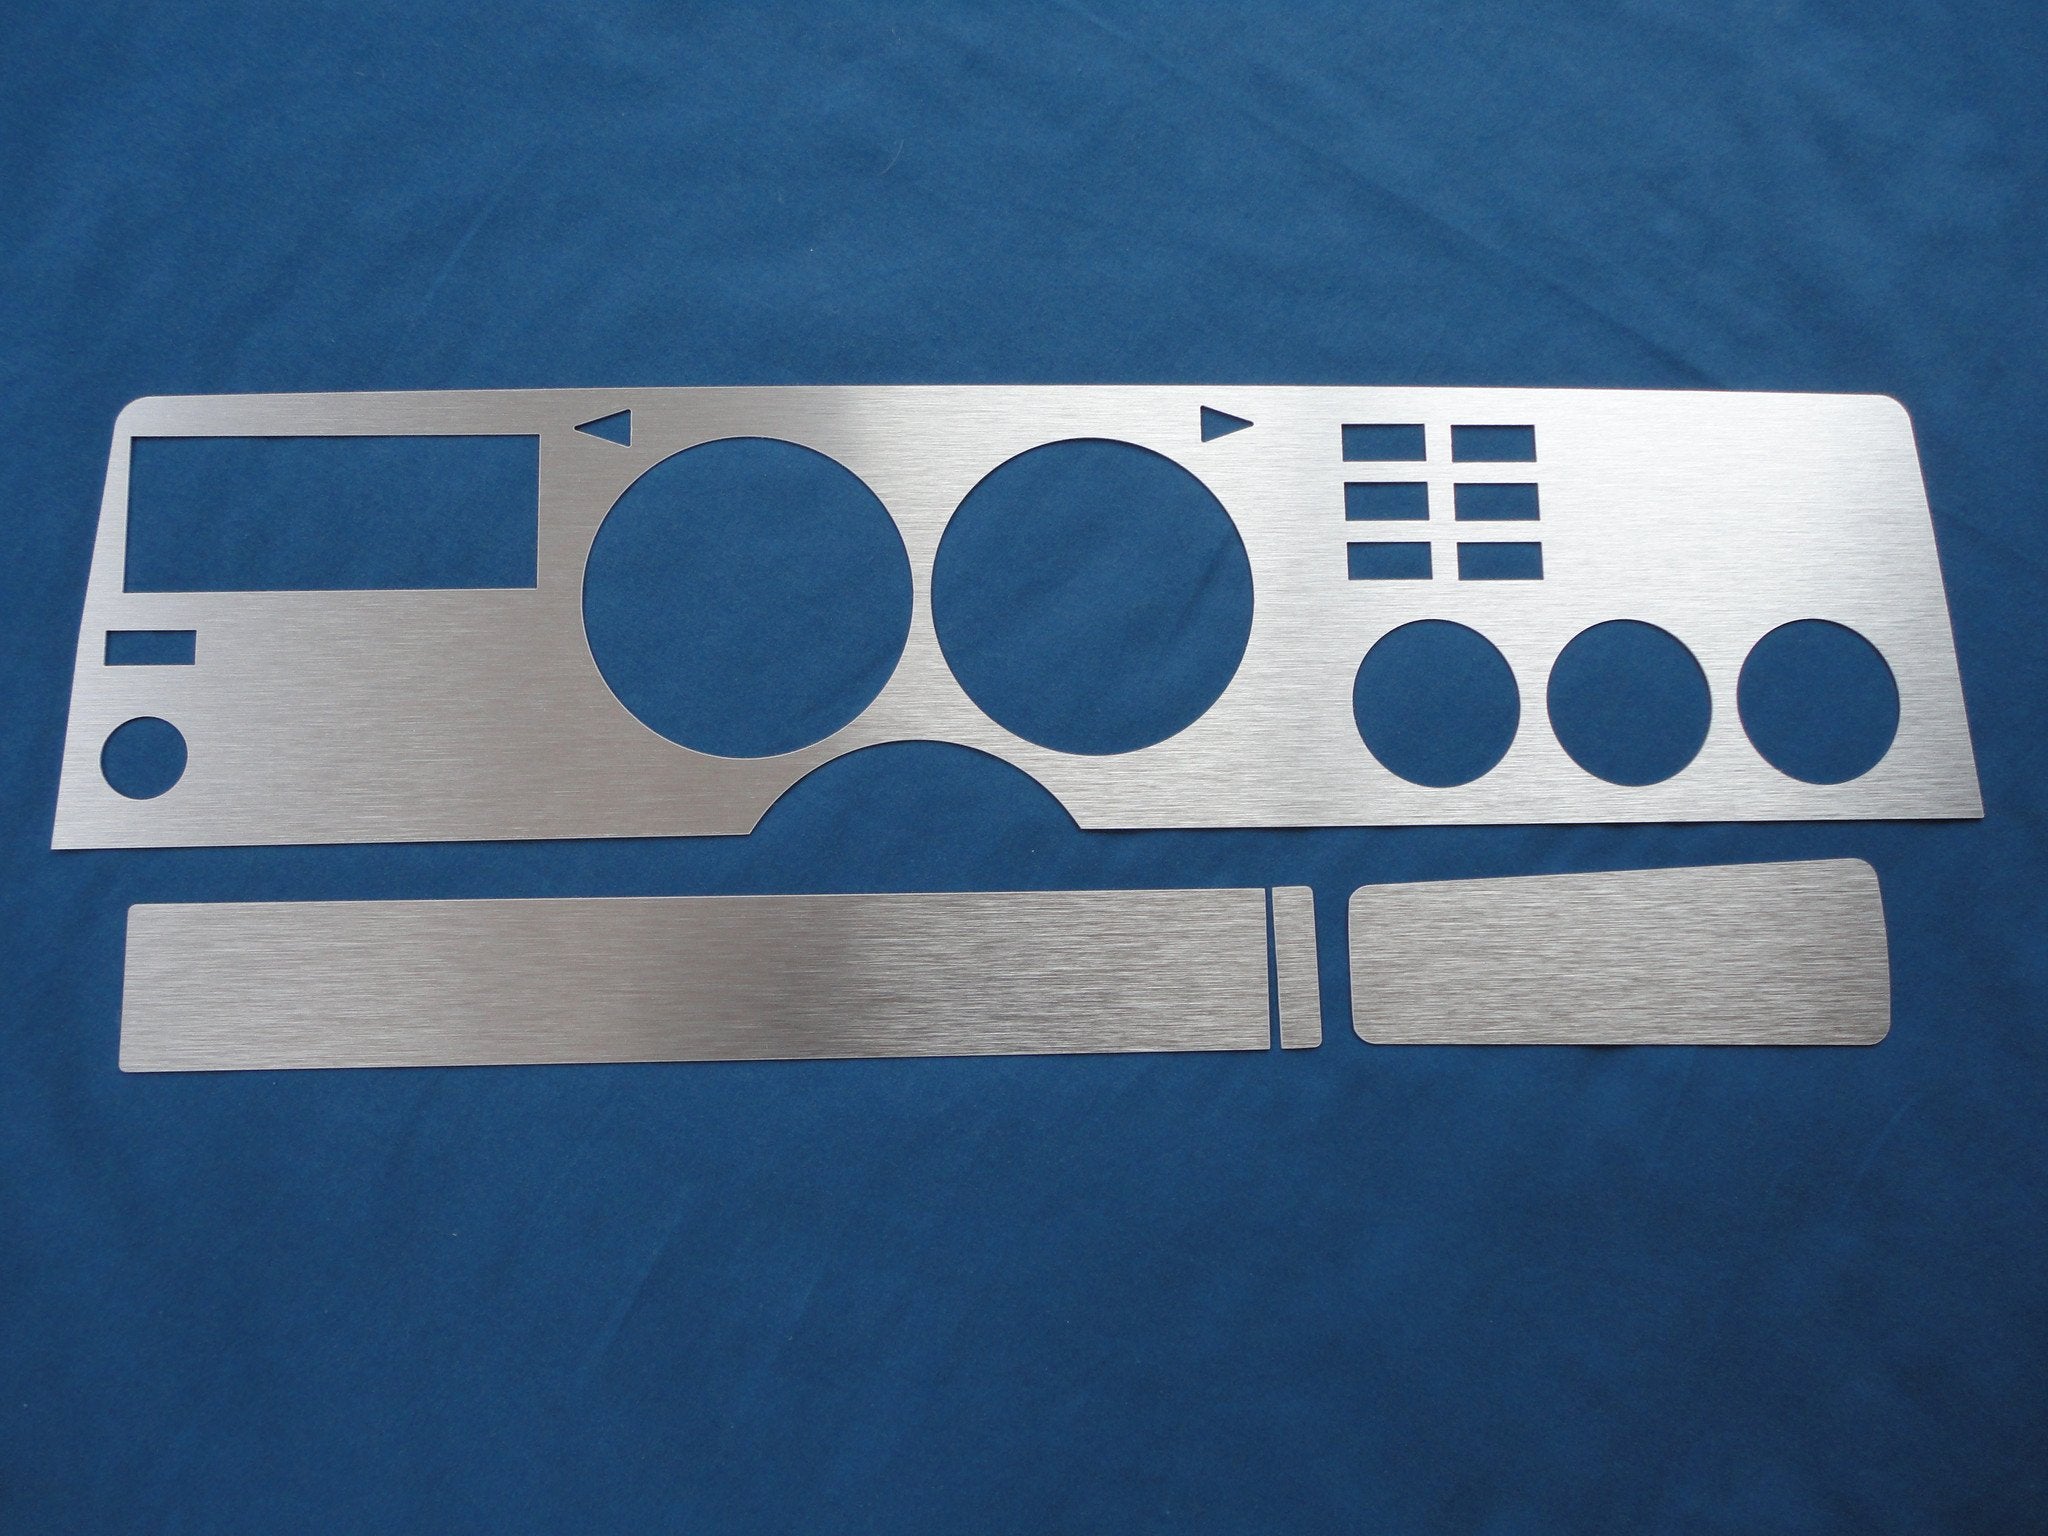
Last night I started trying to clean up the gauge cluster that @79PaceKar so graciously sent me. It has a factory tach adapter and all of the needles were painted a bright "neon" green. As I was trying to clean the paint from the needles both the speedometer and tach needles snapped. I was attempting to be SUPER careful, but it was a losing battle. Also, the speedometer and the fuel gauge now have some damage to the faces caused by acetone somehow leaking through the cloth I was using under the needle to protect the face in an effort to NOT have that happen. :bang:


SO..... I think the way to salvage at least the fuel gauge would be to buy some overlays.


I think I'd like to stick with the factory black instead of going with white or any other color. But as I had both clusters out I noticed that the tach I have installed in the car was a D4 part and the other tach that was sent has a D5 part number. That might explain the issues I was having before? Also, as I understand it, there are 2 different tach adapters? Both that I have are the same part number - I think they are D7, I'll have to confirm when I get home. I also noticed that the D4 tach has a wider needle than the later tach. The skinnier, tapered needle on the later tach actually matched both speedometers, but of course I ended up breaking it. :doh: Gonna have to give superglue a shot, then paint it again....
 
  • Sponsors (?)


Your quite busy on your Cobra! Thats good.
Regarding the tacho: you could just swap the tach adapter and see if one of them has an issue?!
I think only the 76+ tachos have the swaped pins. But if that was the reason the tacho should not be working at all. So I think it is either a bad tach adapter or something with the tacho itself.
You can also run both tachos wihtout adapters, than your reading is off (because it thinks it is a 6 cylinder), but you should not have than you know that it's not the tacho, but very likely the adapter.
Oh... i'm confused: are you talking about the OEM V6 to V8 adapter Or about the MSD adapter?!?
I was talking about the OEM adapter, but as I said in confused now :thinking:
 
I'm leaning toward the stock adapter and it's compatibility with the current tach. I was thinking that I'd try it again with the new adapter, then maybe try both adapters with the "new" tach to see what I could figure out. I was also thinking of swapping to the "new" tach as well just for the simple fact that the needles match the other gauges. When I threw this cluster together I liked the yellow and red "warning" areas of the tach, but now that I've looked closer at the needles I think it just looks mismatched. But since I believe that there are 2 different stock tach adapters, I think the 2 that I currently have should be matched to a later tach and not the D4 tach that I've been attempting to use.
 
Than I would like to suggest, that you run both tachos without adapter. Then you can be sure, that both units work (beside they will read different RPMs)...
I'm completely with you: the tacho without red/yellow marking is the nicest.
 
  • Like
Reactions: 1 users
I guess I lied about the date codes. The tach in my cluster is indeed a D4, but it's the speedometers that are D5. The "new" tach is D7 as well as both adapters. So I think I can probably get the D7 tach working with one of the adapters as long as I can get the needle fixed and presentable.

IMG_20230310_173019.jpg
IMG_20230310_173042.jpg
IMG_20230310_173034.jpg
IMG_20230310_173107.jpg
IMG_20230310_173053.jpg
 
  • Like
Reactions: 1 user
I tried to clean a gauge face with a Q-tip and smeared the white, but still not near as bad as breaking the needle.
What a colossal bummer.

Looking forward to the white overlays...
 
Super glue appears to be holding it together as I was able to finish cleaning all of the paint off. It's had 2 coats of filler primer sprayed onto it now, will take a look at it later and see if I can spray a coat of flourescent red. I sprayed it once before trying to clean the remaining paint and it looks like it's a real close match to the original color.

IMG_20230311_134154.jpg


This stuff wasn't cheap!! Maybe it's just because I've not bought model car paint in so long.... :shrug:

IMG_20230311_134201.jpg
 
  • Like
Reactions: 1 user
It took me 3 different attempts to get the needle painted and looking acceptable, but the "new" tach is together again and mounted in the gauge pod. What ended up working was painting it with gloss red auto enamel, then spraying it with the florescent red. It comes out a little dark that way, but it looks pretty close. So, since it's a different shade than the rest, I went ahead and gave the other gauges the same treatment. Unfortunately I ended up with 2 bad fuel gauges, so I just bought one off eBay, so I'll have to repeat the process one more time with that before putting all back together.

IMG_20230314_172909_01.jpg


I'm hopeful that the new gauge doesn't need any other attention as I'm trying to NOT have to deal with the overlays. But, if I need to, I have the link saved and will go that route. Like I said, I'm not interested in any other color other than stock.....
 
Last edited:
  • Like
Reactions: 1 users
It is nice seeing that - mine is in pretty good shape. The one that @79PaceKar sent wasn't. No biggie since I was originally only going to use the tach adapter. But the front of the housing is pretty broken up and the main housing is missing the area that surrounds the left signal indicator. I am, however, using the clear lens part of that cluster as mine was yellowed and brittle. I ended up just removing it when I tore the dash apart to try to work on some of the wiring issues a few months ago. I had the intention of using some polishing compound to try to clear it up but ended up breaking it in the process, so it's nice having this one that's in really good shape. :)

On a side note, I see that Classic Auto Reproductions offers a replacement circuit board for the gauge cluster. Hopefully they're working on a new housing to go with it - I'm sure there will be a lot of II owners that would love to have the option to replace theirs!

 
  • Useful
Reactions: 1 user
Replaced the A/F gauge controller - that's what the problem was. Found out that aside from the burned wires it actually melted the connection at the O2 sensor. So that's working again - and reading 10.0 at idle now, which makes some sense I guess since I fiddled with the mixture screws when I found that the gauge wasn't working properly. :shrug: The new controller is tied away from everything as best as I could, hopefully I don't have that issue again.

IMG_20230315_191220.jpg


The "new" fuel gauge should be here by Tuesday or Wednesday of next week, so that's on standby for now. I'm debating if I want to give the outer housing a fresh coat of paint to get rid of the white ring around the 3 small gauges or if I want to leave it.

IMG_20230315_191351.jpg


IMG_20230315_191511.jpg


And here's the gauge housing that I got from @79PaceKar - as you can see, it's not in too good of shape, so I'm happy that mine is. :)

IMG_20230315_191601.jpg


IMG_20230315_191645.jpg
 
  • Like
Reactions: 1 user
So I'm hunting for a V8 badge to replace the one that was lost from the passenger fender and come across 2 listings on eBay. Are these now made of gold? I think these sellers are smoking something for asking these prices....


And another listing on Marketplace.... :oops:


View: https://www.facebook.com/commerce/listing/146006915014180/?media_id=0&ref=share_attachment


p1975-78 Ford Mustang ll "V-8" Fender Emblems OEM # D5ZB-16C114-AA Vintage​

$125 · In stock
Listed in Newport News, VA

Details​

  • Condition
    Used - like new
p1975-78 Ford Mustang ll "V-8" Fender Emblems OEM # D5ZB-16C114-AA Vintage


_nc_ohc=8EgxHDTjrR8AX-2J4Yx&_nc_ht=scontent-atl3-1.jpg
 
Last edited:
  • Dislike
Reactions: 1 user
I didn't get much done on the car over the weekend. The replacement fuel gauge arrived, so I got that needle painted and the gauge installed in the cluster. I think I might go ahead and spring for the new dash inserts from Classic Auto Reproductions while I'm going through this stuff....

 
The gauge cluster is in the car, but I decided it was time to order some proper screws to put it all back together instead of the hodge podge of different fasteners I had to begin with. If anyone is interested, these look like they should work.....

Disco Automotive 8112 Phillips Trim Screw Assortment https://a.co/d/gWUulj1

VIGRUE 175Pcs #8 x 1/2" to 1-1/2" Wood Screw Assortment Kit, 304 Stainless Steel Pan Head Fast Self Tapping Drywall Screws Black Oxide https://a.co/d/0ObzjIa

VIGRUE 240Pcs #6 x 3/8" to 1-1/2" Wood Screw Assortment Kit, 304 Stainless Steel Pan Head Fast Self Tapping Drywall Screws Black Oxide https://a.co/d/jd5qnKL

I returned an email from Classic Auto Reproductions but haven't heard anything back yet.... :shrug:

Screenshot_20230322-114131.jpg
Screenshot_20230322-114047.jpg


Screenshot_20230322-114057__01.jpg
 
  • Like
Reactions: 1 user
The pad has a pretty big crack in it. Luckily I have a replacement that I'll be swapping. Hopefully they can get a hold of that company and get something going on that front so we II owners can get a good replacement.
 
Here are a couple pics of the crack in my dash pad @Noobz347

fb_img_1612820586095-jpg.jpg


fb_img_1612820608701-jpg.jpg


The pad itself is attached to a steel part that acts as the forward section of the top of the dash. The four eye cars are somewhat similar in shape at the front, but they are one piece and will not work unfortunately. Here is the II's dash pad design:

1679501906608.png

1679501925198.png


And the four eye dash pad:

mustang-dash-pad-black-79-86_05797daa.jpg


mustang-dash-pad-black-79-86_b973a706.jpg
 
  • Like
Reactions: 1 user